You might have already tried using triggers to send auto-replies to buyers and had nothing happen. Don't worry—using Zendesk as an Amazon, eBay, Newegg, Shopify, Walmart, WooCommerce, or Etsy autoresponder just takes a little extra setup. And with ChannelReply, it will even count toward Amazon’s 24-hour response SLA!
Don't have a ChannelReply account yet? Try it free!
Table of Contents
Important Notes
How Timing Works in Our Zendesk Autoresponder
This autoresponder system generates messages once every half-hour. It could be up to 35 minutes before an auto-reply appears on a Zendesk ticket, so keep calm and carry on if nothing happens right away.
You can safely answer your messages at any time. If an agent sends a response before the auto-reply appears in Zendesk, ChannelReply cancels the auto-reply. The agent’s response is delivered to the customer immediately instead.
Shopify and WooCommerce Do Not Require This Setup
If you use our Zendesk-Shopify or Zendesk-WooCommerce integration, you can use this system as a Shopify autoresponder. However, you don't have to. Zendesk's standard triggers work for Shopify or WooCommerce with no special setup needed.
With that said, we’ll assume you are using this autoresponder for all your ChannelReply tickets. It makes setup much easier!
Additional Marketplace Autoresponders
This system has been tested and confirmed to work with Amazon, eBay, Newegg, Shopify, and WooCommerce. We haven't yet tested autoresponders with TikTok, Mirakl, or Octopia, but we expect them to work well with TikTok and Octopia. Mirakl autoresponders may encounter issues due to the three-way messaging system, where replies could be delivered to marketplace staff rather than directly to customers.
If you're interested in trying autoresponders with any of these newer marketplaces, please contact us for help with setup and monitoring to ensure everything works as expected.
Before Starting: Prevent Double Messaging
If you haven’t changed or deactivated Zendesk’s default triggers, be warned that some might go off at the same time as your ecommerce autoresponder. This could result in a barrage of error notifications, or worse, your customers seeing multiple auto-replies.
Follow the steps below to prevent double messaging from Zendesk’s default triggers. If you’ve built custom triggers or automations that work as autoresponders, take the same steps with those to prevent them from firing as well.
In ChannelReply, make sure you have created tags for each connected marketplace account. Create a list of all your ChannelReply tags.
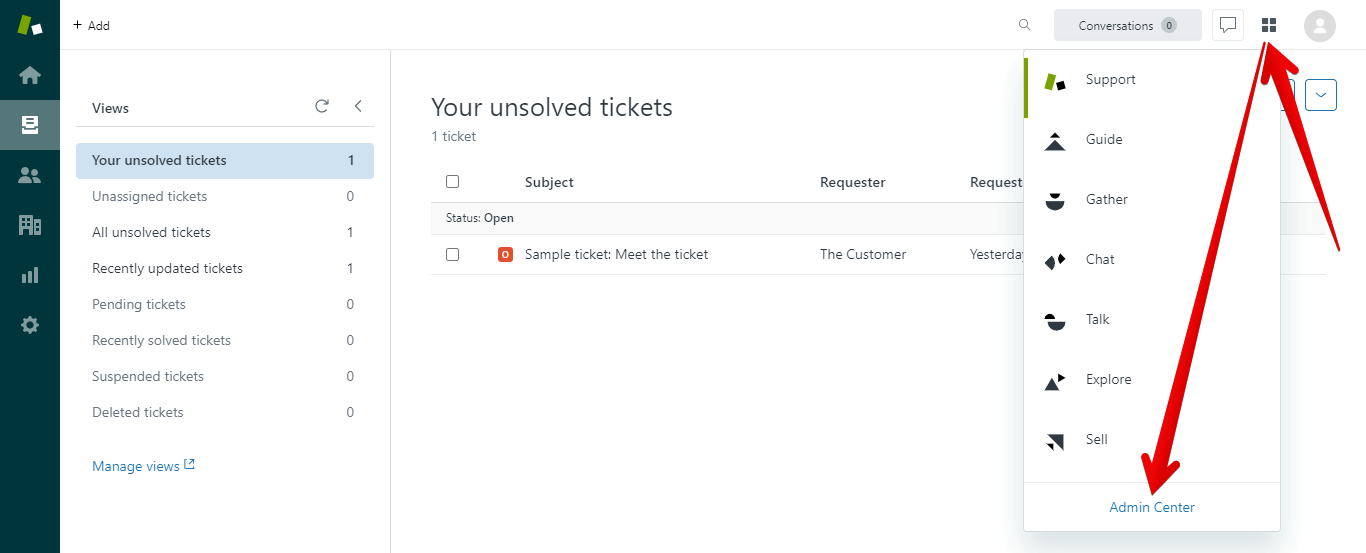
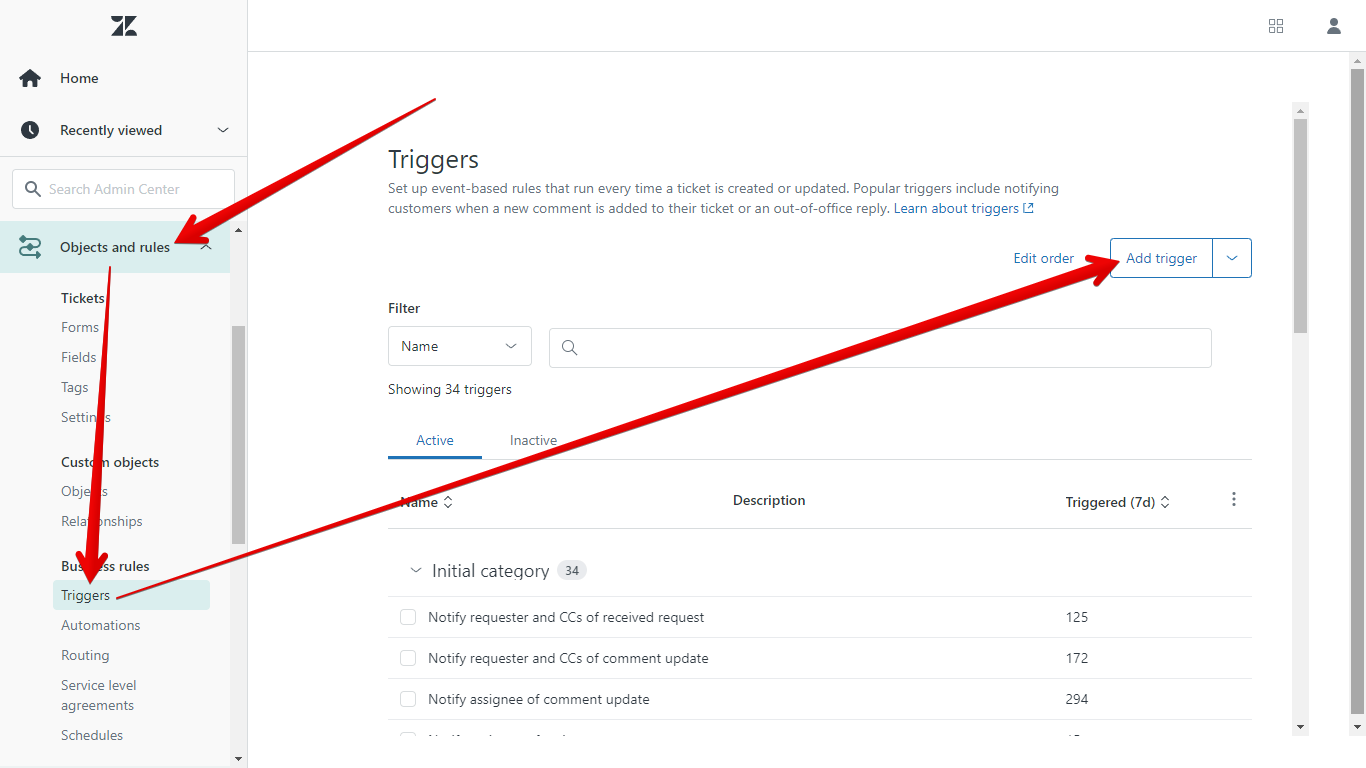
In Zendesk, click Products (the four-squares icon in the upper right), then Admin Center.
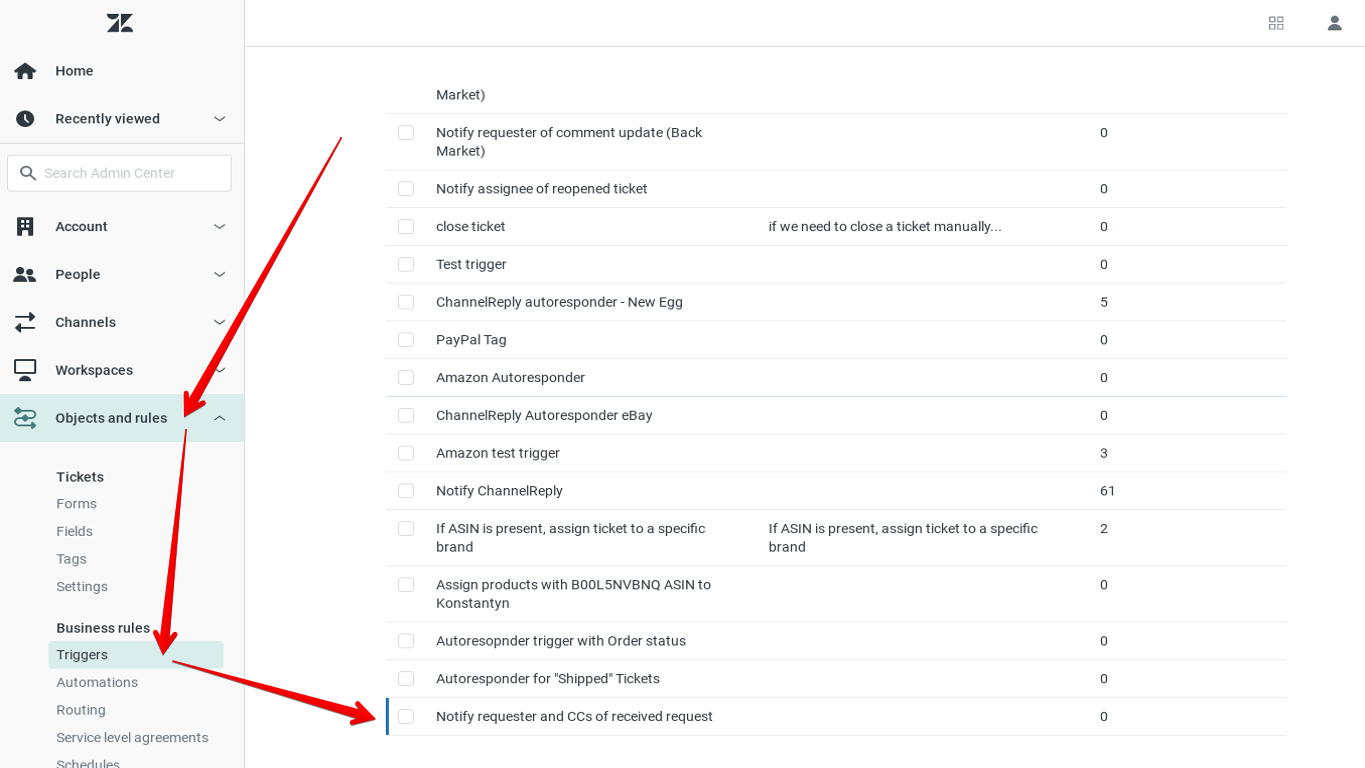
Open the "Objects and rules" menu, then click Triggers. Find "Notify requester and CCs of received request."
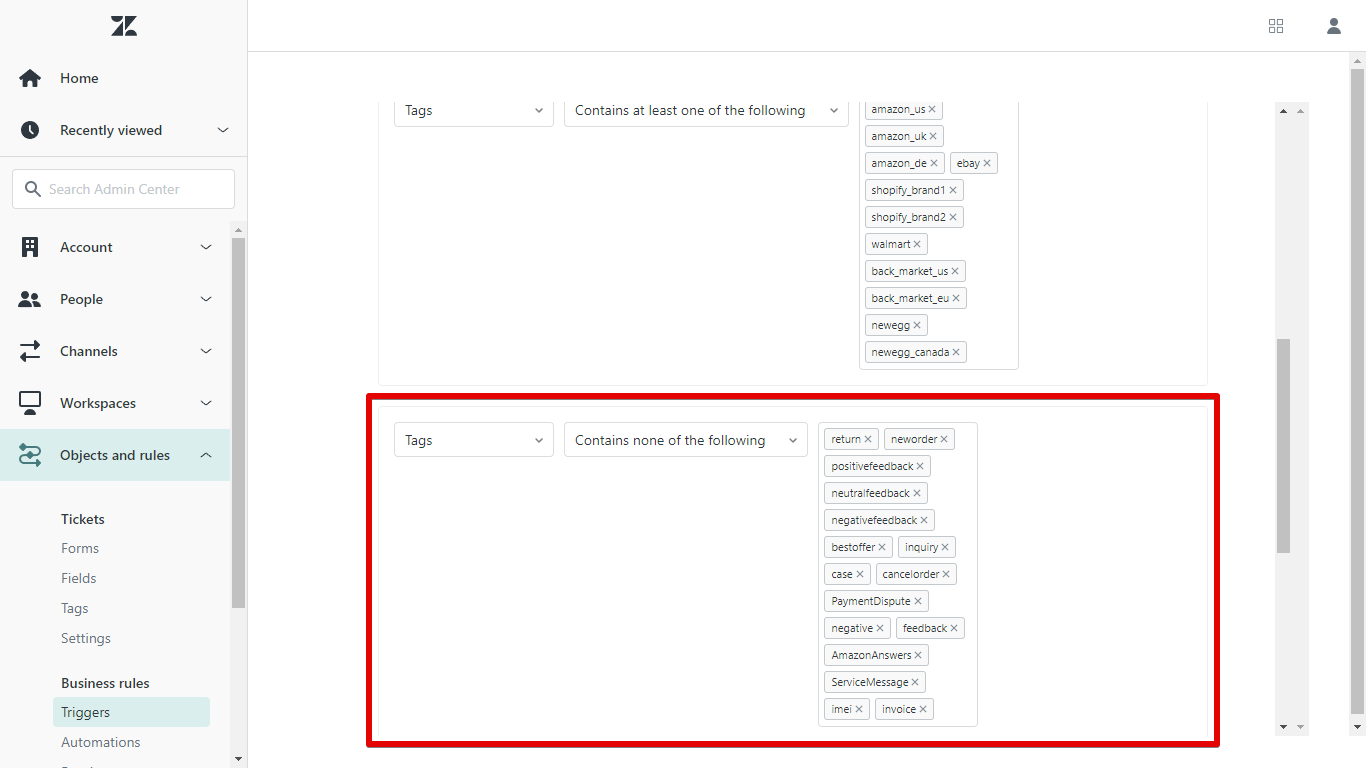
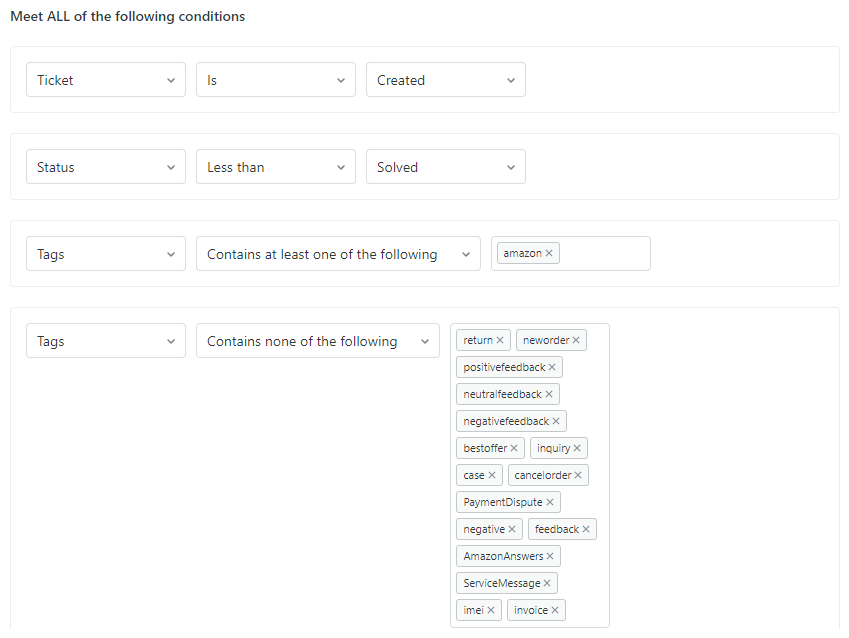
Edit the trigger and make sure it has the following ALL condition:
Tags | Contains none of the following | (Your ChannelReply tags)
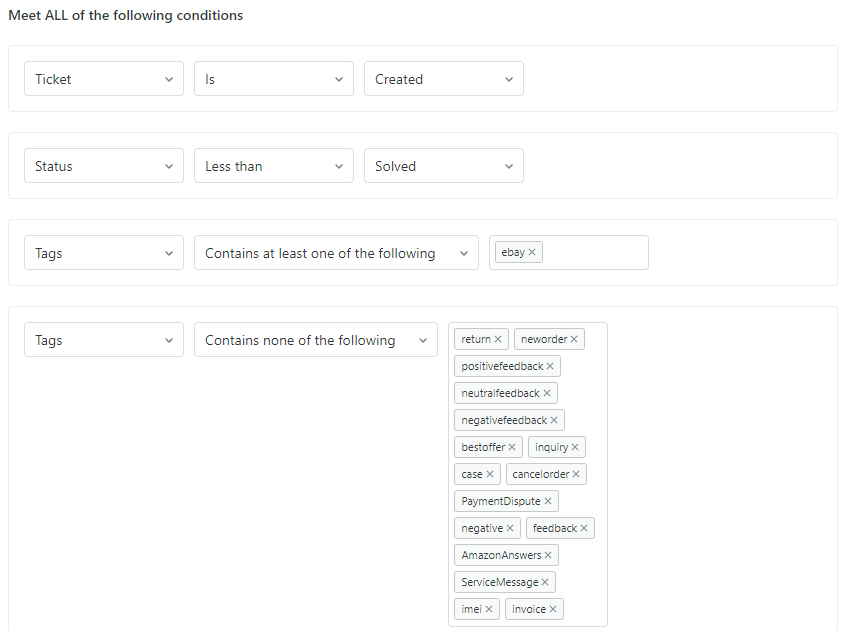
Here’s an example for someone with two Amazon accounts, one tagged with “amazon_us” and the other “amazon_uk”:
This stops Zendesk’s default auto-reply from trying to answer marketplace messages. It will still work for normal emails.
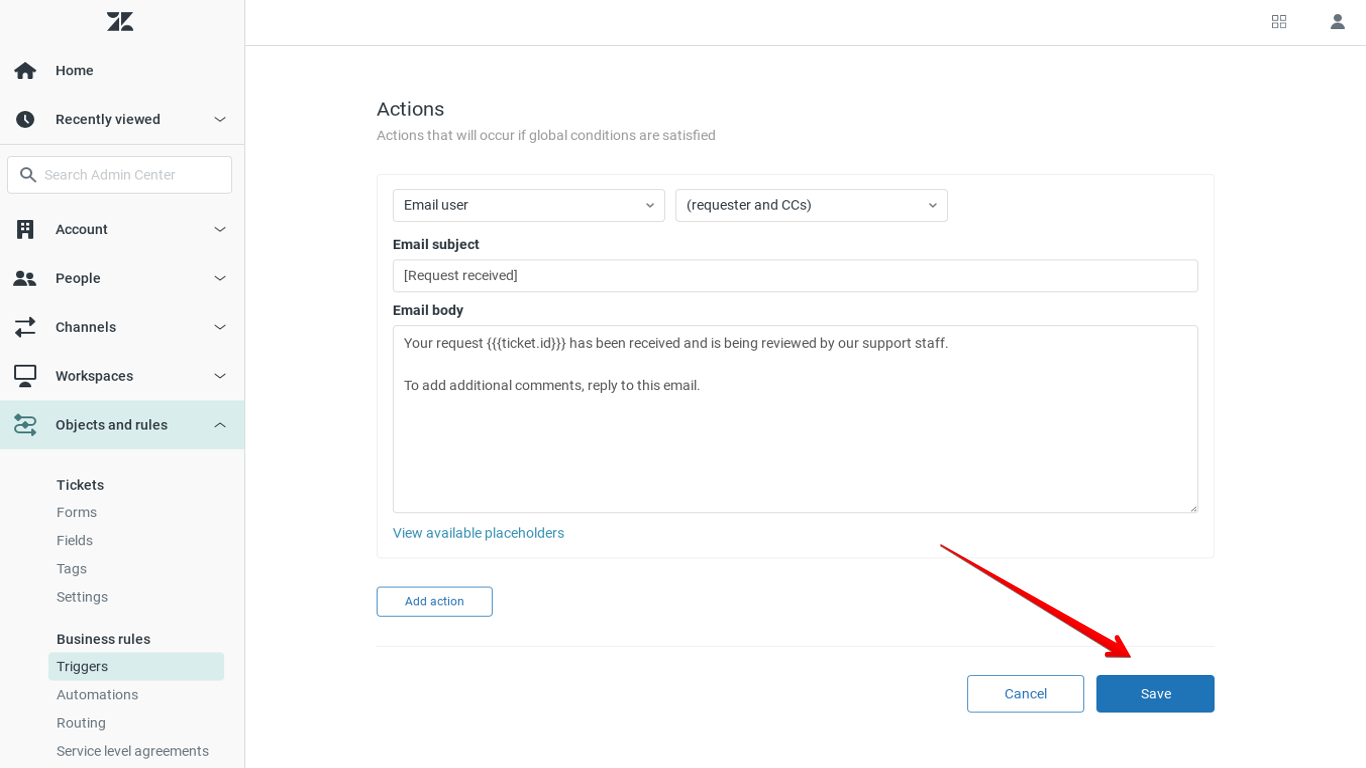
Click “Save” at the bottom of the screen. This will save your changes and return you to the Triggers menu. (If you already had the right conditions set up and can’t save, hit “Cancel” instead.)
Next, edit the default trigger "Notify requester and CCs of comment update." (This is different from “Notify requester and CCs of received request,” the trigger you just edited.)
Under “Meet ALL of the following conditions,” make sure you have the same condition:
Tags | Contains none of the following | (Your ChannelReply tags)
This will ensure your customers never get two copies of your responses.
Quick Setup vs. Advanced Setup
You should now choose whether to use Quick or Advanced Setup.
Quick Setup will immediately create a simple autoresponder that replies once to each new ticket that appears in Zendesk. All you will have to do is write the message!
You can then end setup or customize your quick autoresponder with advanced options. For example, you can set it to reply to follow-up messages, or to only respond to certain tickets.
Note that with Quick Setup, your autoresponder will immediately start replying to all new tickets. This even includes tickets that do not come from ChannelReply. You can change this quickly, though.
Advanced Setup will explain the full process from start to finish. This way, you can control the entire setup. It is only recommended for advanced users.
Click here to go to Advanced Setup or continue reading for Quick Setup. Note that Quick Setup steps are marked QS (QS 1., QS 2. etc.) while Advanced Setup steps are marked AS (AS 1., AS 2. etc.).
Quick Setup
QS 1. Write Your Auto-reply
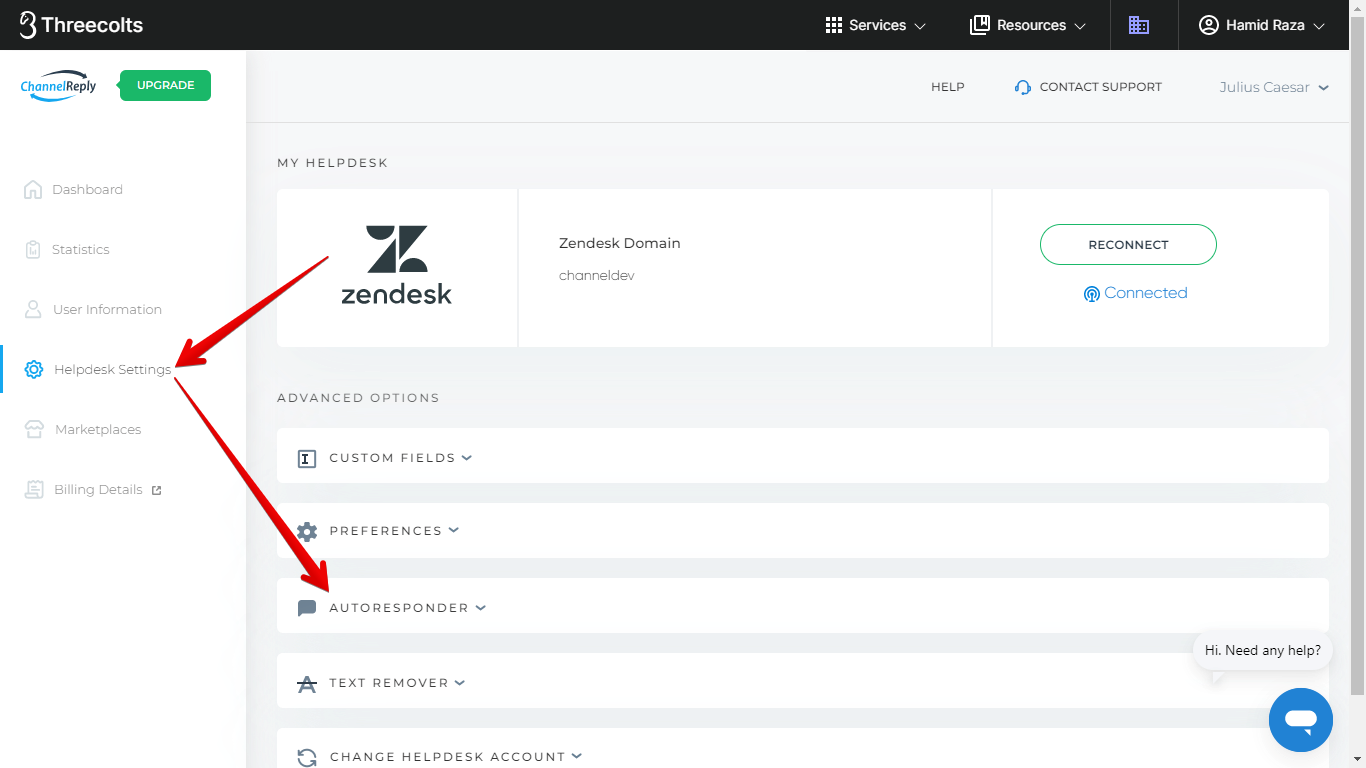
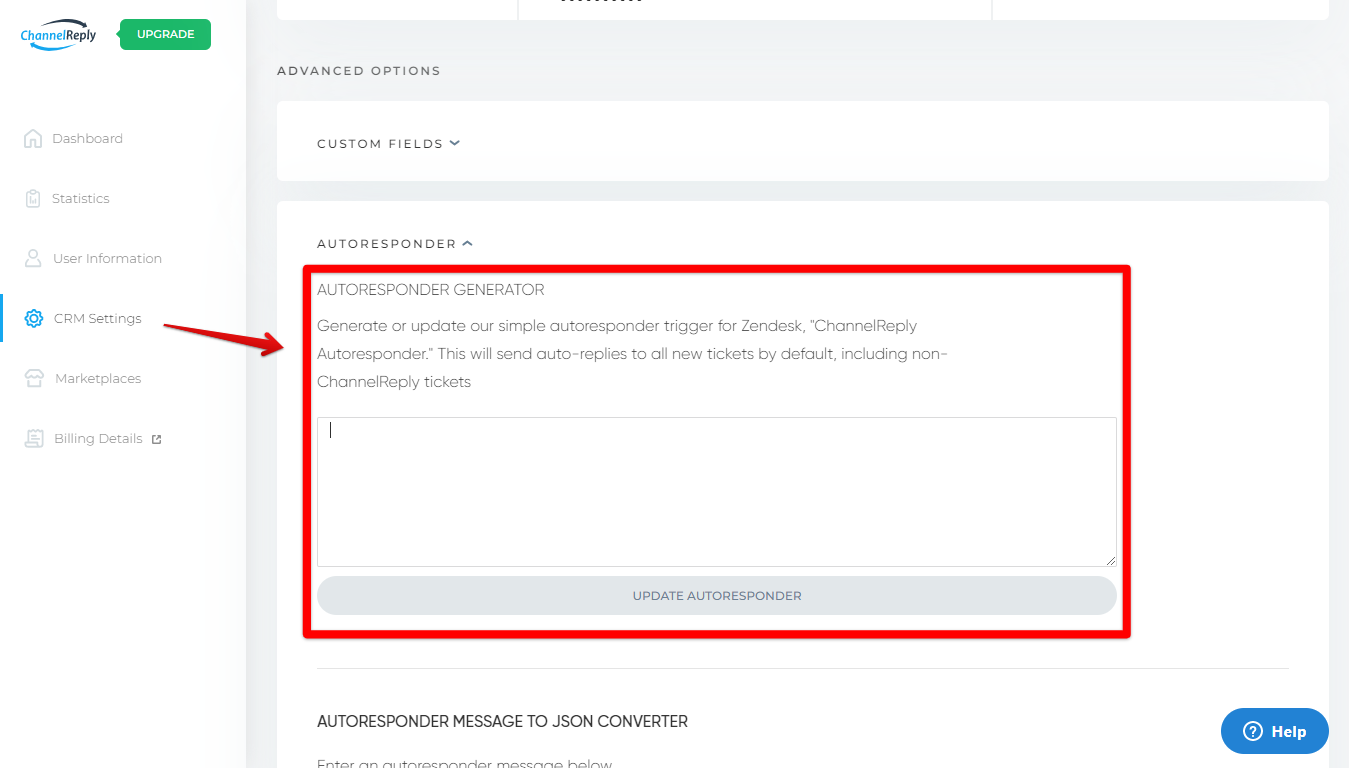
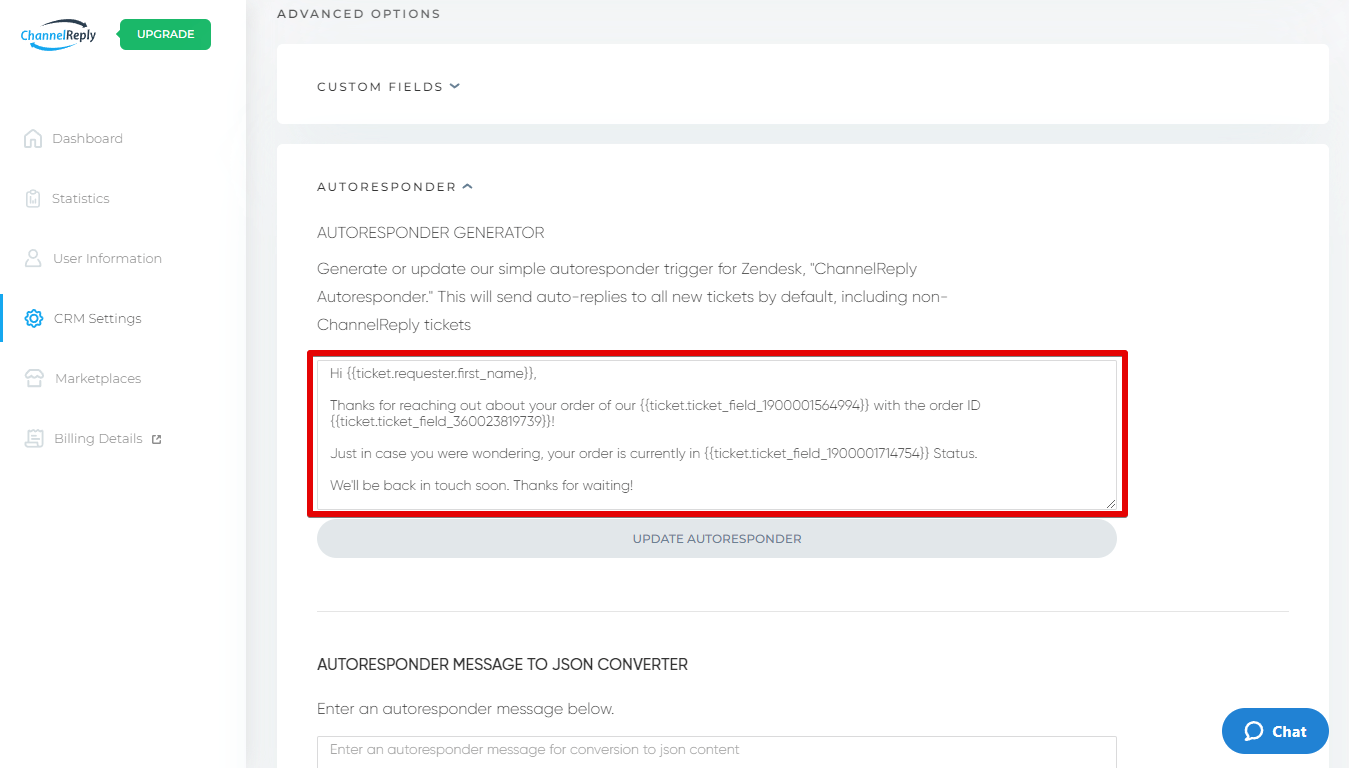
Visit your ChannelReply dashboard and click "Helpdesk Settings" in the left-hand menu. Then open the "AUTORESPONDER" dropdown.
You will see the autoresponder generator tool at the top of the menu that appears.
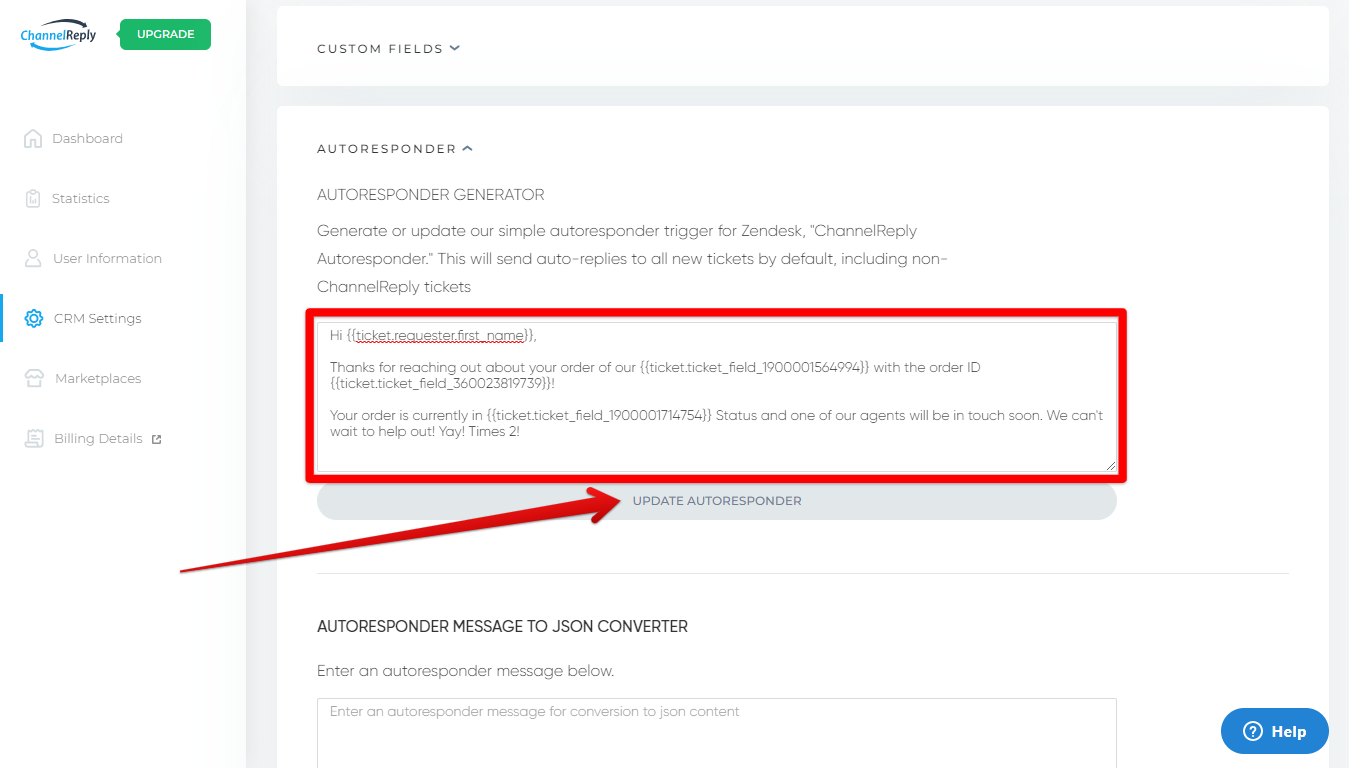
Enter your auto-reply in the autoresponder generator. You can include any Zendesk ticket fields like {{ticket.requester.first_name}}. You can also include placeholders made with ChannelReply custom fields.
Once you’re happy with your auto-reply, click “UPDATE AUTORESPONDER.”
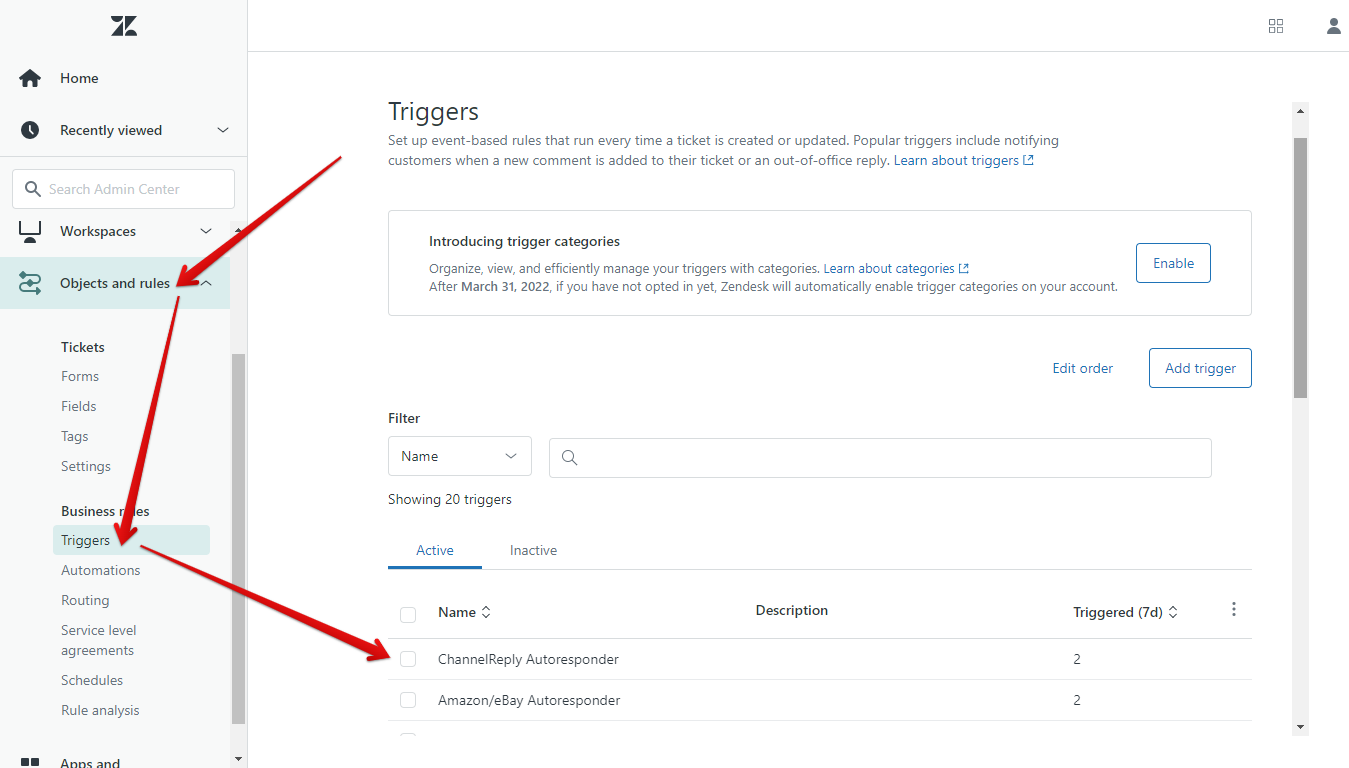
This will create the trigger “ChannelReply Autoresponder” inside your Zendesk account. This is a very basic autoresponder that will send your auto-reply to only the first message of every ticket. Note that it will reply to both ChannelReply and non-ChannelReply tickets at first.
If you’re happy with this simple autoresponder for all tickets, you’re totally finished! It’s already working. If you want to customize it further, though, then read on.
QS 2. (Optional) Decide Which Ecommerce Channels Your Autoresponder Targets
Return to your Zendesk Admin Center screen. The "Objects and rules" menu and "Triggers" submenu should already be open. Find "ChannelReply Autoresponder" in your list of active triggers and click on it to begin editing.
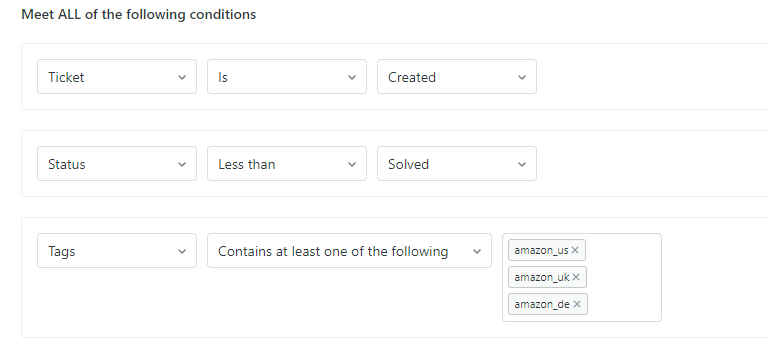
If you don’t want to auto-reply to all your tickets, simply add the following under “Meet ALL of the following conditions”:
Tags | Contains at least one of the following | (Your ChannelReply tags)
It’s up to you which of your marketplace accounts your autoresponder will answer. It all depends on which ChannelReply tags you enter.
So, if you want to auto-reply to all your Amazon, eBay, Back Market, Shopify and Walmart customer messages, add all of your ChannelReply tags. If you only want this to work as an Amazon autoresponder, then only enter your Amazon tags:
You can make as many autoresponders as you want, so feel free to make one specific autoresponder now while planning to make others later. We'll cover how to make more autoresponders in step QS 4.
We also recommend excluding our special notifications from your autoreplies. Otherwise, you could send autoresponses to things like eBay Resolution Center cases, which might not be ideal! To avoid this kind of situation and also prevent lots of "Could not deliver your reply" error messages, add the following "ALL" condition:
Tags | Contains none of the following | [All tags from the comma-separated list of all automatic ChannelReply tags]
When you've finished making changes, remember to click "Save" at the bottom of the screen.
QS 3. (Optional) Set up Auto-replies to Follow-up Messages
By default, this trigger will auto-reply to only the first message in each ticket. However, you can make it respond to all new messages if you prefer. This is quite a bit more complicated, though!
If you’re happy only responding to the first message in each ticket, skip to step QS 4. If you want to reply to every message that comes in, though, then read on.
QS 3.1. Determine Whether You Need Setup A or Setup B
The setup for auto-replying to follow-up messages depends on your Zendesk settings. Check whether both of the following statements are true:
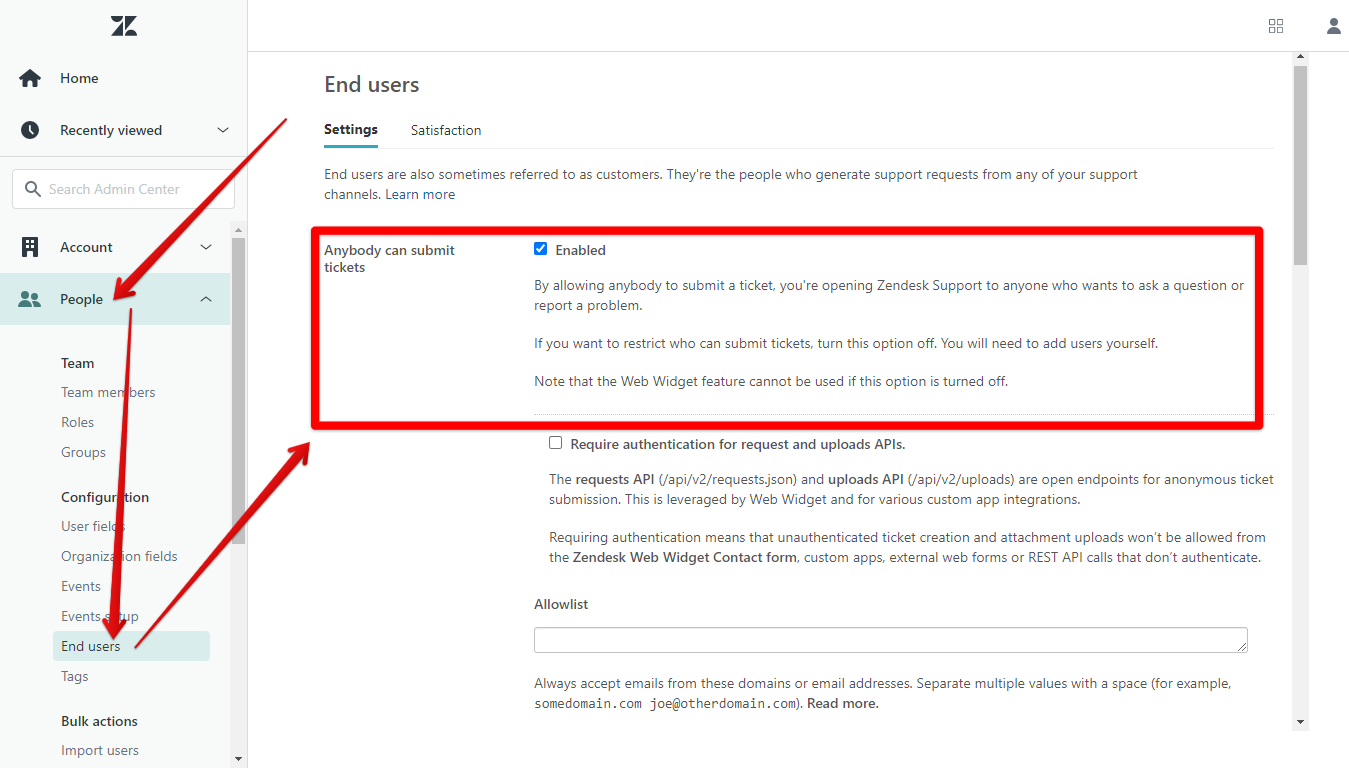
Statement 1. In Admin Center > People > End Users, “Anybody can submit tickets” is enabled.
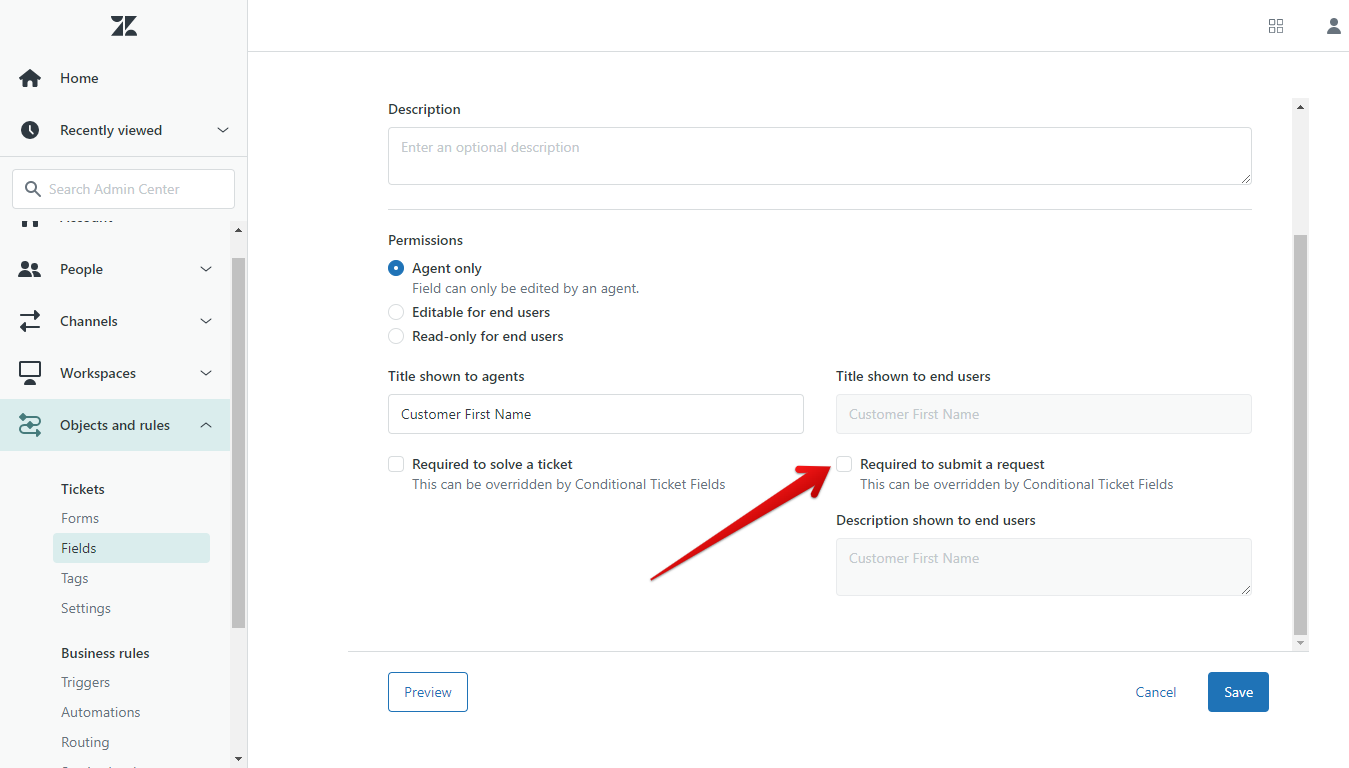
Statement 2. None of your custom fields have “Required to submit a request” turned on.
This includes all custom fields that you have created in Zendesk, whether or not you used ChannelReply to make them.
Note that you do not have to check Zendesk's default ticket fields. Also, “Required to submit a request” is turned off by default for ChannelReply custom fields. You can assume it’s turned off for our fields if you know nobody has changed any field settings.
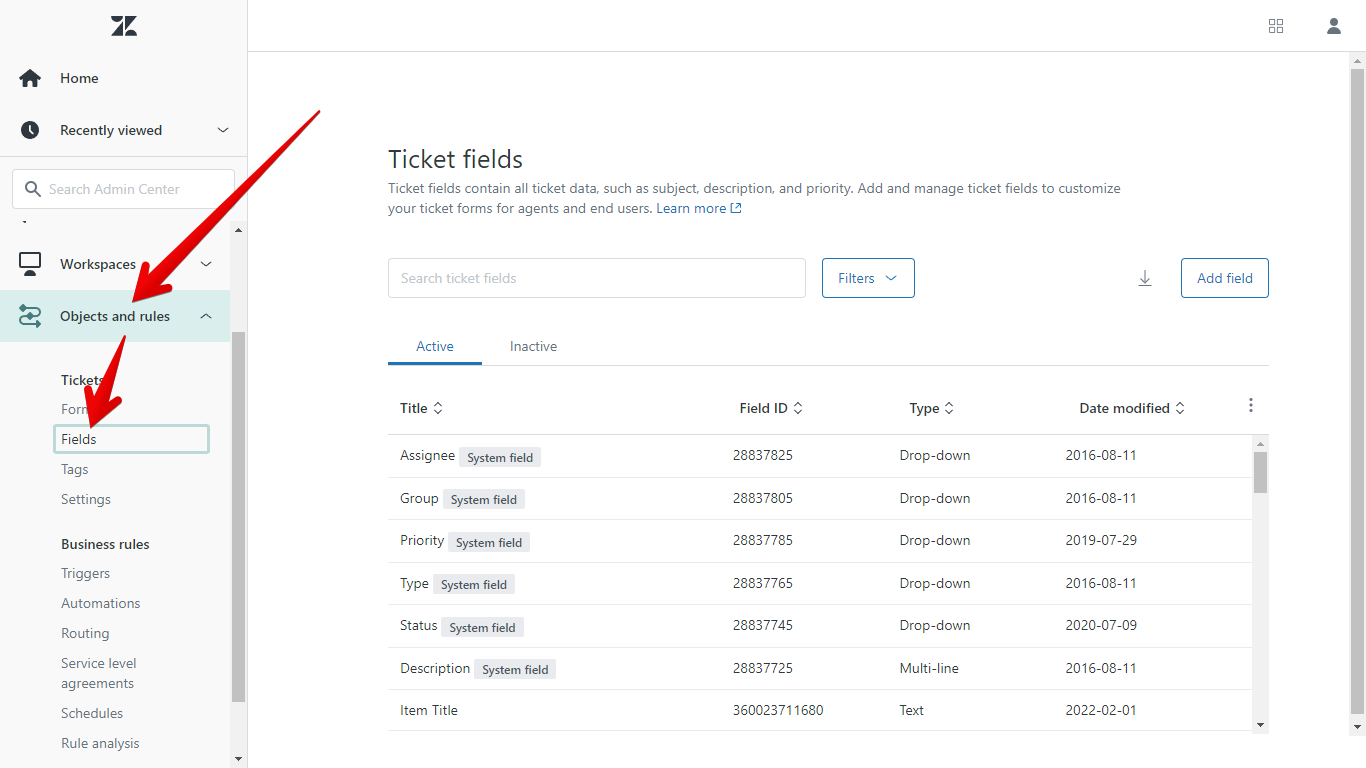
To check this setting, go to Objects and rules > Fields.
Click on any custom field to open it. You'll then see the "Required to submit a request" option, among many other settings.
If statements 1 and 2 above are true, use setup A. If “Anybody can submit tickets” is disabled, or if any custom fields have “Required to submit a request” checked, then use setup B instead.
QS 3.1.1. Setup A
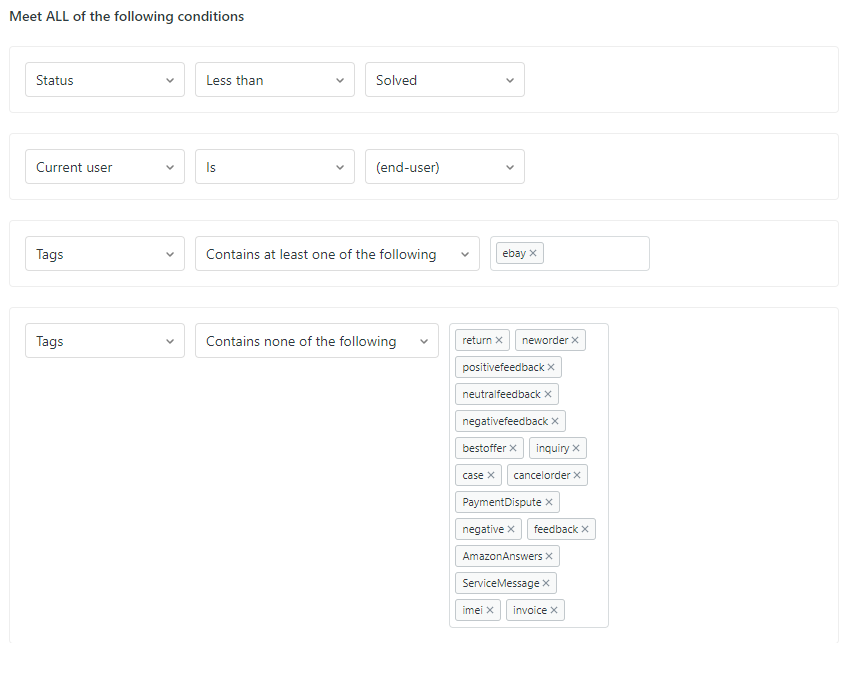
Reopen your ChannelReply Autoresponder trigger. Change the ALL conditions to the following:
Status | Less than | Solved
Current User | Is | (end-user)
Tags | Contains at least one of the following | (Your ChannelReply tags)
Tags | Contains none of the following | [All tags from the comma-separated list of all automatic ChannelReply tags]
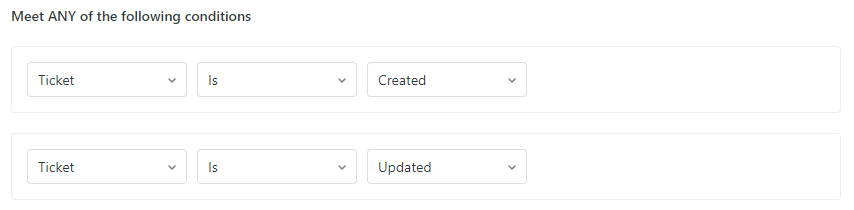
Then add the following ANY conditions:
Ticket | Is | Created
Ticket | Is | Updated
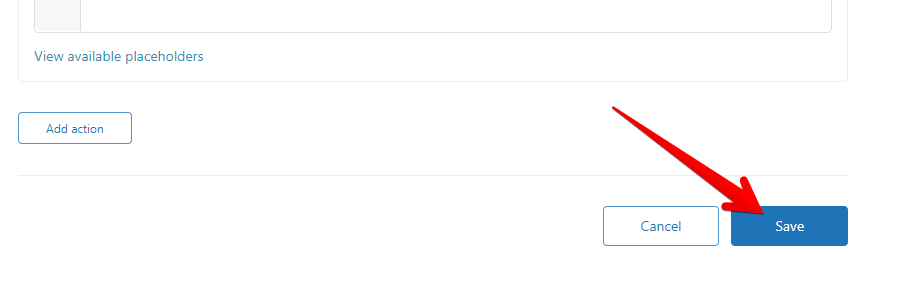
Finally, scroll all the way down and click “Save.”
Your autoresponder will now reply to every customer message in a ticket! Skip ahead to step QS 4 if you’d like to keep refining your setup.
QS 3.1.2. Setup B
You’ll need to create two autoresponder triggers. The one that was already created will be used to answer the first message in each new ticket. The second will answer any follow-up messages.
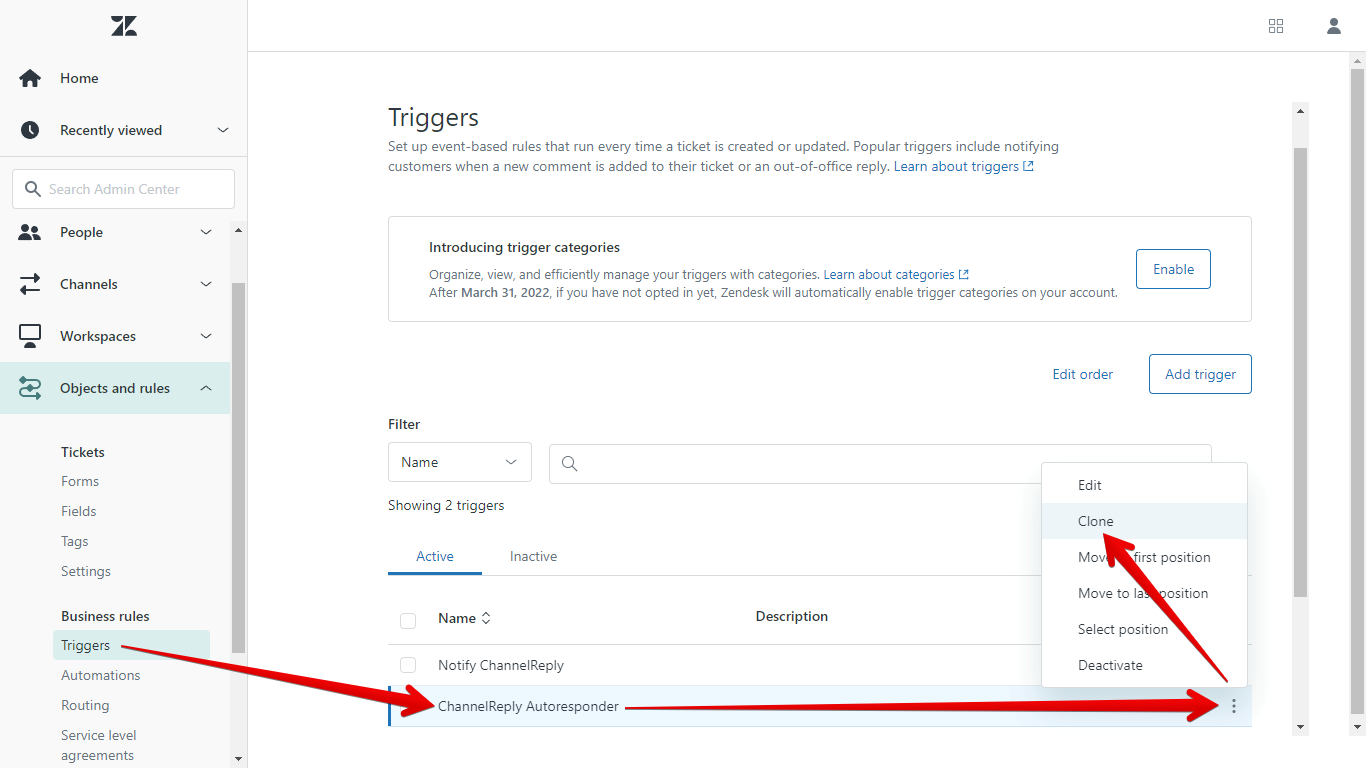
Find “ChannelReply Autoresponder” in your list of triggers and mouse over it. Click the column of three dots on the right and choose “Clone.”
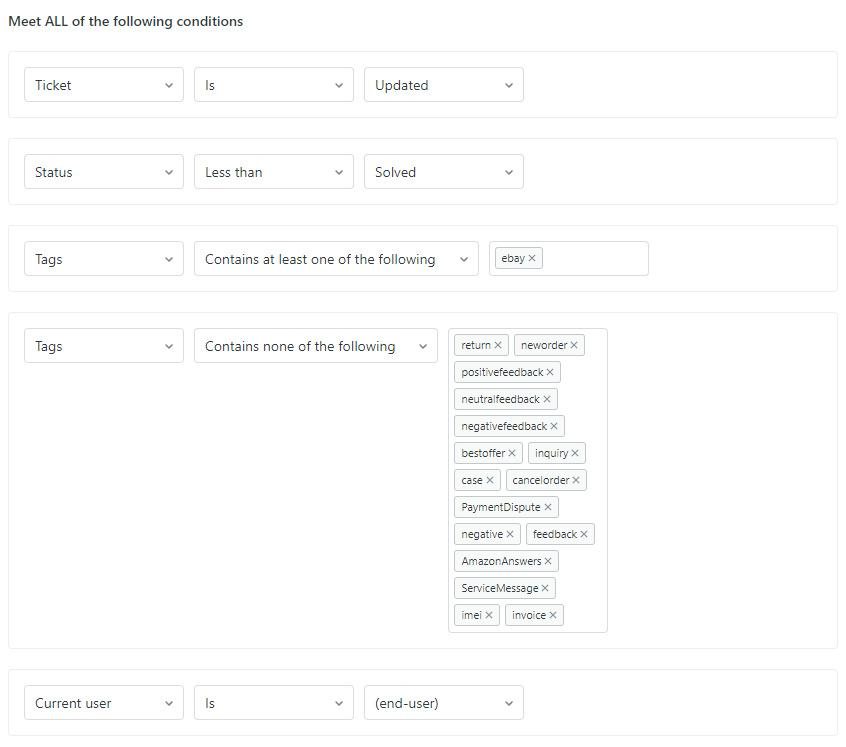
Give the copy a new name, like “ChannelReply Follow-up Autoresponder.” Then change the ALL conditions to the following:
Ticket | Is | Updated
Status | Less than | Solved
Tags | Contains at least one of the following | (Your ChannelReply tags)
Tags | Contains none of the following |[All tags from the comma-separated list of all automatic ChannelReply tags]
Current user | Is | (end-user)
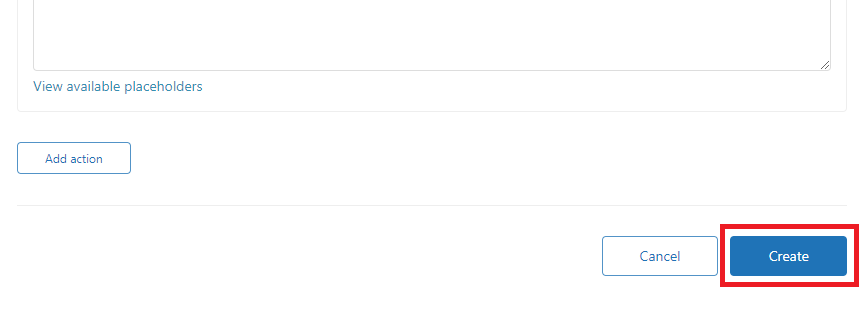
Once you’re finished, scroll down and click “Create.”
You’re all set! Responses will be delivered every time the buyer messages you. We’ll cover how to edit your message later, but you can skip to our editing instructions now if you want to do it right away.
QS 4. (Optional) Create Additional Autoresponders
Creating another autoresponder takes much less work. Just clone the trigger you’ve already created, then edit the clone. (If you're using Setup B, clone and edit both triggers you created earlier.) Here’s how to clone and edit:
- Mouse over your autoresponder in the list of triggers.
- Click the column of dots on the right, then click Clone.
- Rename the trigger.
- Delete the tags currently listed in the "Tags | Contains at least one of the following" condition. Replace them with the tags for the account(s) you want this new autoresponder to work for.
- Make any other desired changes, such as updating the message (explained in step QS 5 below.).
- Click “Create” to save your new autoresponder.
QS 5. (Optional) Edit Your Auto-replies
The original ChannelReply Autoresponder trigger that was automatically generated in step QS 1 is easy to edit. Simply return to your ChannelReply account and go back to Helpdesk Settings > AUTORESPONDER.
Edit the message in the autoresponder generator and click “UPDATE AUTORESPONDER.”
Your message will be updated without affecting any of your other settings.
If you created clones of the first autoresponder, though, those are a little trickier to edit. You’ll need your message in JSON code.
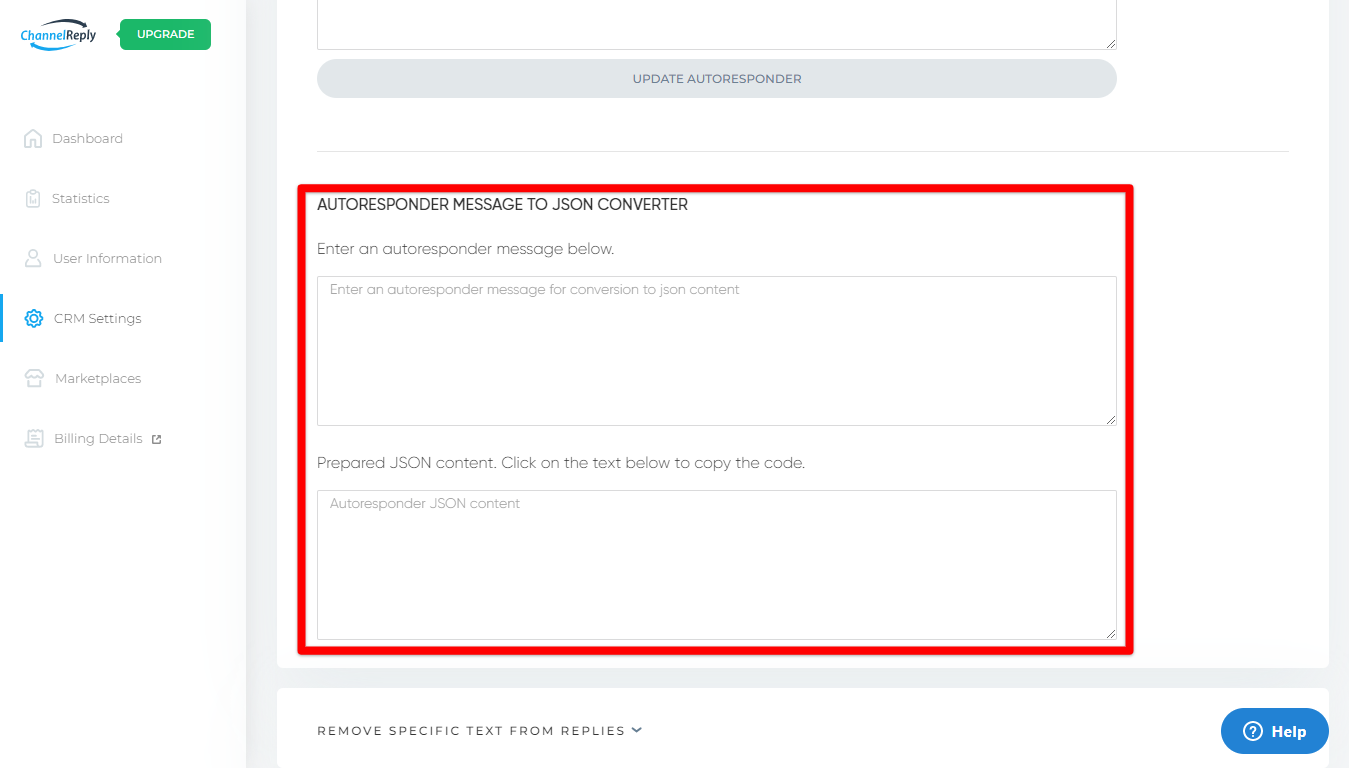
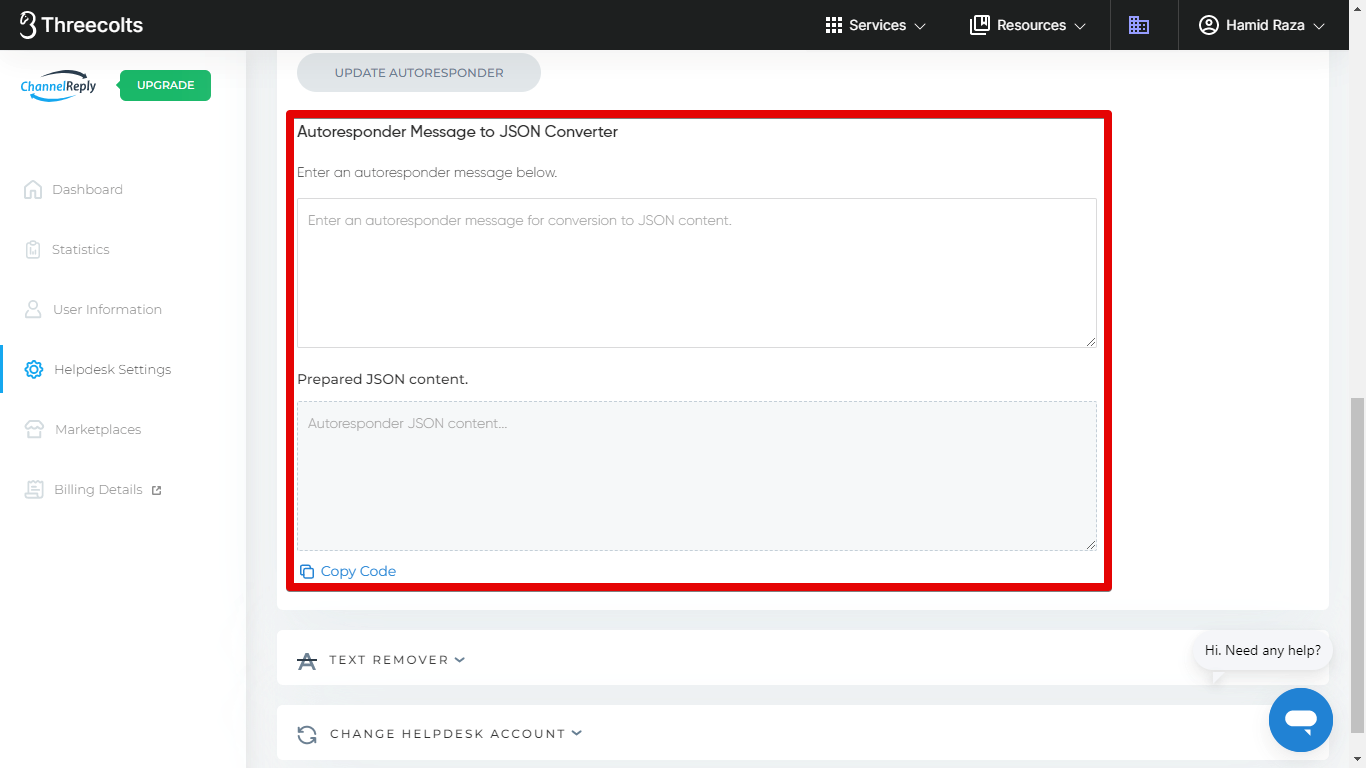
The easiest option is to use our autoresponder-message-to-JSON converter. This tool is found just below the autoresponder generator.
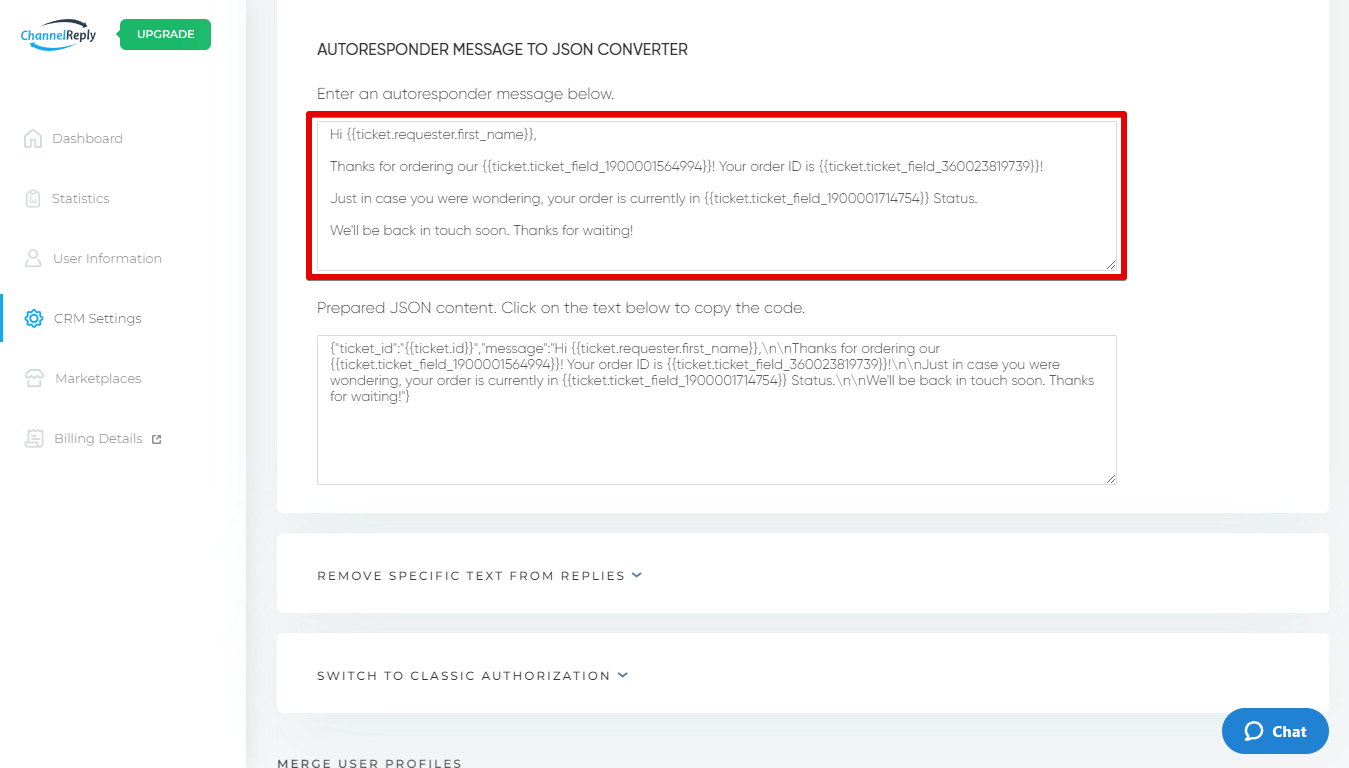
Simply type your message into the autoresponder message field. Remember, you can use Zendesk placeholders and ChannelReply custom fields in your reply.
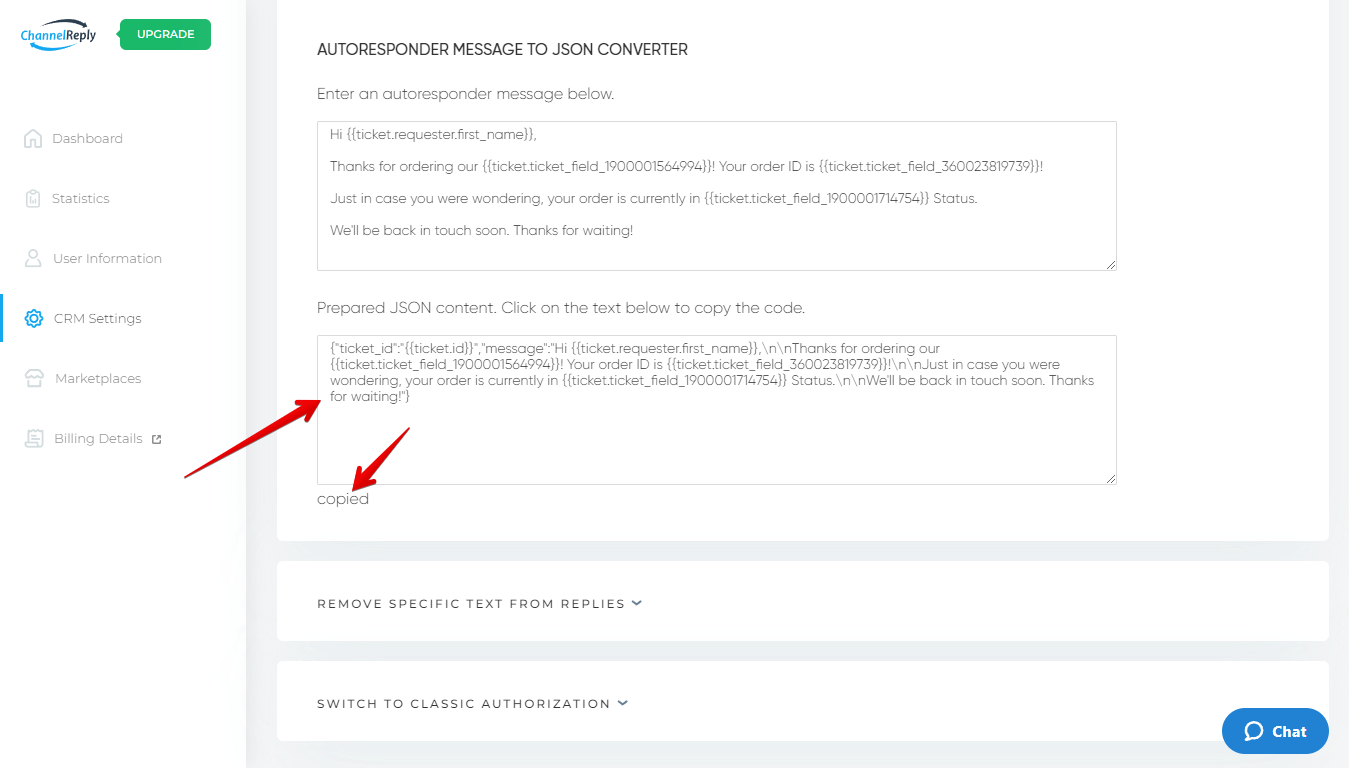
Once done, click anywhere on the prepared JSON content field. This will automatically copy the content.
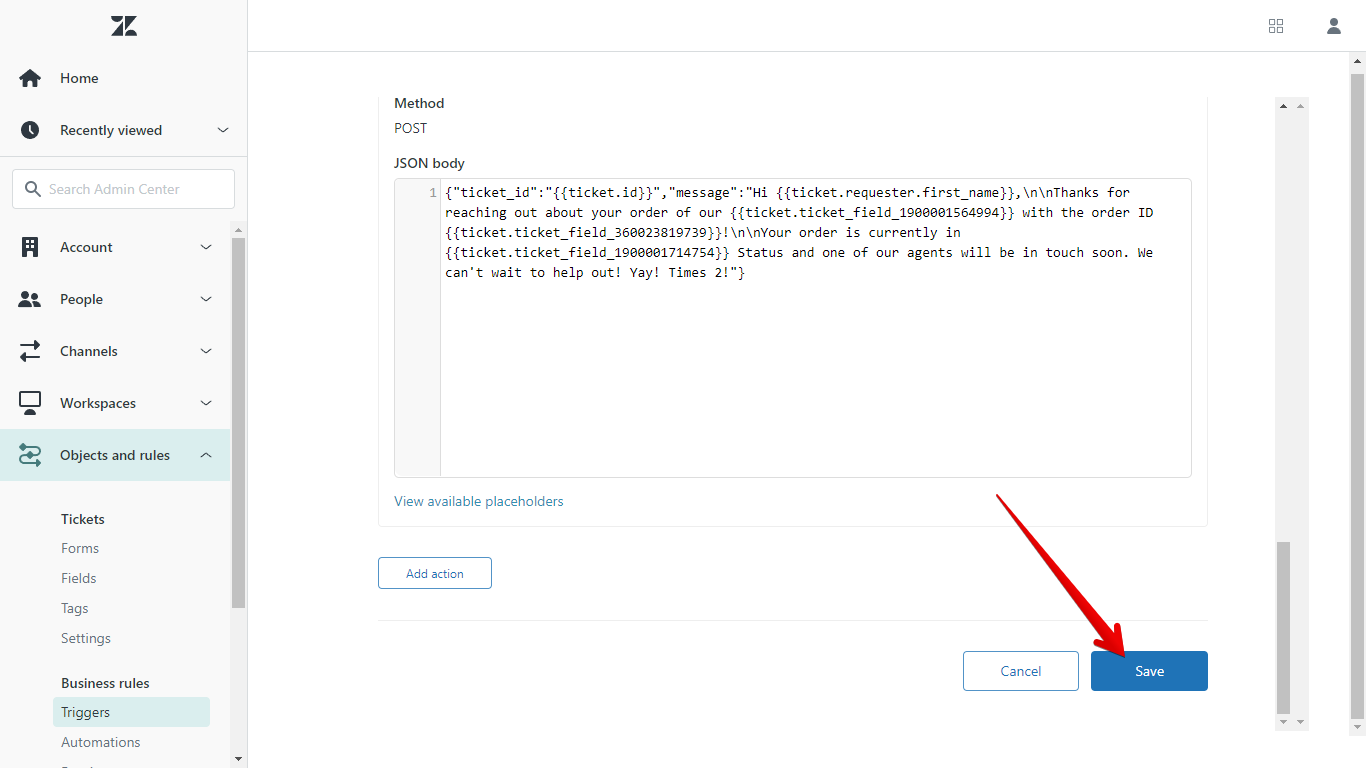
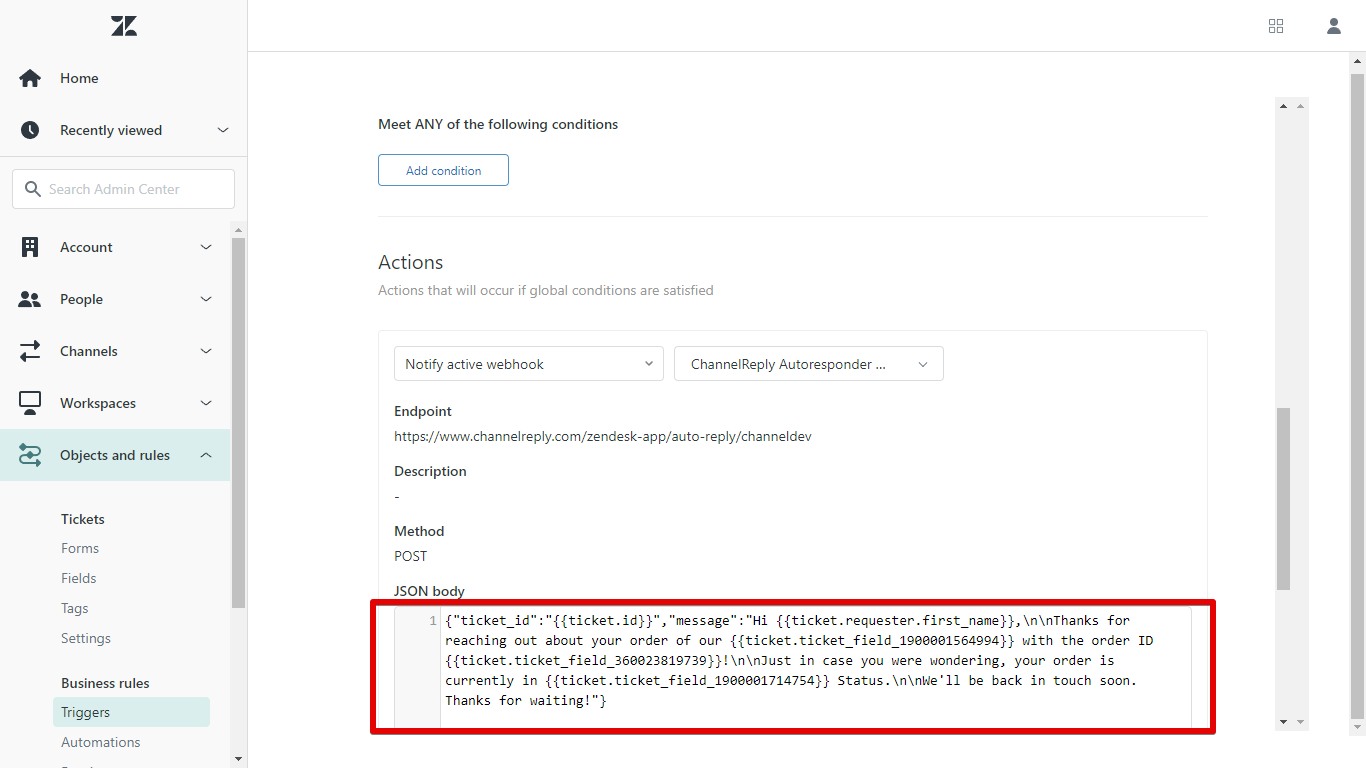
Then return to the autoresponder trigger in Zendesk. Paste your prepared JSON into the “JSON body” field near the bottom of the screen. Hit “Save” and your message update is complete!
That’s everything you need to know for Quick Setup! For info on advanced tricks like disabling your autoresponder during business hours, jump to the "Tips" section.
Advanced Setup
Don’t want us to auto-generate stuff in your Zendesk account? No sweat! Here’s how to build an ecommerce autoresponder from scratch:
AS 1. Create a Webhook
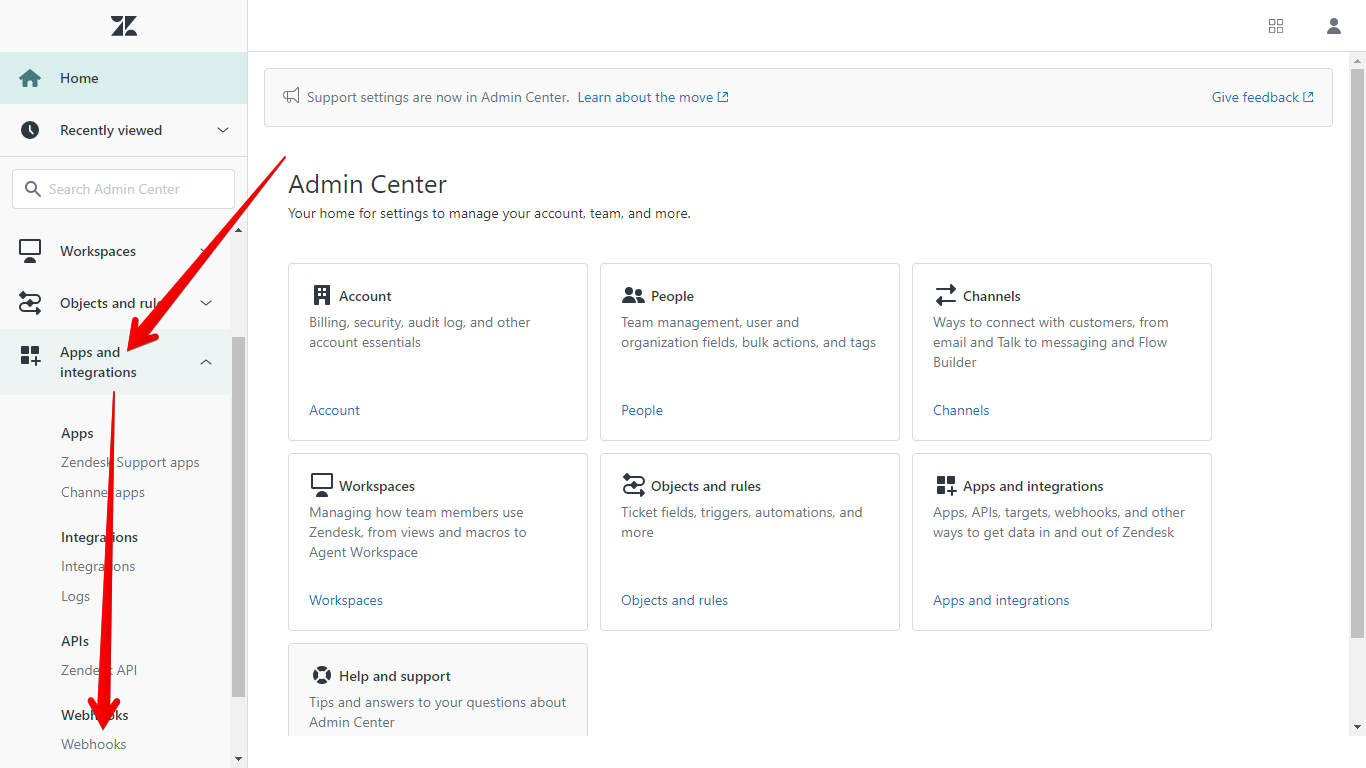
In your Zendesk Admin Center, open the “Apps and integrations” menu. Choose “Webhooks.”
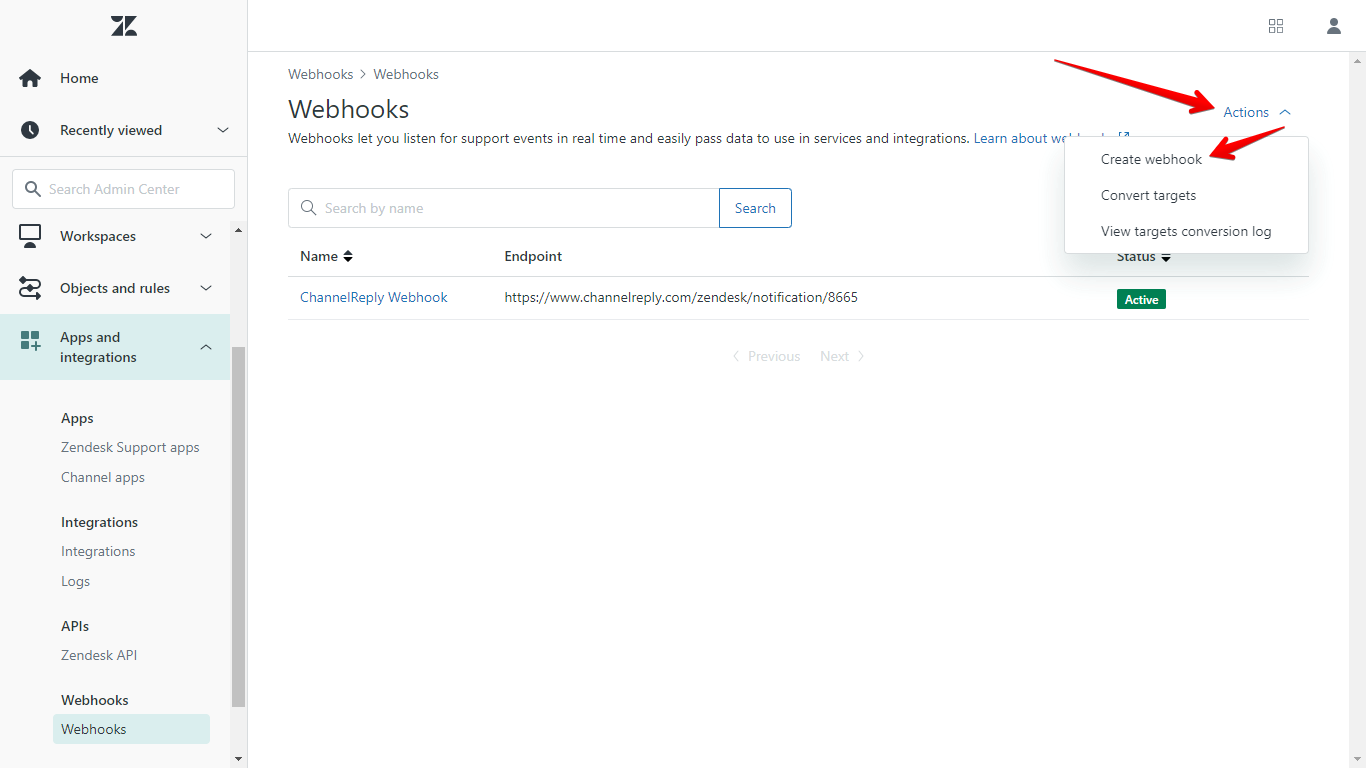
Click “Actions” in the upper right, then select “Create webhook.”
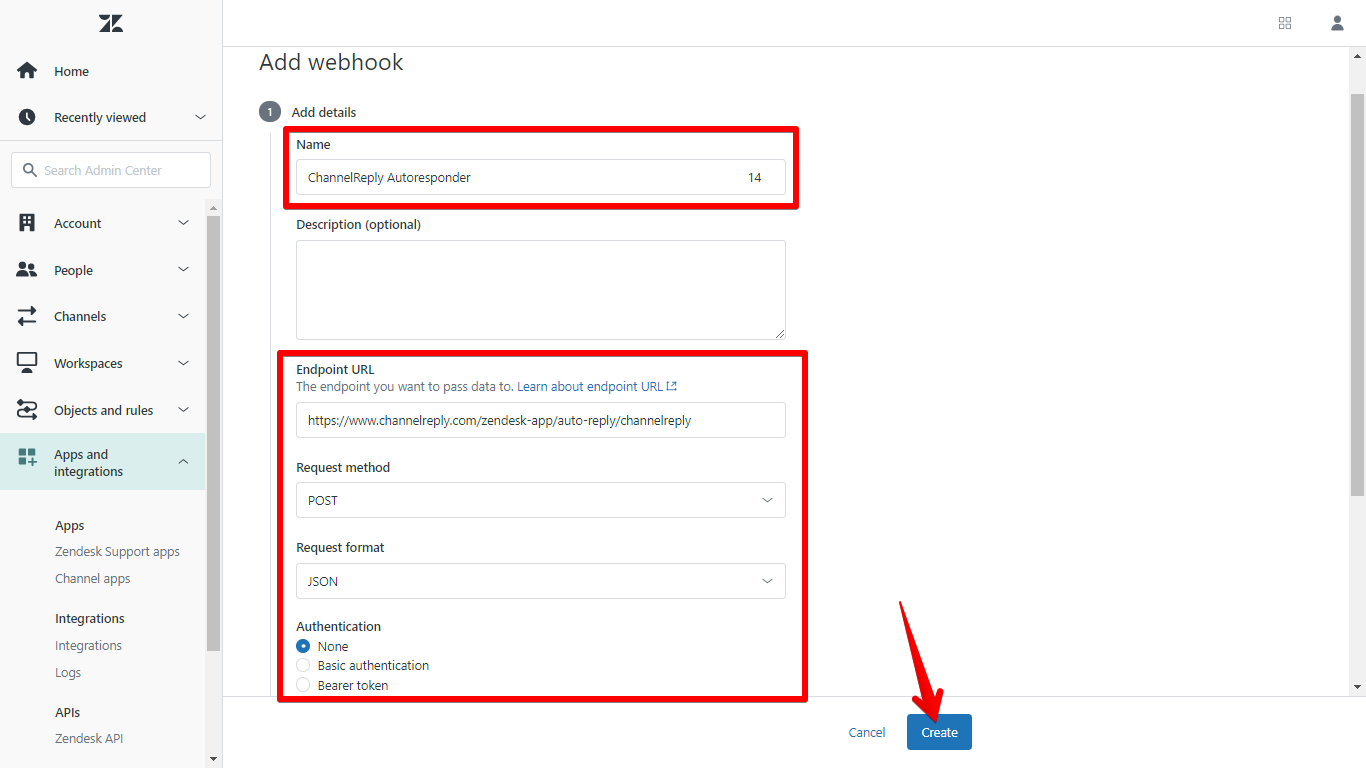
On the following page, name the webhook “ChannelReply Autoresponder.” Then enter the following data:
Endpoint URL: https://www.channelreply.com/zendesk-app/auto-reply/!!company!!
IMPORTANT: Change “!!company!!” in the URL to your company’s Zendesk domain. If your Zendesk domain URL were https://somebusiness.zendesk.com, you’d use the following: https://www.channelreply.com/zendesk-app/auto-reply/somebusiness
Request method: POST
Request format: JSON
Authentication: None
You don’t need to worry about other settings like Description. Once these fields are all filled in correctly, click “Create.”
AS 2. Decide Which Ecommerce Channels Your Autoresponder Targets
Now you can design your autoresponder!
It’s up to you which of your marketplace accounts your autoresponder will answer. It all depends on which ChannelReply tags you enter when following the steps below.
So, if you want to auto-reply to all your Amazon, eBay, Back Market, Shopify and Walmart customer messages, you'll want to use all your ChannelReply tags. If you want a unique autoresponder for just one Amazon account, you'll enter only the tag for that one account.
You can make as many autoresponders as you want, so feel free to make one specific autoresponder now while planning to make others later. We'll cover how to make more in step AS 5.
AS 3. Write Your Walmart, Shopify, Back Market, eBay and/or Amazon Autoresponder Message
Open the "Objects and rules" submenu on the left. Click "Triggers," then hit “Add trigger.”
Give the trigger an easily recognizable name, such as “Amazon Autoresponder” or “eBay Autoresponder.”
Next, scroll down and add the following action:
Notify active webhook | ChannelReply Autoresponder
In the “JSON body” field, you will need to enter your autoresponder message in JSON code. You can generate the encoded version of your message automatically or enter it manually. Keep reading for automatic generation instructions, or skip ahead for manual instructions.
AS 3.1. Creating or Replacing Your JSON Code Automatically
You can create your JSON-encoded message automatically using our JSON converter. This tool is found in your ChannelReply account under Helpdesk Settings > AUTORESPONDER. It’s just below the autoresponder generator.
Simply type your message into the autoresponder message field. You can use Zendesk placeholders and ChannelReply custom fields in your reply.
Once done, click anywhere on the prepared JSON content field. This will automatically copy the content.
Then return to the autoresponder trigger in Zendesk. Paste your prepared JSON into the “JSON body” field near the bottom of the screen.
You’re done! Any time you want to update your message, you can follow the same steps and copy over the fresh set of code.
You can now skip to step AS 4 and decide how you want to set up your auto-reply.
AS 3.2. Creating and Editing Your JSON Code Manually
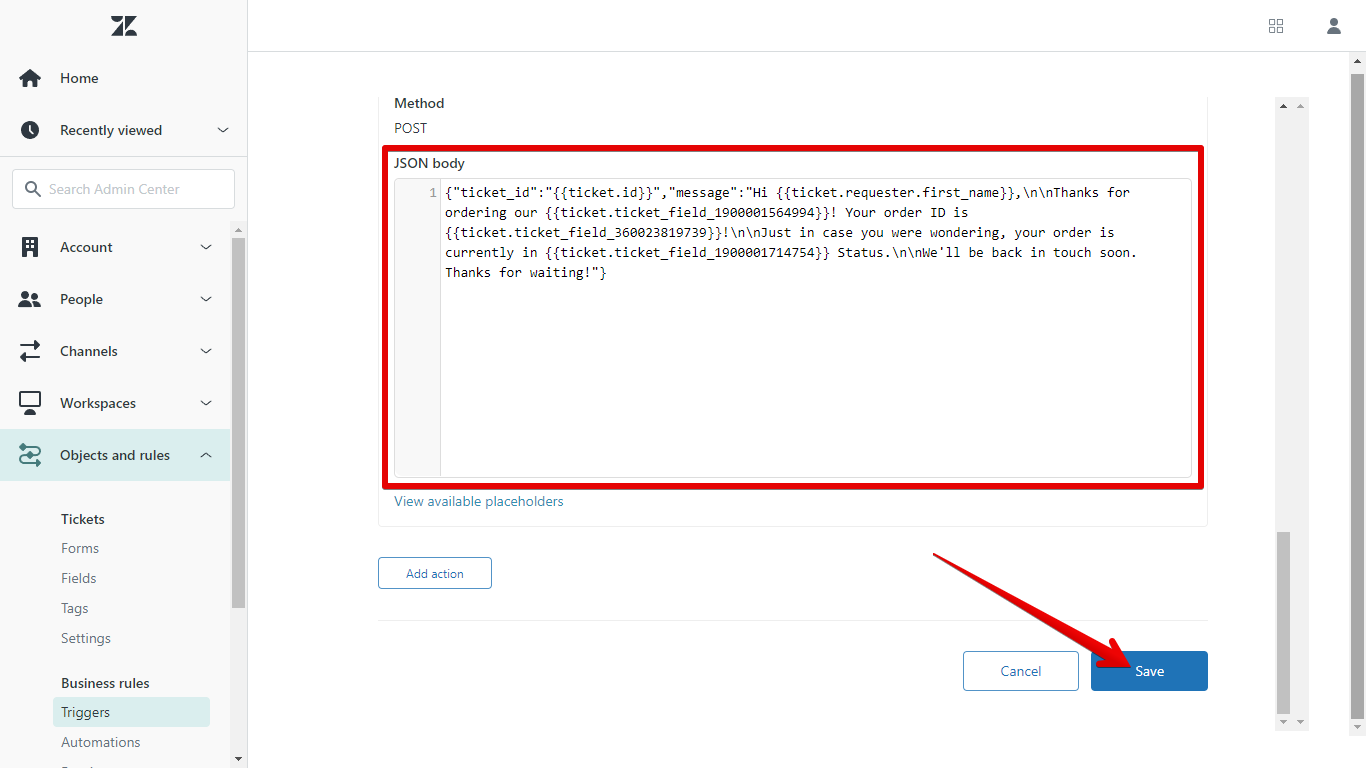
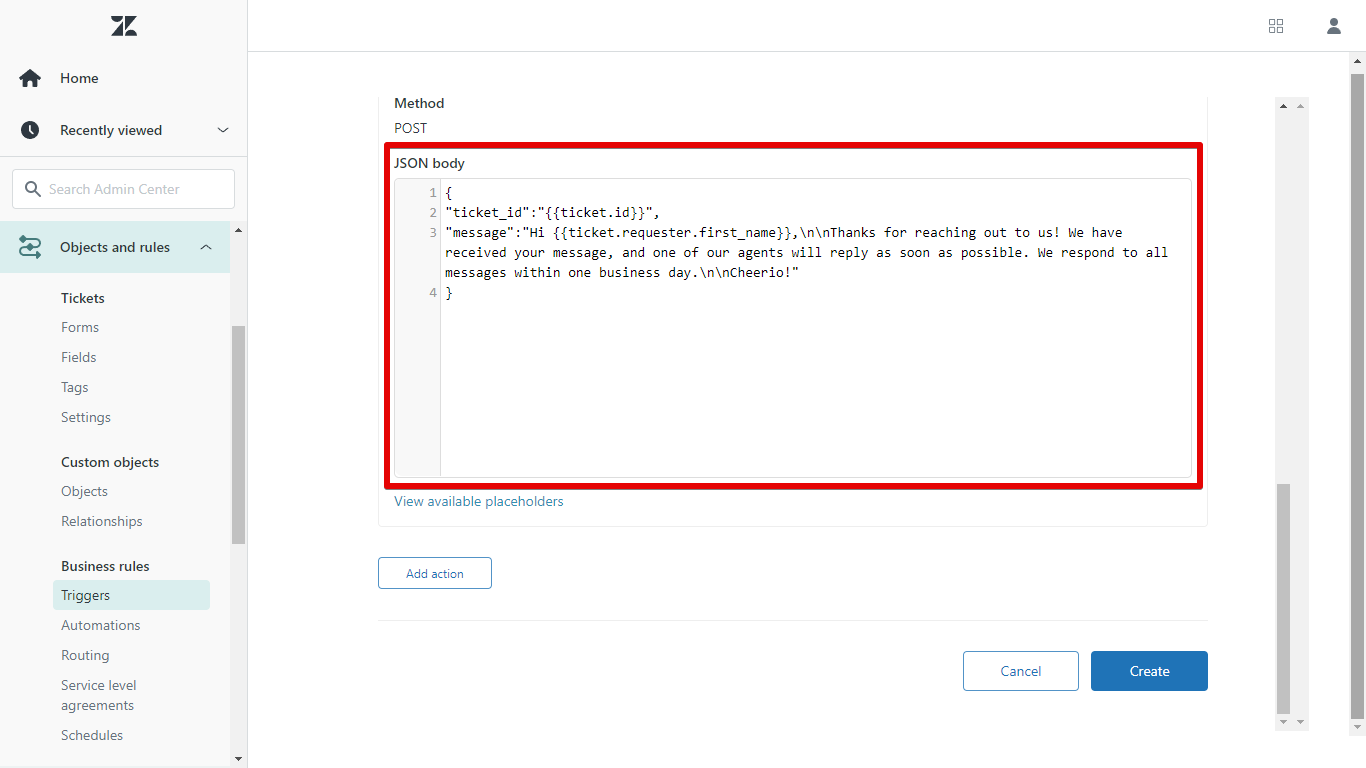
If you want to do this manually, copy and paste the following text into the “JSON body” field in Zendesk:
{
"ticket_id":"{{ticket.id}}",
"message":"YOUR_AUTORESPONDER_MESSAGE"
}
Replace YOUR_AUTORESPONDER_MESSAGE with your actual autoresponder message. Just be careful to keep the following in mind:
- Write your message in a single line.
- For each line break, enter “\n” without quotes or spaces around it. You will need two in a row if you want a blank line between paragraphs.
For example, say you wanted your message to look like the one below, with spacing between the lines:
Hi {{ticket.requester.first_name}},
Thanks for reaching out to us! We have received your message, and one of our agents will reply as soon as possible. We respond to all messages within one business day.
Cheerio!
In that case, your JSON text would need to be:
{
"ticket_id":"{{ticket.id}}",
"message":"Hi {{ticket.requester.first_name}},\n\nThanks for reaching out to us! We have received your message, and one of our agents will reply as soon as possible. We respond to all messages within one business day.\n\nCheerio!"
}
Remember, you can include eBay, Amazon, Back Market, Walmart and Shopify data in your auto-reply! ChannelReply custom fields and normal Zendesk placeholders both work even in JSON code. You can instantly enter details like the item the customer bought, the status of their order and more. See our article on using custom fields as Zendesk placeholders for help.
AS 4. Decide How Often to Send Replies
Once your message is created, you can choose how you want the autoresponder to run.
The instructions depend on whether you want to reply to only the first message in each ticket, or to all buyer messages. Follow the instructions under “Auto-reply Once Per Ticket” below, or jump to “Auto-reply to Every Message.”
AS 4.1. Auto-reply Once Per Ticket
Enter the following ALL conditions:
Ticket | Is | Created
Status | Less than | Solved
Tags | Contains at least one of the following | (Your ChannelReply tags)
Tags | Contains none of the following | [All tags from the comma-separated list of all automatic ChannelReply tags]
Finally, at the bottom of the page, click “Create.”
AS 4.2. Auto-reply to Every Message
The setup for auto-replying to follow-up messages depends on your Zendesk settings. Check whether both of the following statements are true:
Statement 1. In Admin Center > People > End Users, “Anybody can submit tickets” is enabled.
Statement 2. None of your custom fields have “Required to submit a request” turned on.
This includes all custom fields that you have created in Zendesk, whether or not you used ChannelReply to make them.
Note that you do not have to check Zendesk's default ticket fields. Also, “Required to submit a request” is turned off by default for ChannelReply custom fields. You can assume it’s turned off for our fields if you know nobody has changed any field settings.
To check this setting on your custom fields, go to "Objects and rules" and click "Fields."
Open any field you need to check. You'll then see the "Required to submit a request" option, among many other settings.
If statements 1 and 2 above are true, use setup A. If “Anybody can submit tickets” is disabled, or if any custom fields have “Required to submit a request” checked, then use setup B instead.
AS 4.2.1. Setup A
Enter the following ALL conditions:
Status | Less than | Solved
Current User | Is | (end-user)
Tags | Contains at least one of the following | (Your ChannelReply tags)
Tags | Contains none of the following | [All tags from the comma-separated list of all automatic ChannelReply tags]
Add the following ANY conditions:
Ticket | Is | Created
Ticket | Is | Updated
Then scroll all the way down and click “Create.”
AS 4.2.2. Setup B
You’ll need to create two autoresponder triggers. The one you’ve already begun creating will be used to answer the first message in each new ticket. The second will answer any follow-up messages.
Enter the following ALL conditions:
Ticket | Is | Created
Status | Less than | Solved
Tags | Contains at least one of the following | (Your ChannelReply tags)
Tags | Contains none of the following | [All tags from the comma-separated list of all automatic ChannelReply tags]
Then scroll all the way down and click “Create.”
Next, clone the autoresponder. This clone will be used to answer messages you receive on existing tickets. To make the clone, mouse over your autoresponder, click the column of dots on the right, then click Clone.
Give the clone a new name, like “eBay Follow-Up Autoresponder.” Then change the ALL conditions to the following:
Ticket | Is | Updated
Status | Less than | Solved
Tags | Contains at least one of the following | (Your ChannelReply tags)
Tags | Contains none of the following | [All tags from the comma-separated list of all automatic ChannelReply tags]
Current user | Is | (end-user)
You can edit the message (manually or automatically applying JSON code) if you want. Once you’re finished, scroll down and click “Create.”
AS 5. (Optional) Create and Edit Additional Autoresponders
Creating another autoresponder takes much less work. Just clone the trigger you’ve already created, then edit the clone. (Or, if you're using setup B, clone and edit both triggers you created earlier.)
- Return to Admin > Triggers in Zendesk.
- Mouse over your autoresponder.
- Click the column of dots on the right, then click Clone.
- Rename the trigger.
- Remove the tags from the "Tags | contains at least one of the following" condition. Replace them with the tags for the account(s) you want this new autoresponder to work for.
- Make any other desired changes, such as updating the message (manually or automatically applying JSON code).
- Click “Create” to save your new autoresponder.
Tips for All Ecommerce Autoresponder Setups
Business Hours & Other Extra Settings
You can customize any autoresponder trigger further with added conditions. For example, if you have Zendesk Professional or Enterprise, you might want to add the following ALL condition:
Within business hours? | Is | No
That way, the trigger will only fire when nobody is available to answer tickets.
Determining Which Agent Sends Auto-replies
By default, the agent account used to integrate Zendesk with ChannelReply will be the one sending the auto-replies. You can change the agent used to send auto-replies by following the same steps as changing the agent used for internal notifications.
And You’re Done!
Congratulations on setting up your Walmart / Shopify / Back Market / eBay / Amazon autoresponders! For more time-saving options, see our other advanced Zendesk setup tutorials. Or, if you have any questions or get stuck, just contact us and we’ll be happy to help!