The ChannelReply app can display Amazon, eBay, Back Market, Newegg, Shopify, Etsy, Walmart and WooCommerce info in Zendesk. But what if you want to use that info as placeholders in Zendesk macros or autoresponders? Easy—all you need to do is set up custom fields.
Follow the Quick Start Guide to start using order data placeholders in macros in less than five minutes. Or, to get the most out of custom fields and understand all your options, read the In-Depth Guide.
Click on any screenshot to view the full-sized image.
Table of Contents
Quick Start Guide
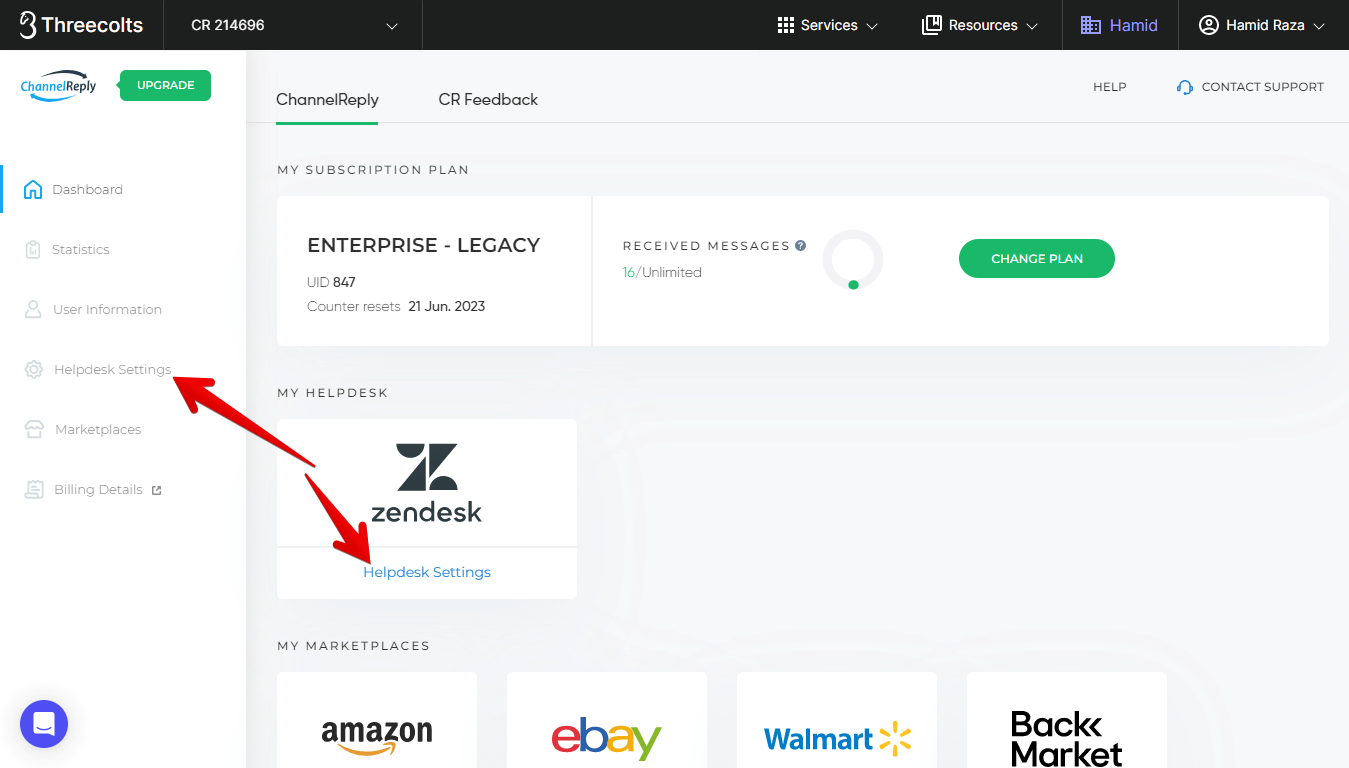
Log in to ChannelReply via Threecolts. Then click “Helpdesk Settings” on the dashboard or in the left-hand sidebar.
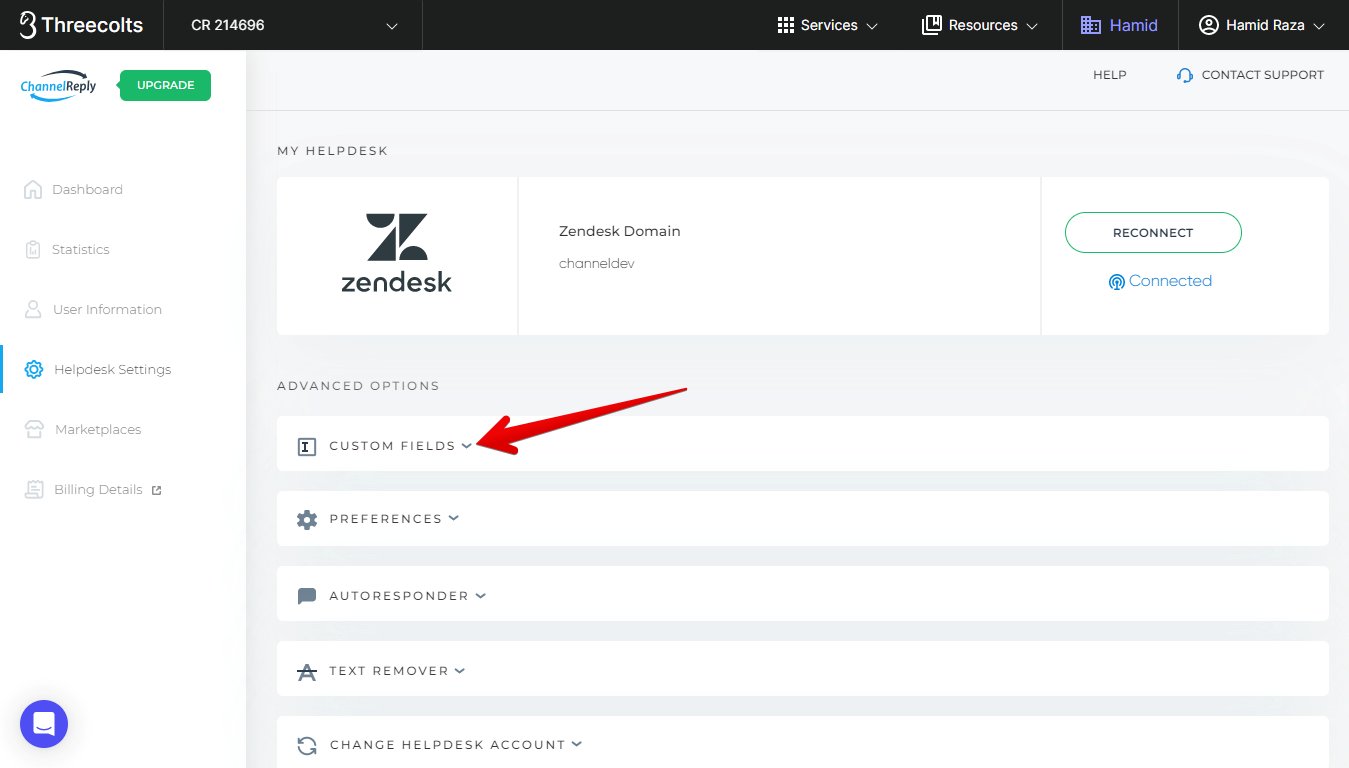
Click “CUSTOM FIELDS.”
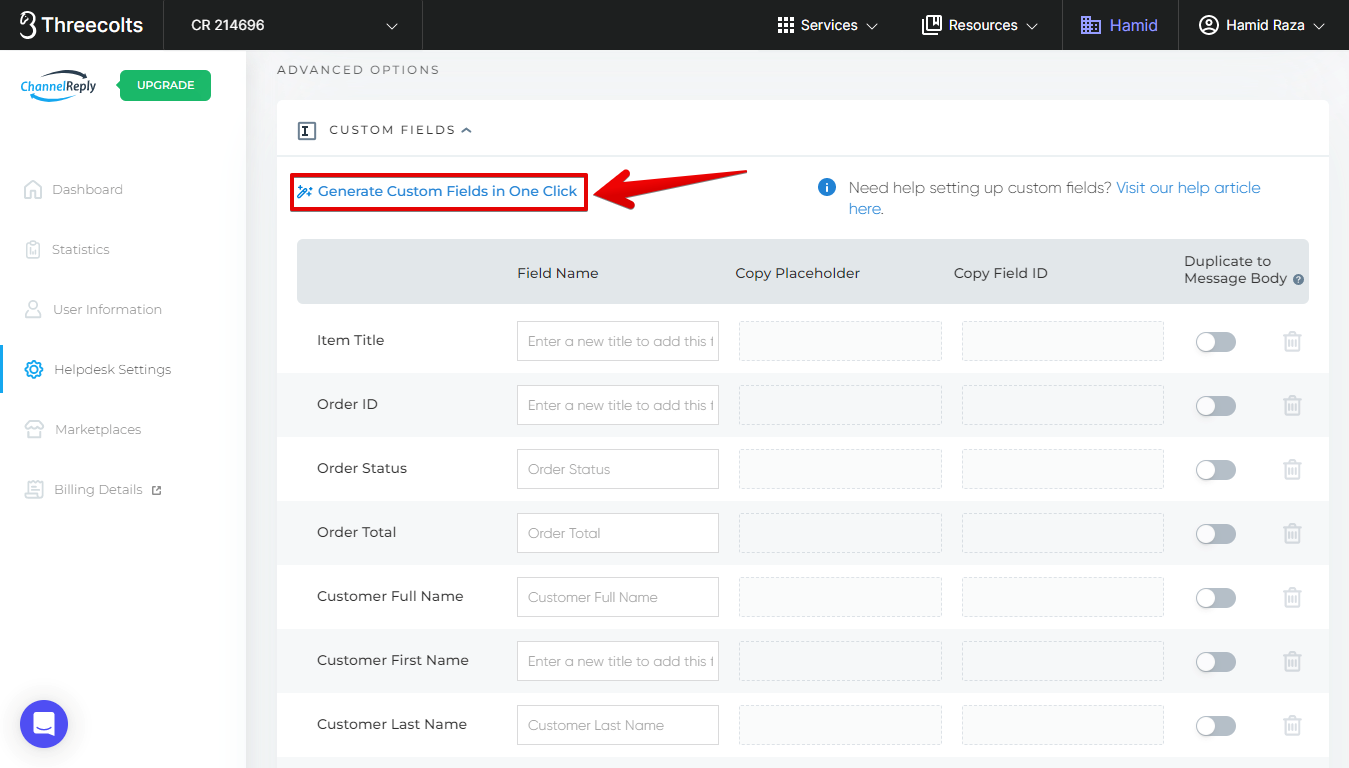
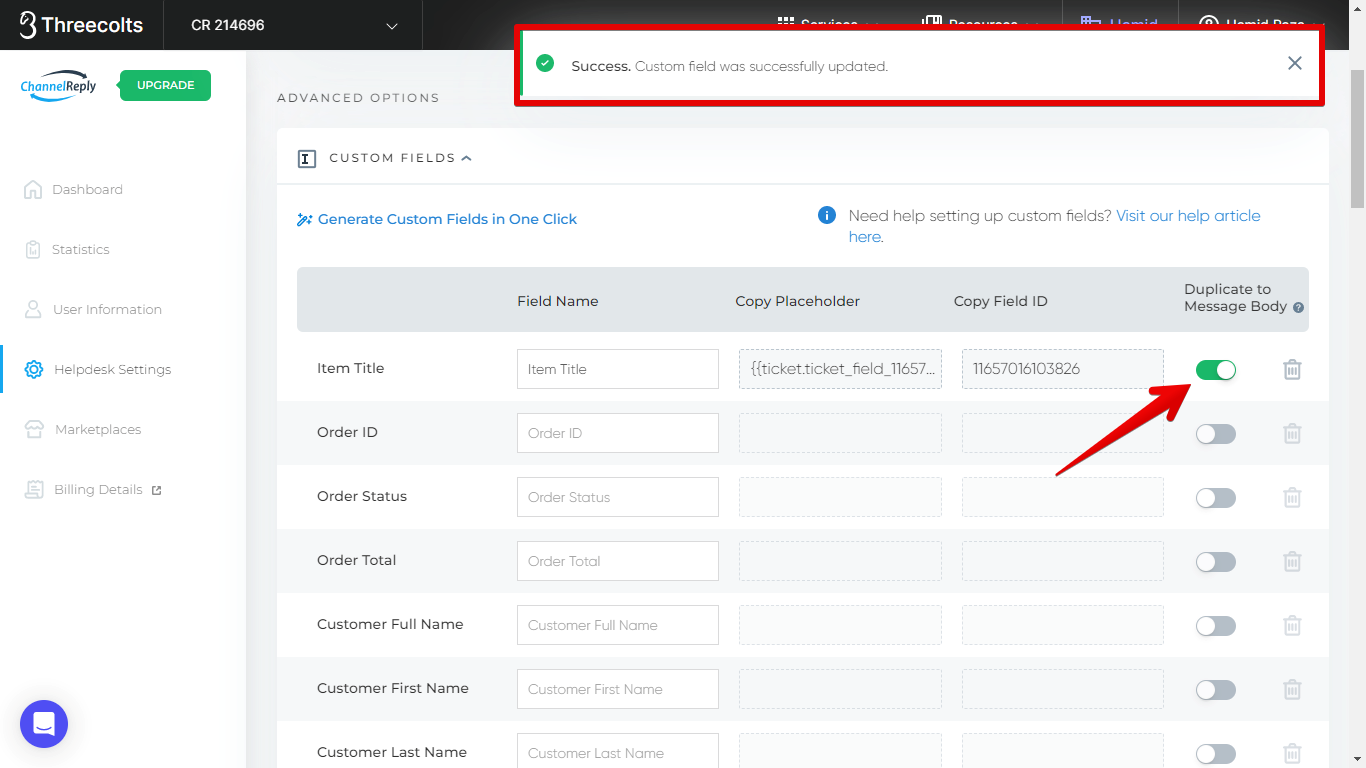
Hit “Generate Custom Fields in One Click.”
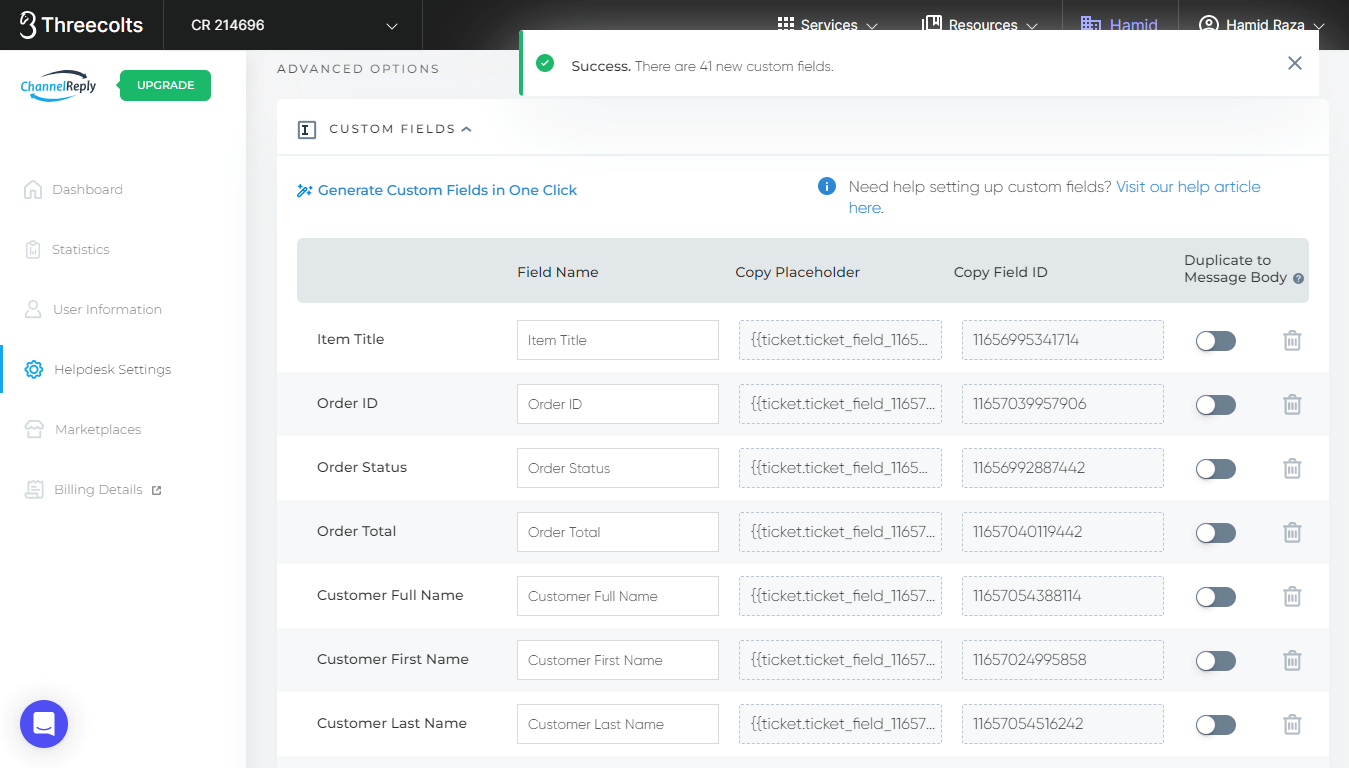
Wait for the success notification to appear in the upper right.
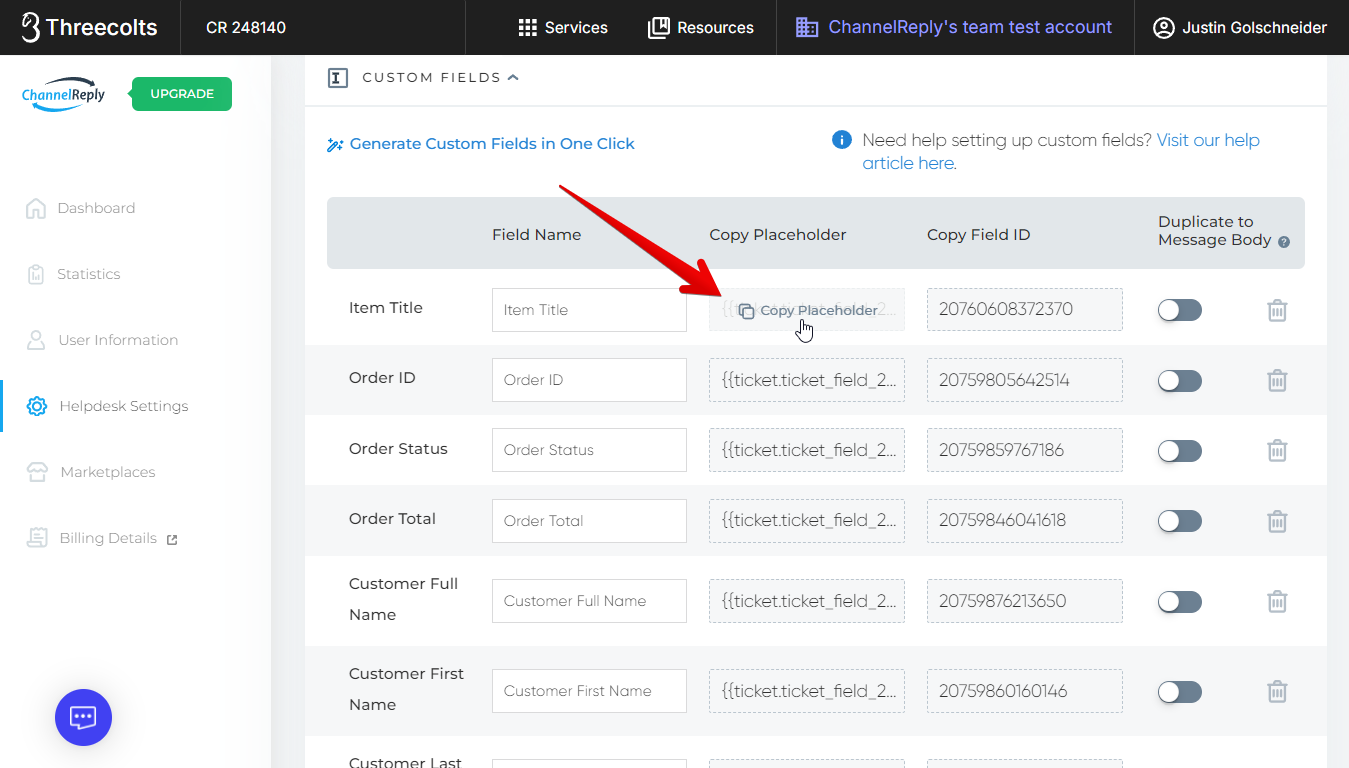
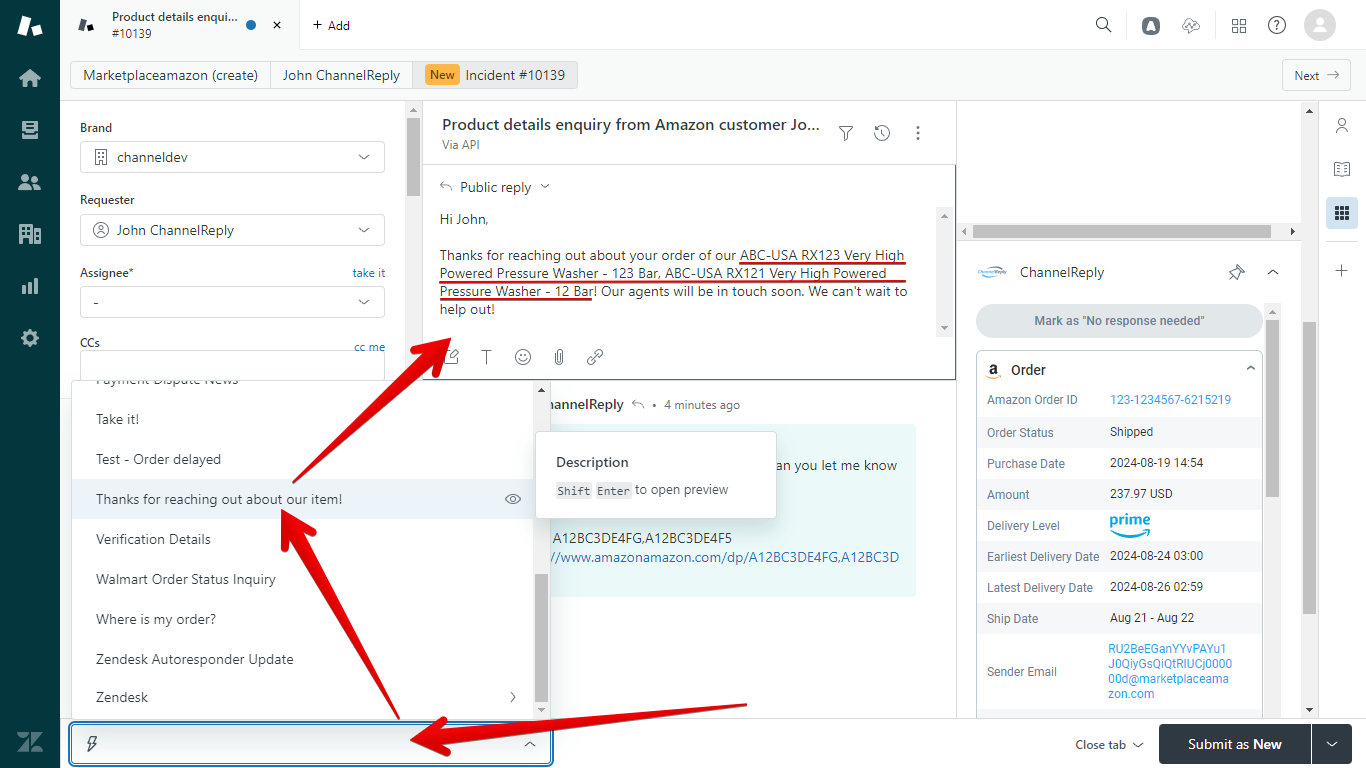
To use any custom field in a Zendesk macro, click on the "Copy Placeholder" field in the center column. This will copy it to your clipboard.
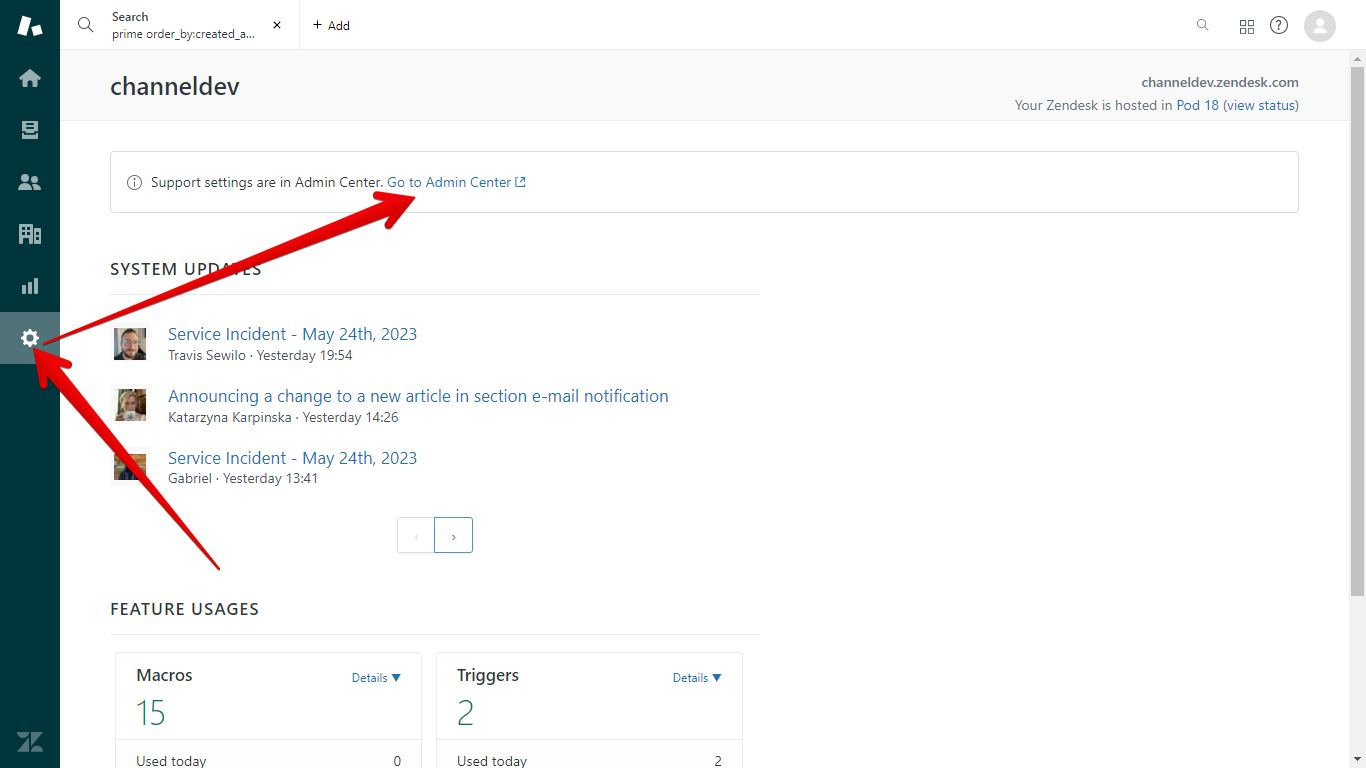
In Zendesk, go to Admin (the gear icon on the left). Click "Go to Admin Center."
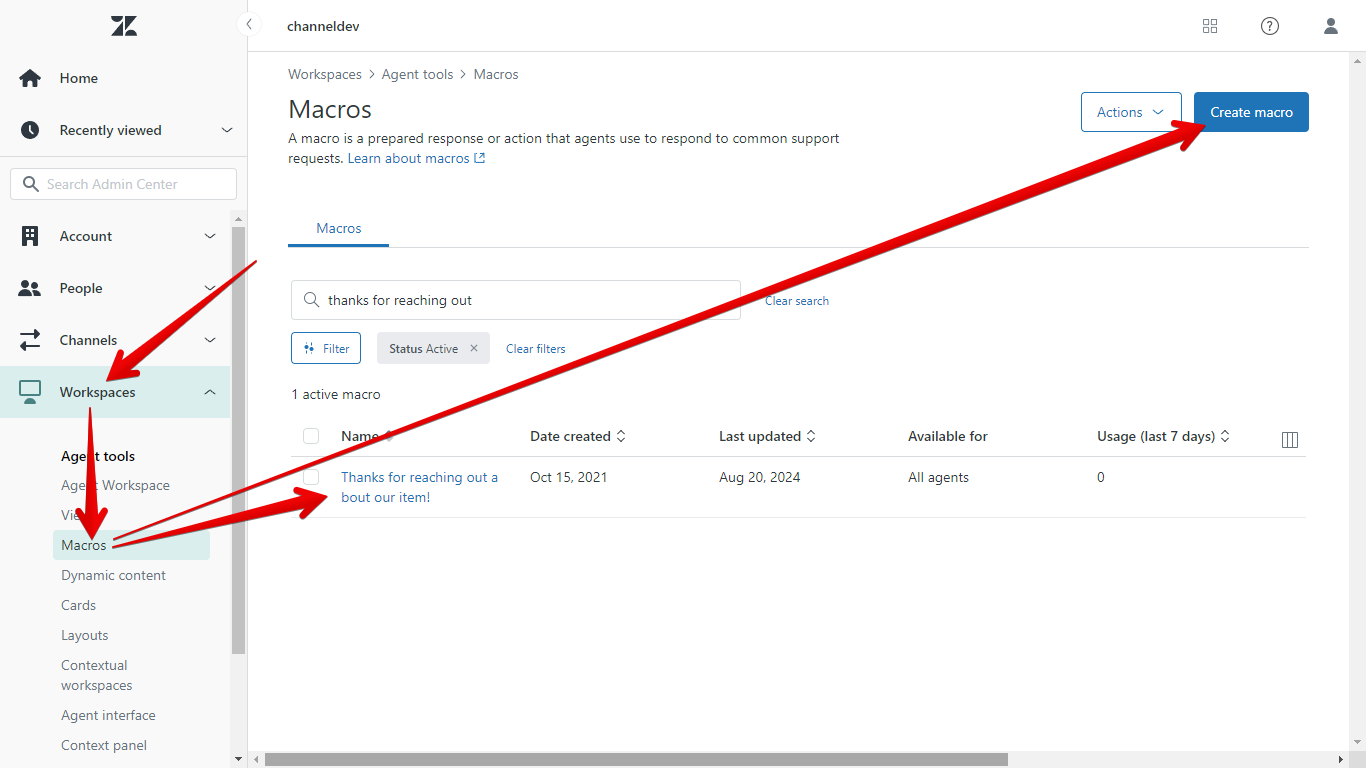
Your Admin Center will open in a new tab. Open Workspaces and select Macros. Click on any macro to edit it, or hit "Create macro" to start a new one.
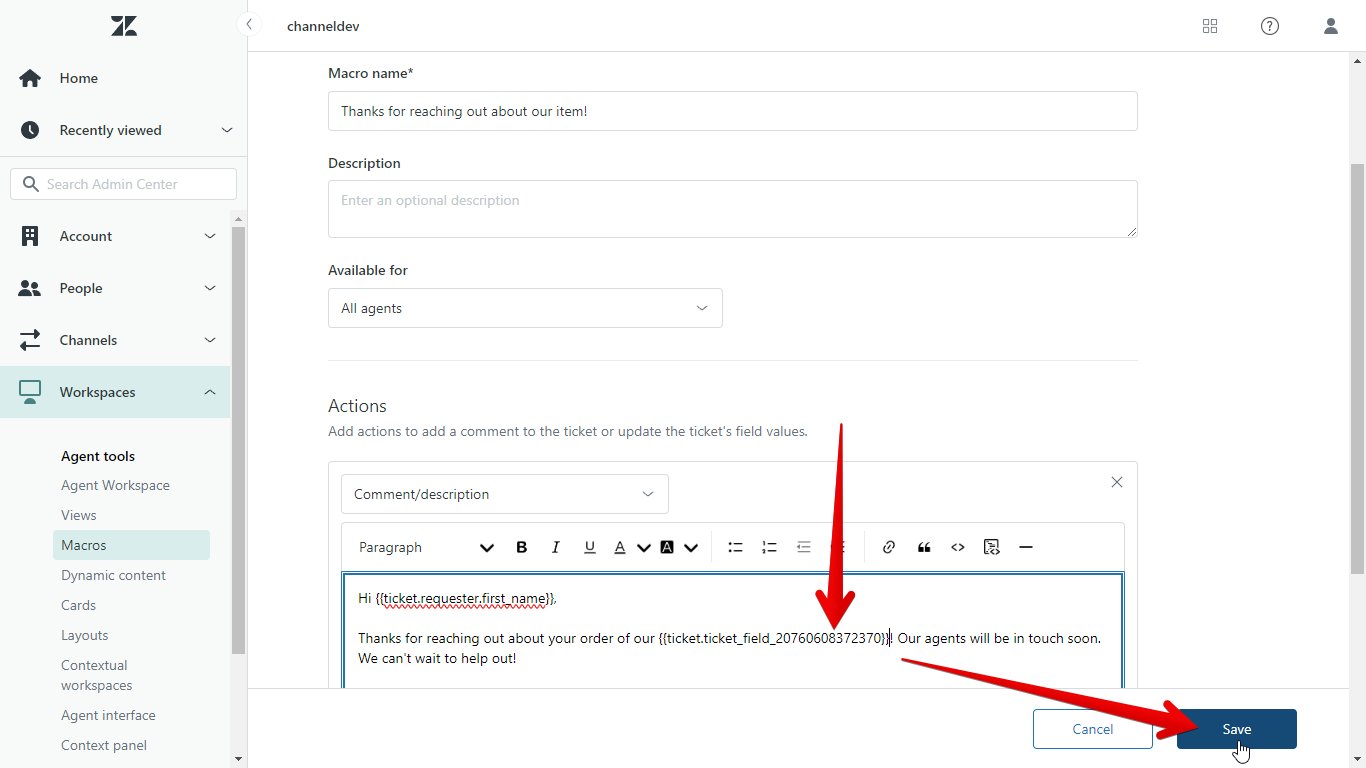
Paste the placeholder into your macro wherever you'd like the custom field to appear. You can also add as many other placeholders as you'd like. Once done, be sure to save your changes.
Open a ChannelReply ticket and use your macro. As long as ChannelReply was able to find data for the field you used, the placeholder will be replaced by info from the customer's order.
To keep learning about using custom fields in Zendesk, skip ahead to "Where Custom Fields Appear in Zendesk." Alternatively, check out “Custom Fields FAQ and Definitions” to learn more about each specific field.
In-Depth Guide
What Are Custom Fields For?
Custom fields allow you to transfer small bits of info from one program to another. With ChannelReply, they pull info from your marketplace accounts into Zendesk. This lets you use them in tools like search, macros, triggers, and autoresponders.
How to Set Up Zendesk Custom Fields in ChannelReply
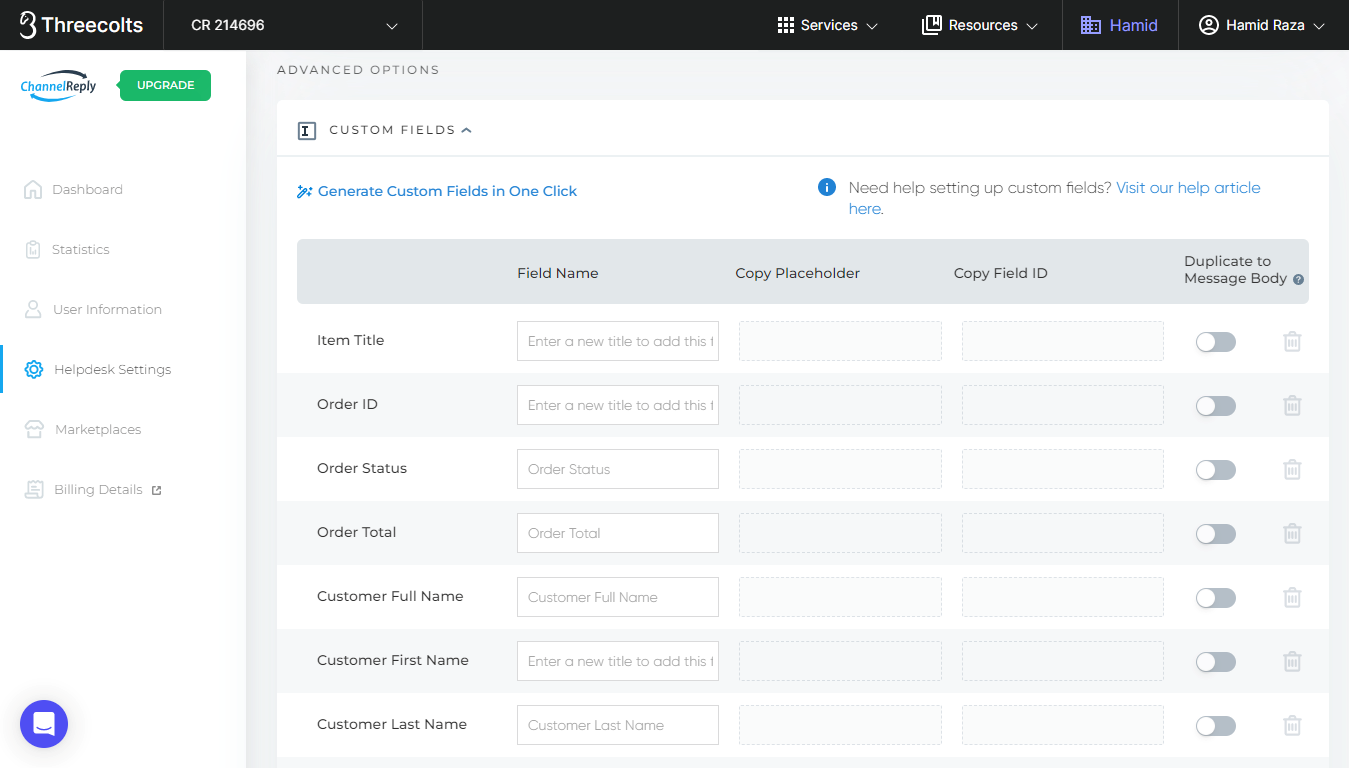
Log in to ChannelReply via Threecolts. Then click “Helpdesk Settings” on the dashboard or in the left-hand sidebar.
Click “CUSTOM FIELDS.”
This will show you your custom fields for Amazon, eBay, Back Market, Newegg, Shopify, Etsy, Walmart and WooCommerce. You can generate, edit, and manage them from here.
To instantly generate all custom fields possible, just hit “Generate Custom Fields in One Click.” This will fill in the default titles for all custom fields and create them in Zendesk.
These fields are automatically saved.
If you decided to generate everything in one click, you can skip down to "Where Custom Fields Appear in Zendesk."
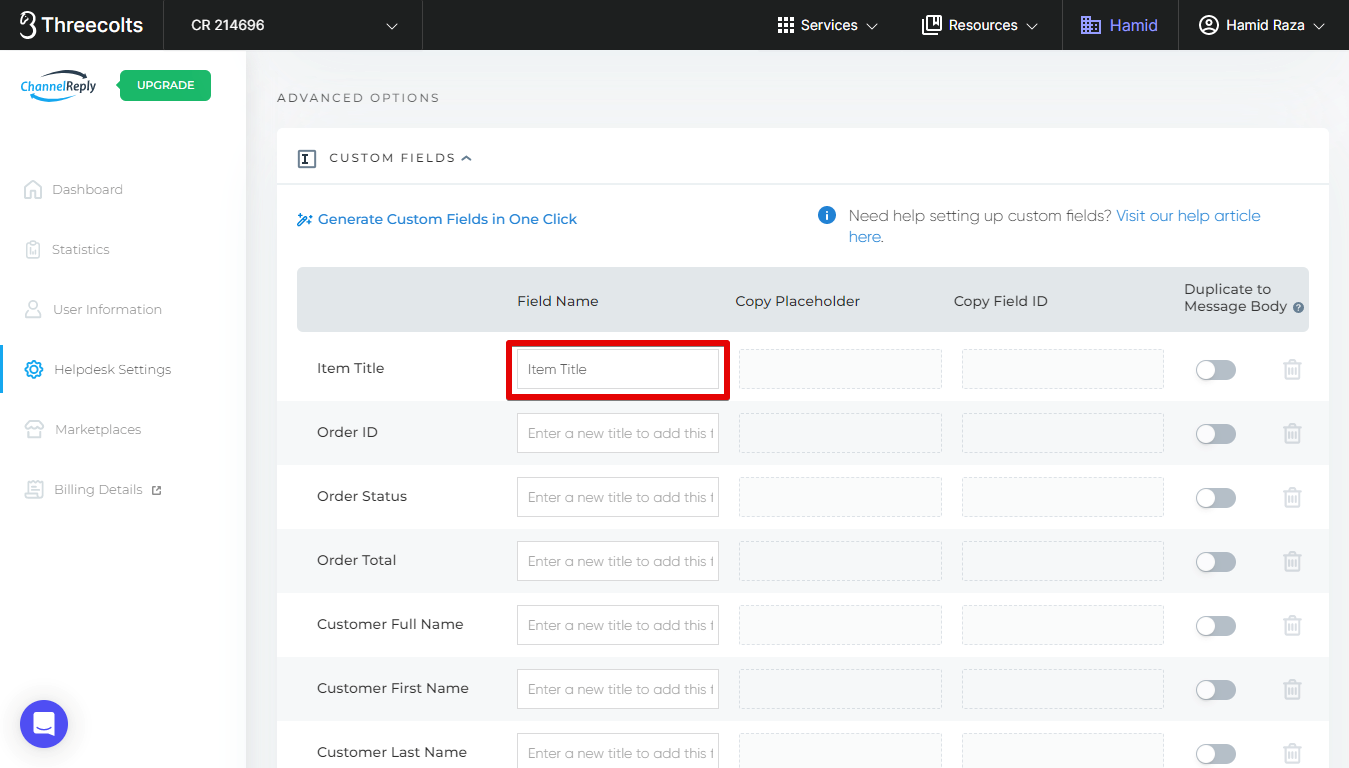
If you only want the custom fields you actually need, you can create them one at a time. To create a custom field, just enter a title.
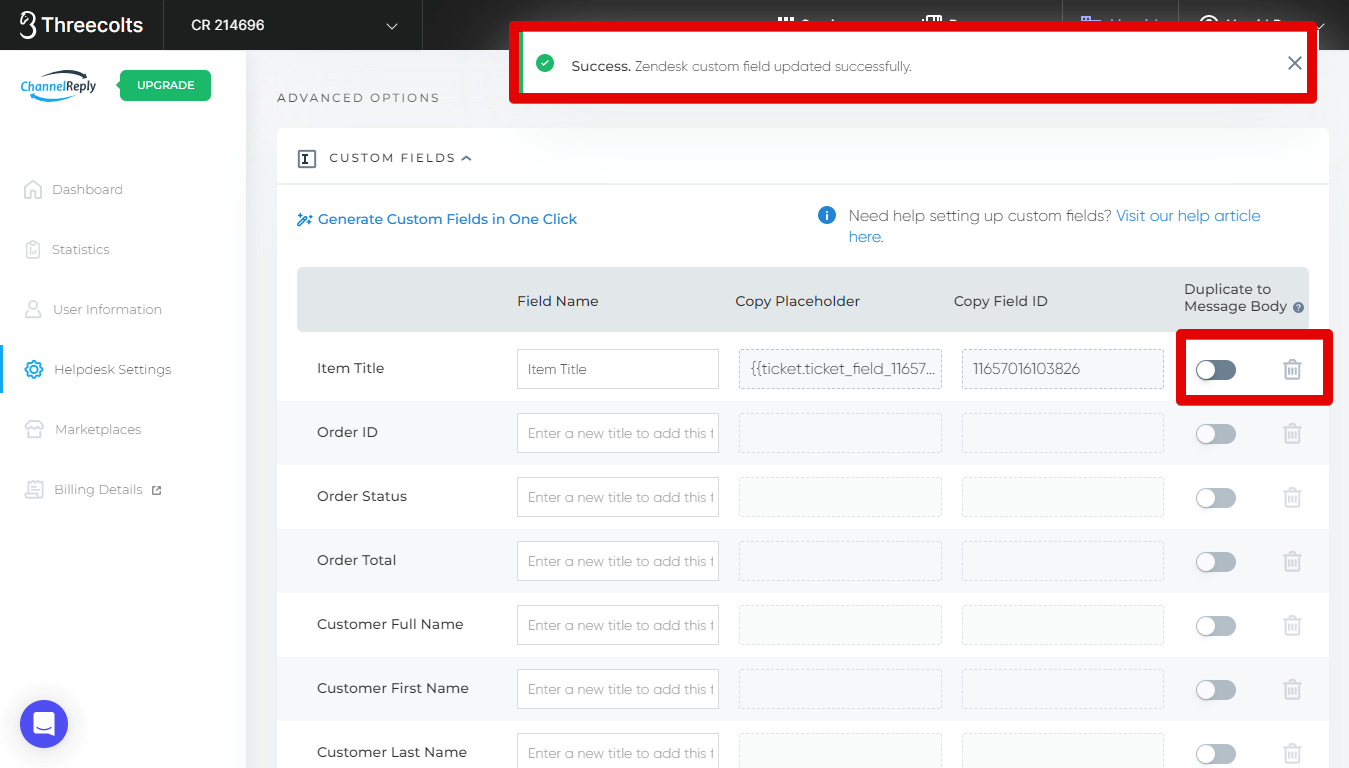
Press "Enter" or click anywhere outside the box to save your custom field. You’ll see a success notification, and the Copy Placeholder and Copy Placeholder ID fields will populate. The Duplicate to Message Body slider and Delete icon will also darken and become clickable.
Repeat this for each custom field you wish to add.
If you aren’t sure whether a particular custom field will be useful for you, be sure to see “Custom Fields FAQ and Definitions” to learn more about it.
Before we explain the “Duplicate to Message Body” setting, it’s best to understand…
Where Custom Fields Appear in Zendesk
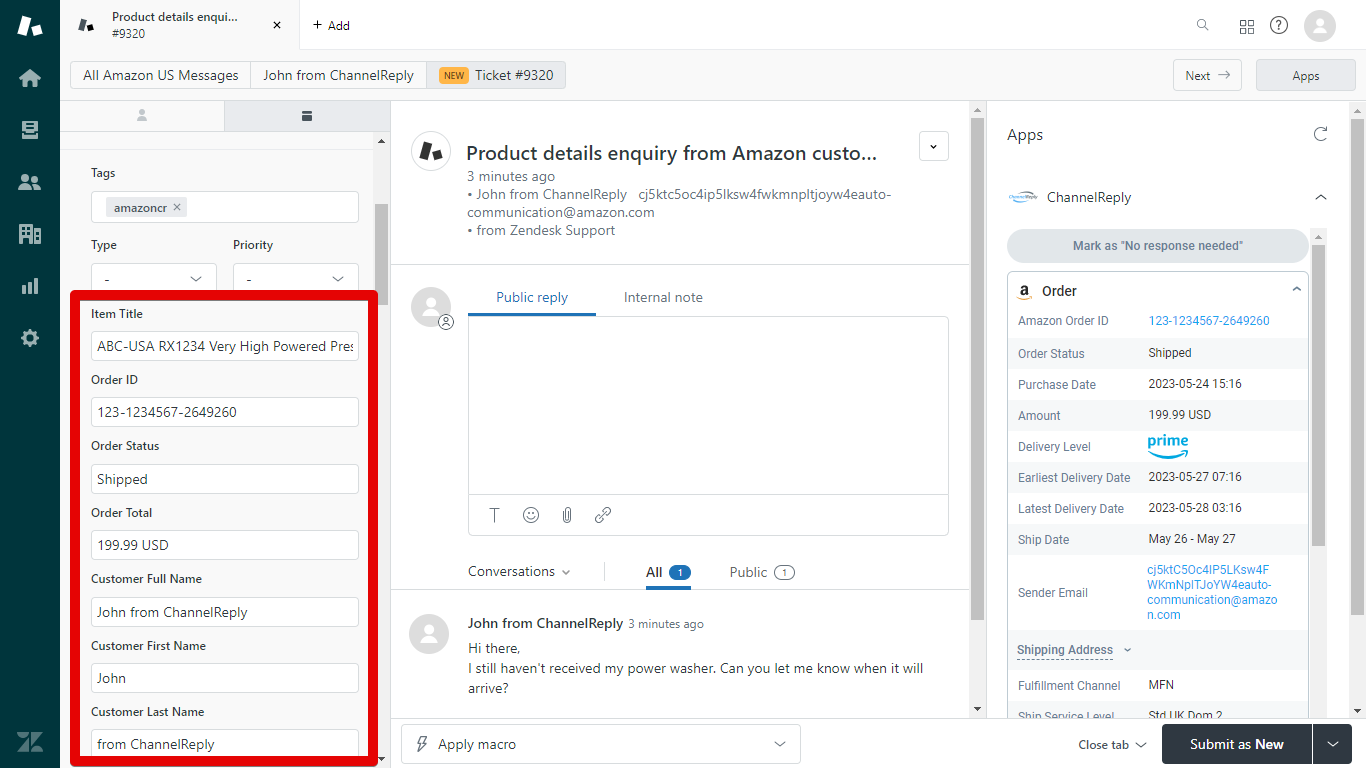
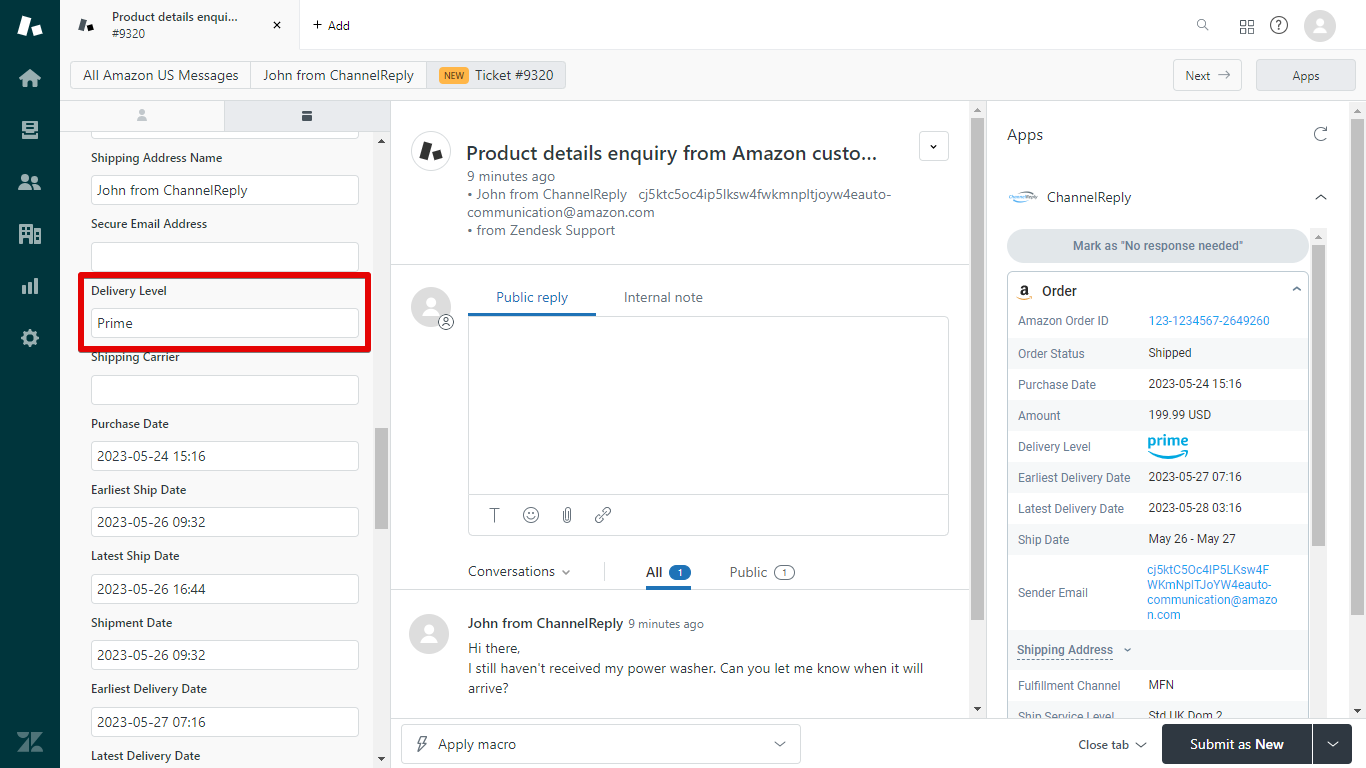
By default, custom fields will appear in the left-hand Zendesk sidebar.
Your ChannelReply custom fields will update every time you open a ticket and allow the ChannelReply app to finish loading on the right.
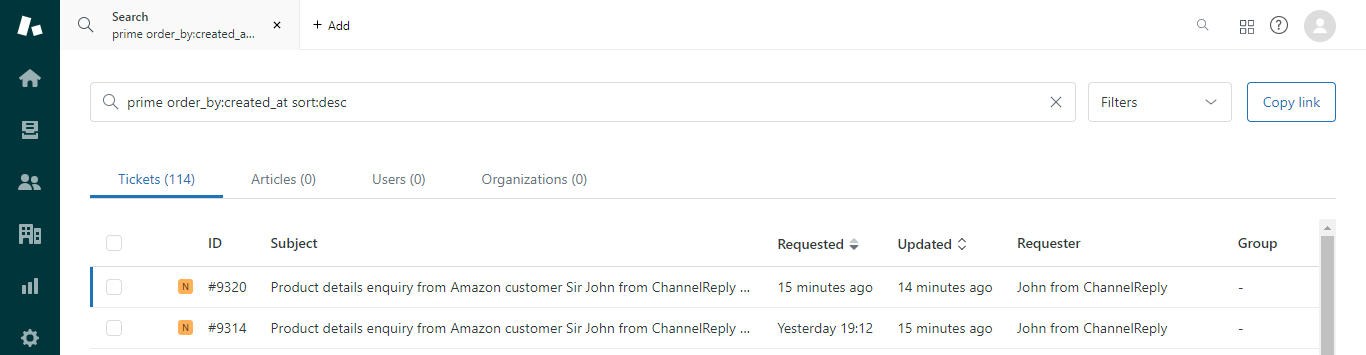
Unlike data in the ChannelReply app, custom field data in the left-hand sidebar can be found with Zendesk searches.
Now we can explain…
The “Duplicate to Message Body” Setting (Optional)
The “Duplicate to Message Body” option is useful for some advanced users. Enabling it on a field will cause that field’s contents to appear inside the first message of each ChannelReply ticket in Zendesk.
For example, say you enabled it for the Item Title field. The title of the item the customer ordered would appear in the first message of each ticket.
To enable this feature, simply click the slider to the right of the field. It will move to the right and turn green. This change will save automatically.
You can turn “Duplicate” off anytime by clicking on the slider again.
Data duplicated to the message body is searchable. Plus, unlike data in the app or the left-hand sidebar, custom field info in the message body is never updated. This feature can therefore be helpful for creating a record of data available when the ticket was created.
This can also be a useful feature if you need custom field data but don’t like to have your interface cluttered with sidebars.
How to Use ChannelReply Custom Fields as Zendesk Autoresponder & Macro Placeholders
Log in to your Zendesk account, then click "Admin" (the gear icon on the left). Click "Go to Admin Center."
Admin Center will open in a new tab.
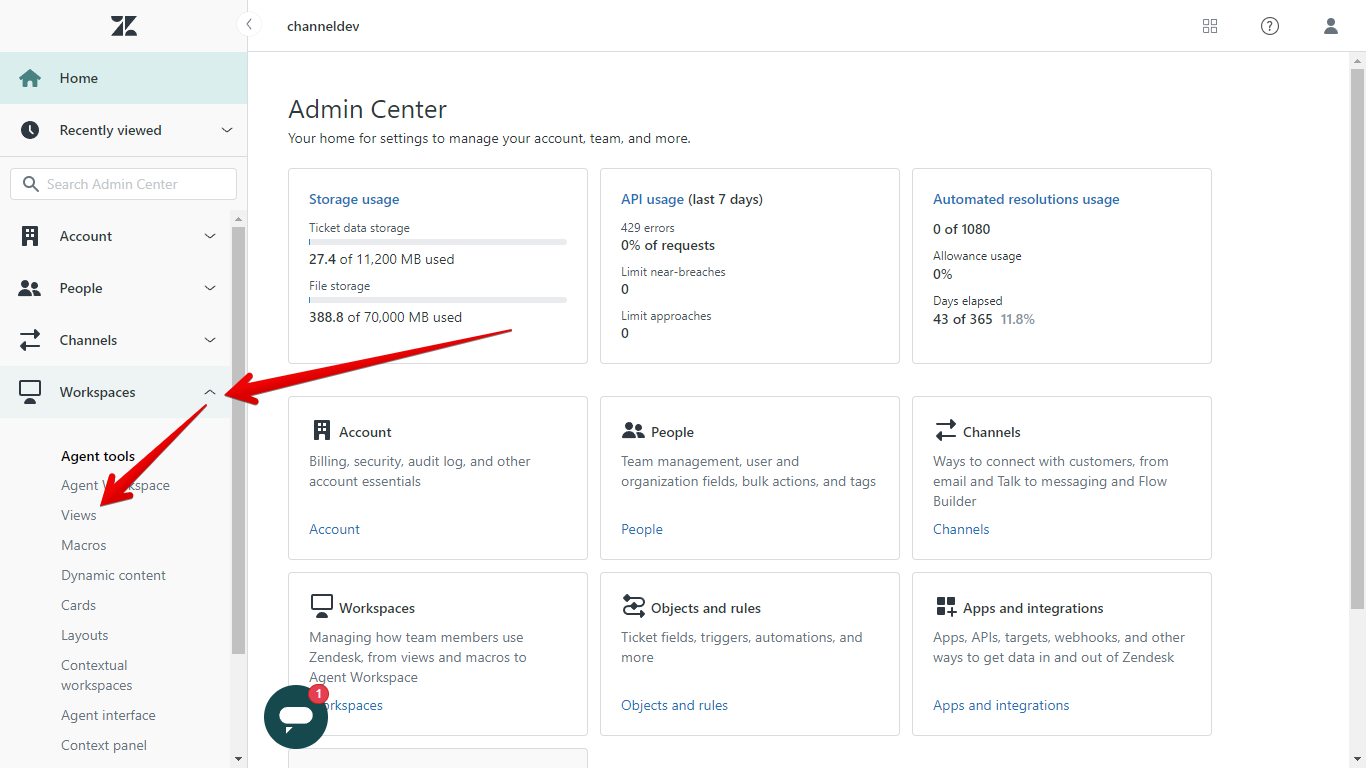
Next, go to your macro or autoresponder. If you're working with macros, you can find yours in Admin Center by going to Workspaces > Macros. Either create a new macro or edit an existing one.
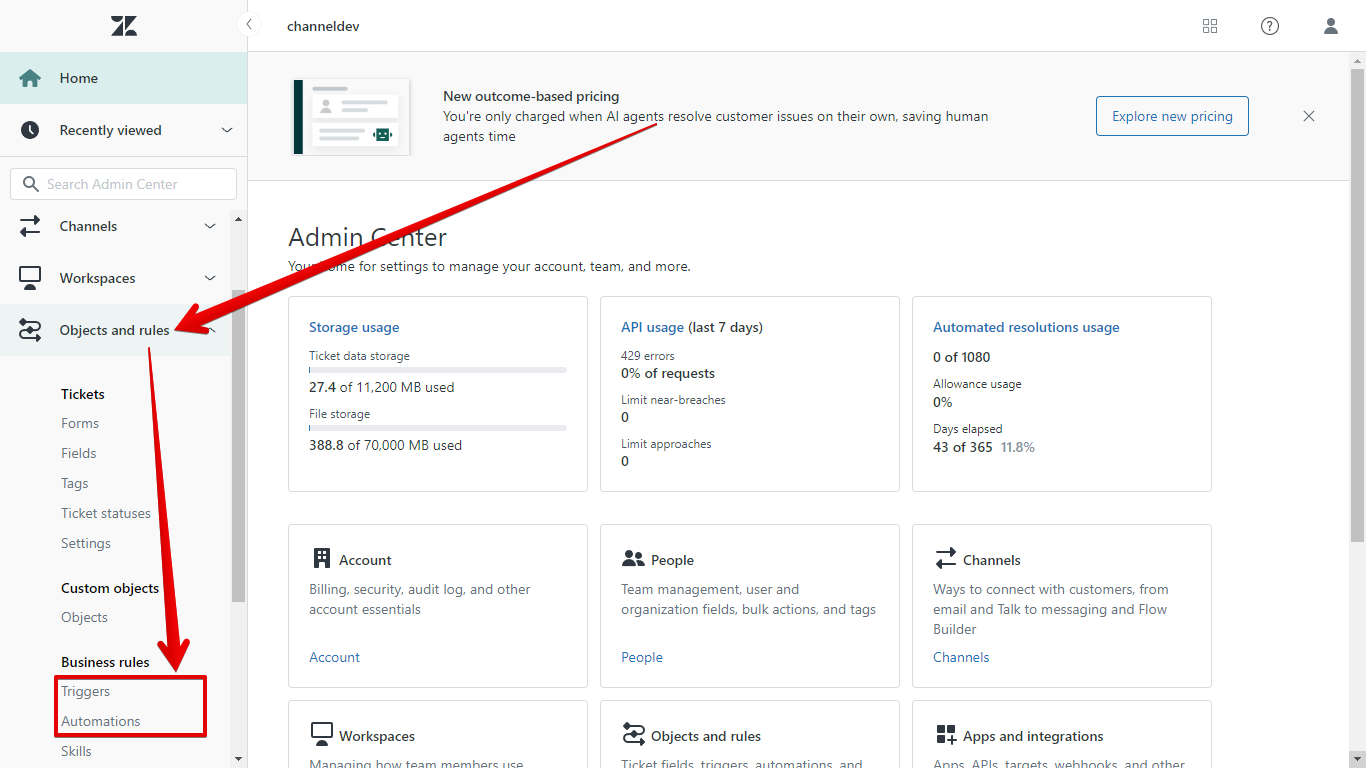
If you're working on an ecommerce autoresponder for Zendesk, go to Objects and rules > Triggers (or Automations, if you decided to build your autoresponder there).
Back on your ChannelReply Helpdesk Settings screen, find the custom field you want to use as a placeholder. Mouse over the field in the middle column on its right and "Copy Placeholder" will appear, along with a copy icon. Click to copy the placeholder to your clipboard.
Return to Zendesk and paste the placeholder anywhere you want it in your macro or autoreply. Be sure to save the changes to your message.
Note that it's OK to have punctuation or other text before or after a placeholder. It will still populate correctly.
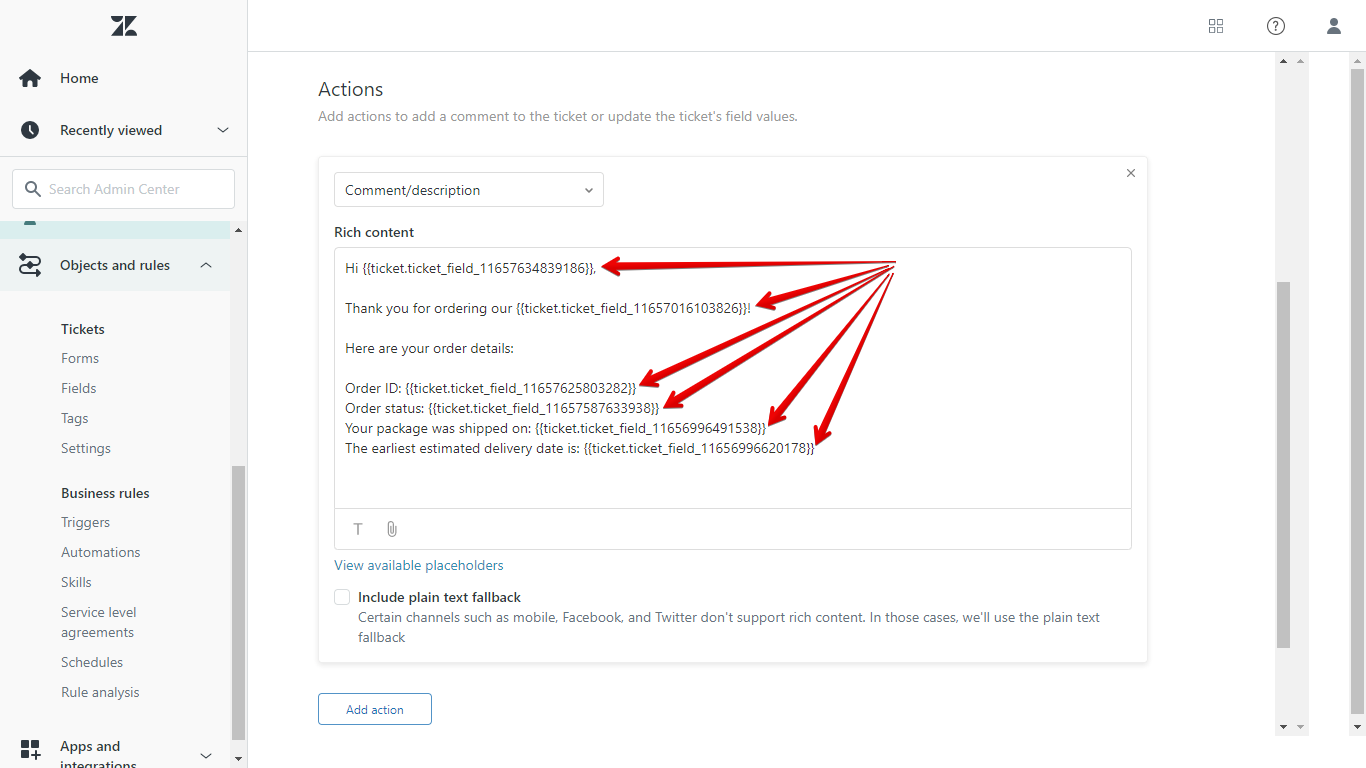
The next time you use your macro or your autoresponder fires, Zendesk will enter the data from ChannelReply in place of the placeholder. Here's an example with the macro shown above:
Let’s say you wanted to feature the name of the shipping carrier in one of your macros. Here’s a step-by-step breakdown of the process:
- In ChannelReply, go to Helpdesk Settings > Custom Fields.
- Find the Shipping Carrier custom field. Mouse over the center column to its right and click "Copy Placeholder."
- In Zendesk Admin Center, go to Workspaces > Macros. Open the macro where you want to use this custom field.
- Paste the placeholder anywhere you want to display the name of the shipping carrier.
Using ChannelReply Custom Fields in Zendesk Triggers
You can use custom field placeholders in comment/reply fields in Zendesk triggers and automations. That's why they work well in autoresponders, after all!
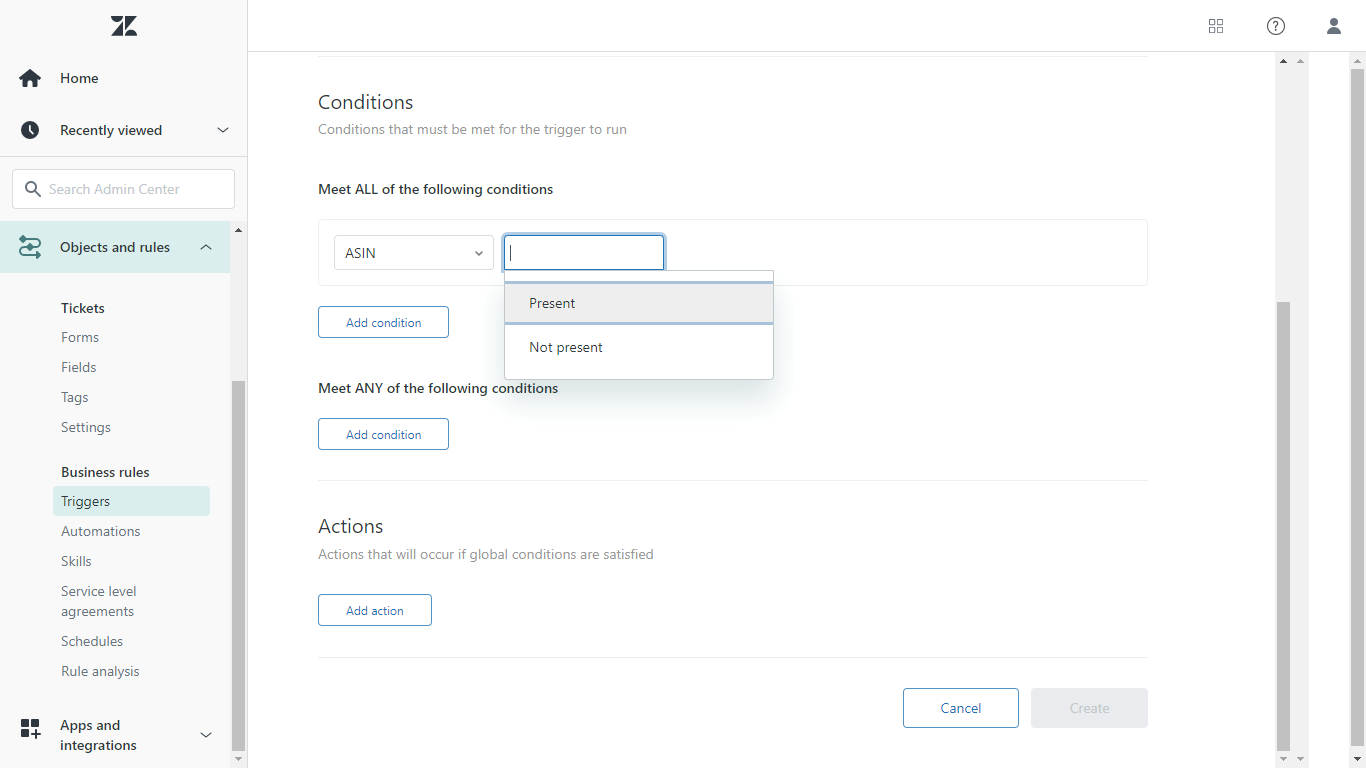
Beyond that, though, Zendesk rules are not built for custom fields. They can only detect whether a custom field is “present” or “not present.”
“Present” means data is available in that custom field. “Not present,” of course, means no data is available.
This can be useful in some situations. For example, if an eBay, Etsy or WooCommerce shopper adds a delivery note to their order, you may want to notify some of your staff. You could do this using the condition "Buyer's Note | Present” with our New Order notifications.
Zendesk rules cannot detect the actual content of custom fields. But, they can detect the content of a message. By using “Duplicate to Message Body,” you can automatically copy custom field contents into the first message of each ticket.
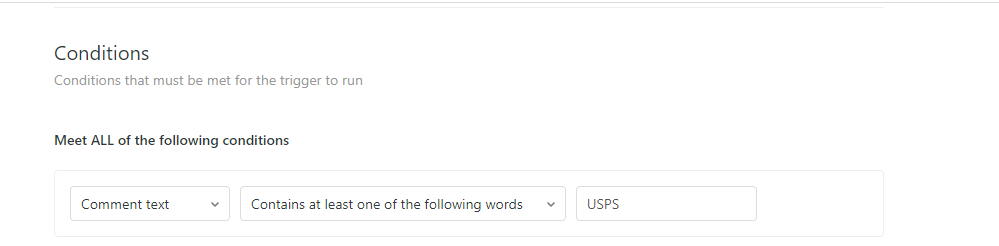
Say you wanted to create a trigger that fires whenever USPS is delivering the customer’s order. You could set “Shipping Carrier” to duplicate to message body using the slider on the right.
Then you could use the trigger condition “Comment text | Contains at least one of the following words | USPS.”
If a customer were to write to you about an order where USPS were the carrier, ChannelReply would add “USPS” to the message body. The Zendesk trigger would see it and fire.
Using Custom Fields in Zendesk Views
You can use custom fields as columns in any Zendesk view. This lets you see details like what item the ticket was about, which marketplace the message came from, and much more, all in the ticket overview. You can even sort your tickets by the contents of custom fields.
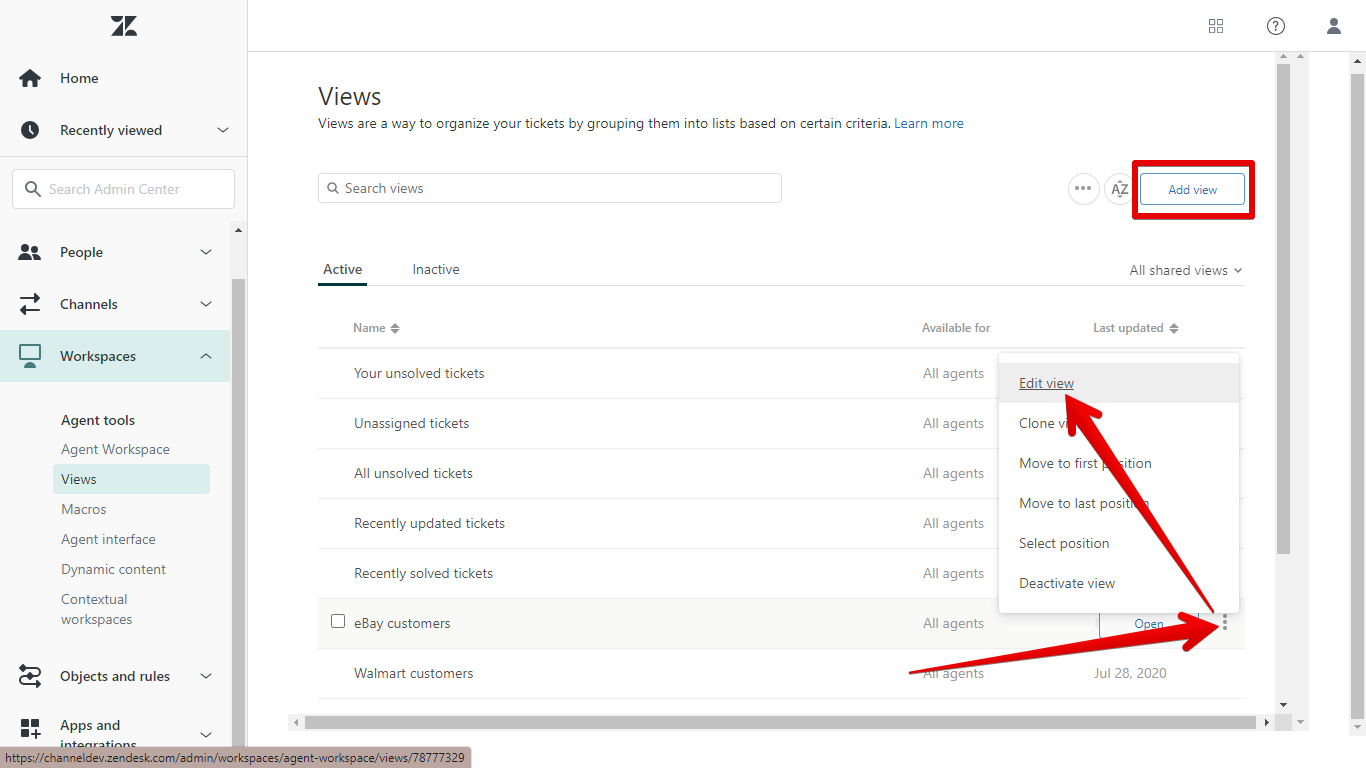
To add a custom field column to a Zendesk view, go to Admin Center > Workspaces > Views in Zendesk.
You can click "Add view" to create a new view. To edit an existing one instead, mouse over the view, then click the column of three dots that appears on the right. A menu will pop up. Click "Edit view."
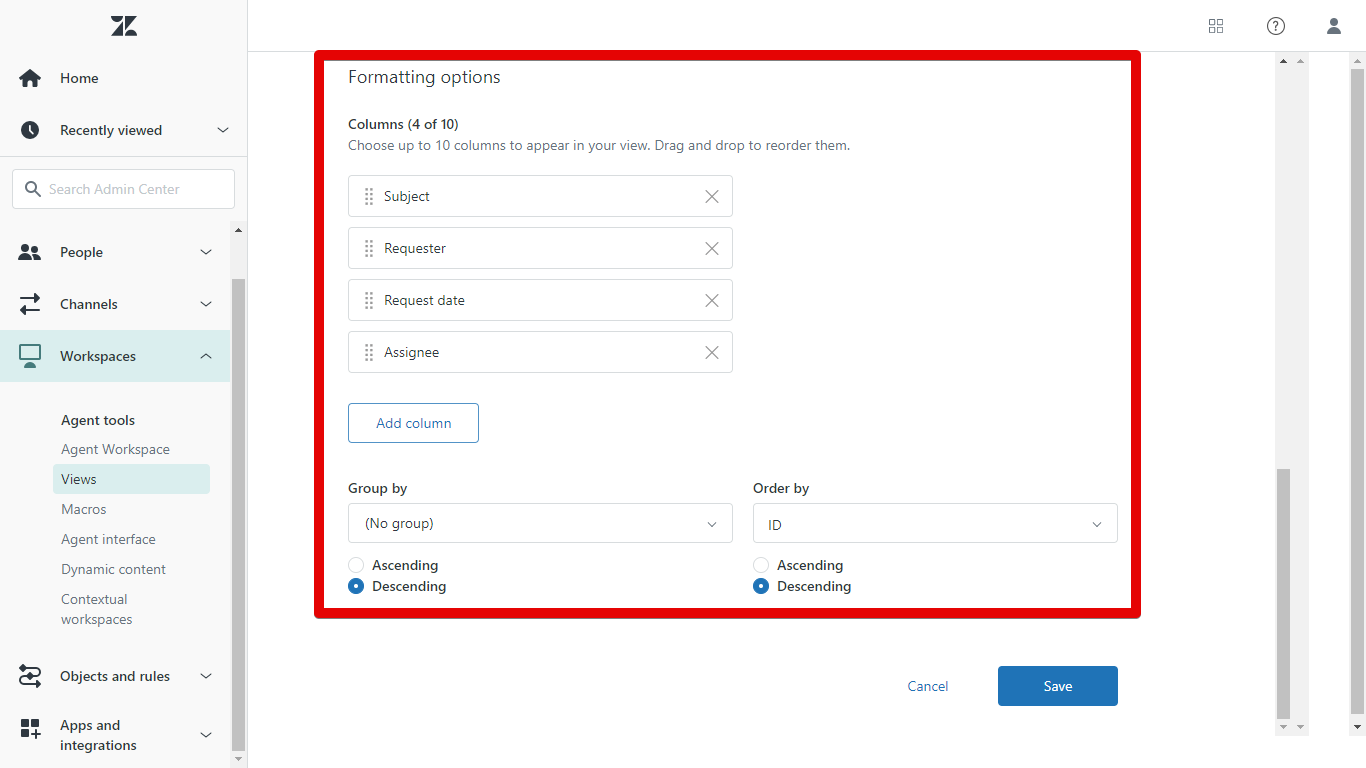
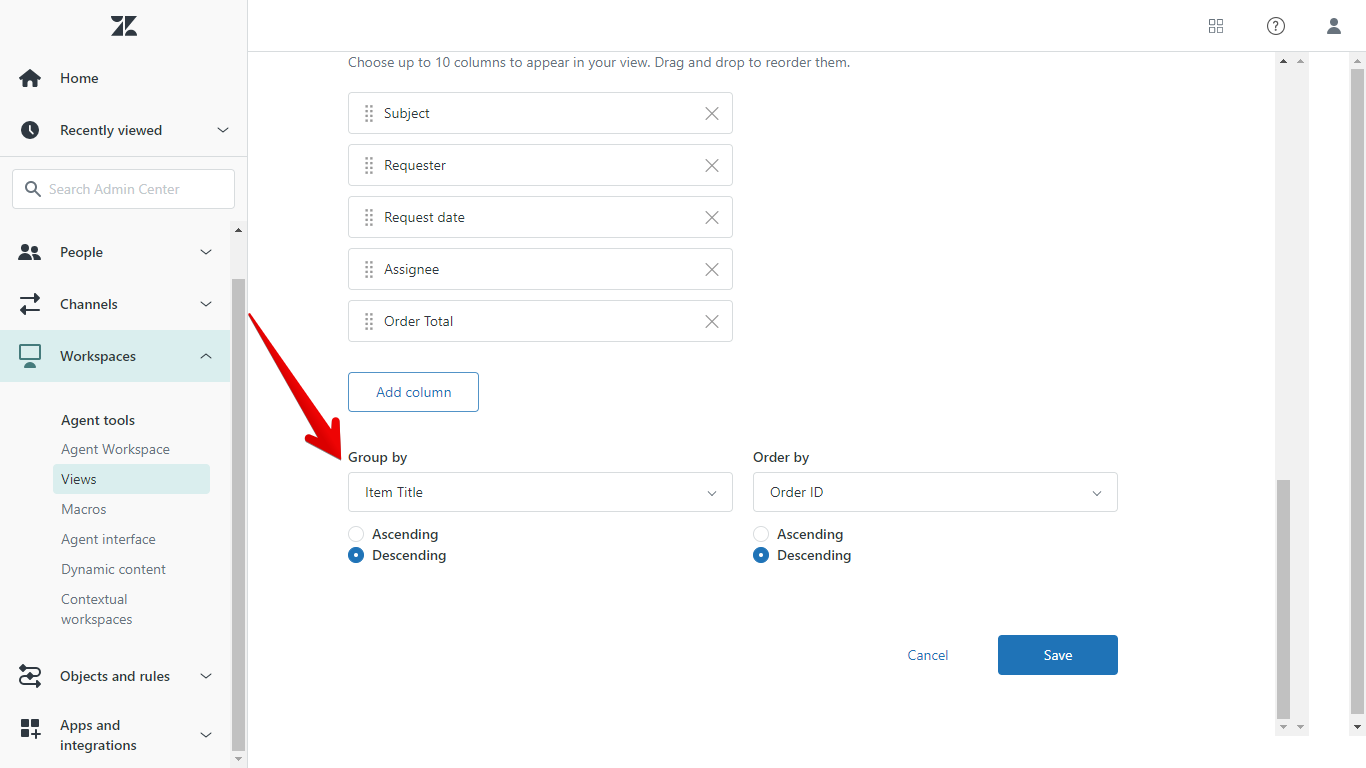
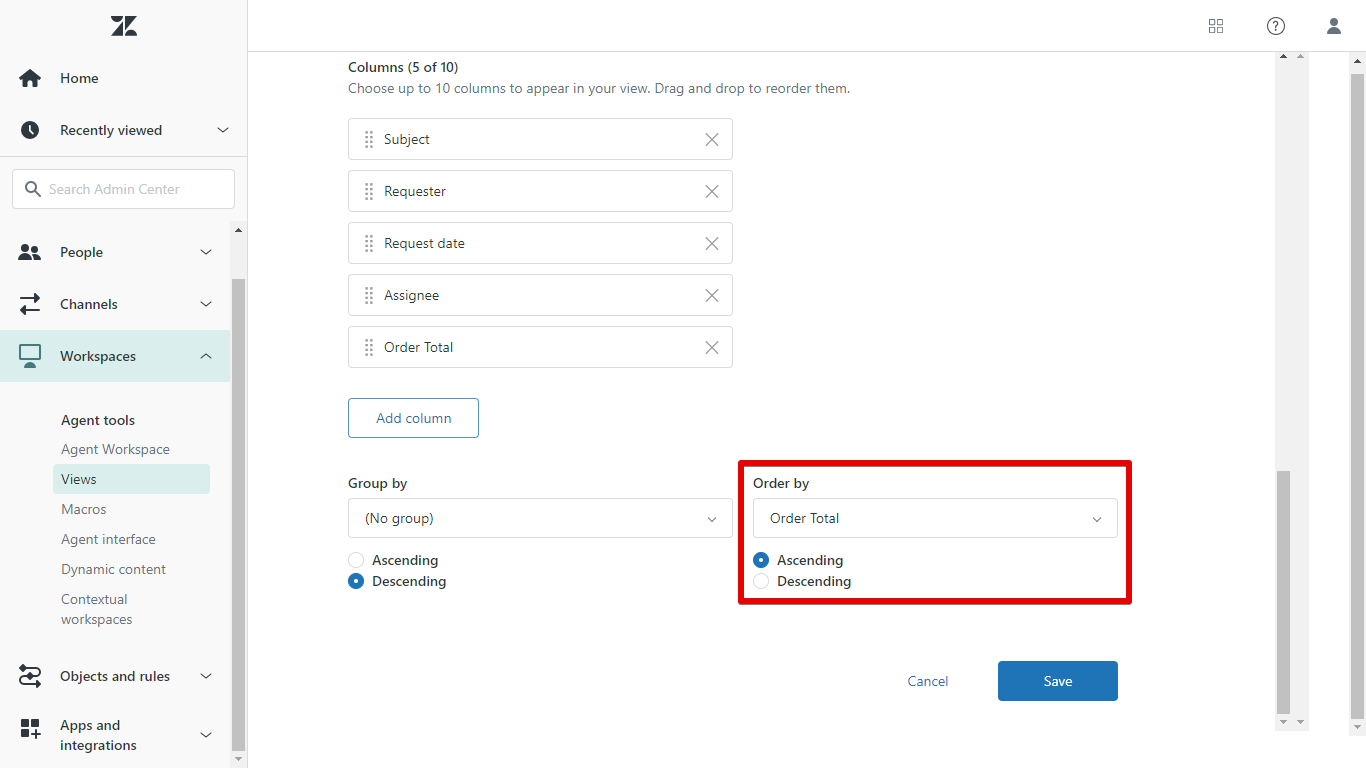
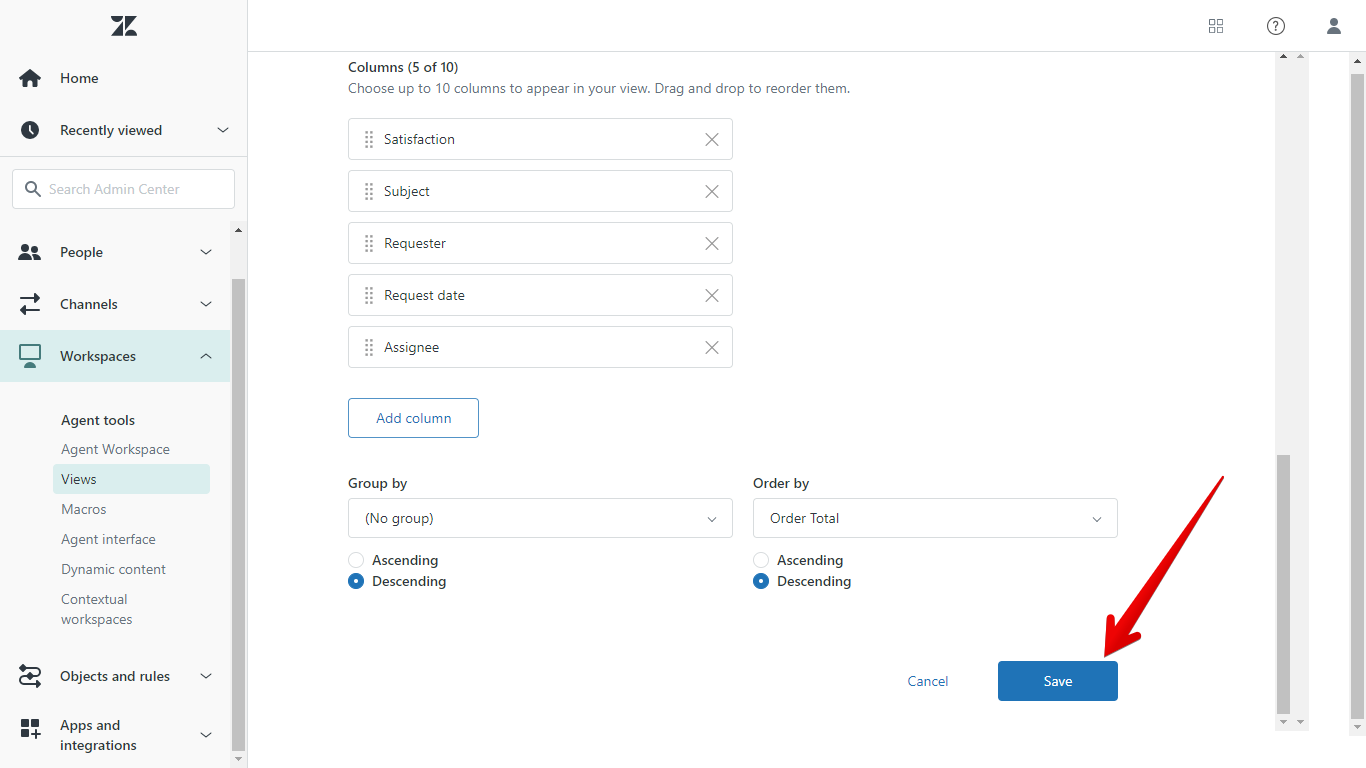
Scroll down to the "Formatting Options" section. Here you can use custom fields in all three settings: "Columns," "Group by," and "Order by."
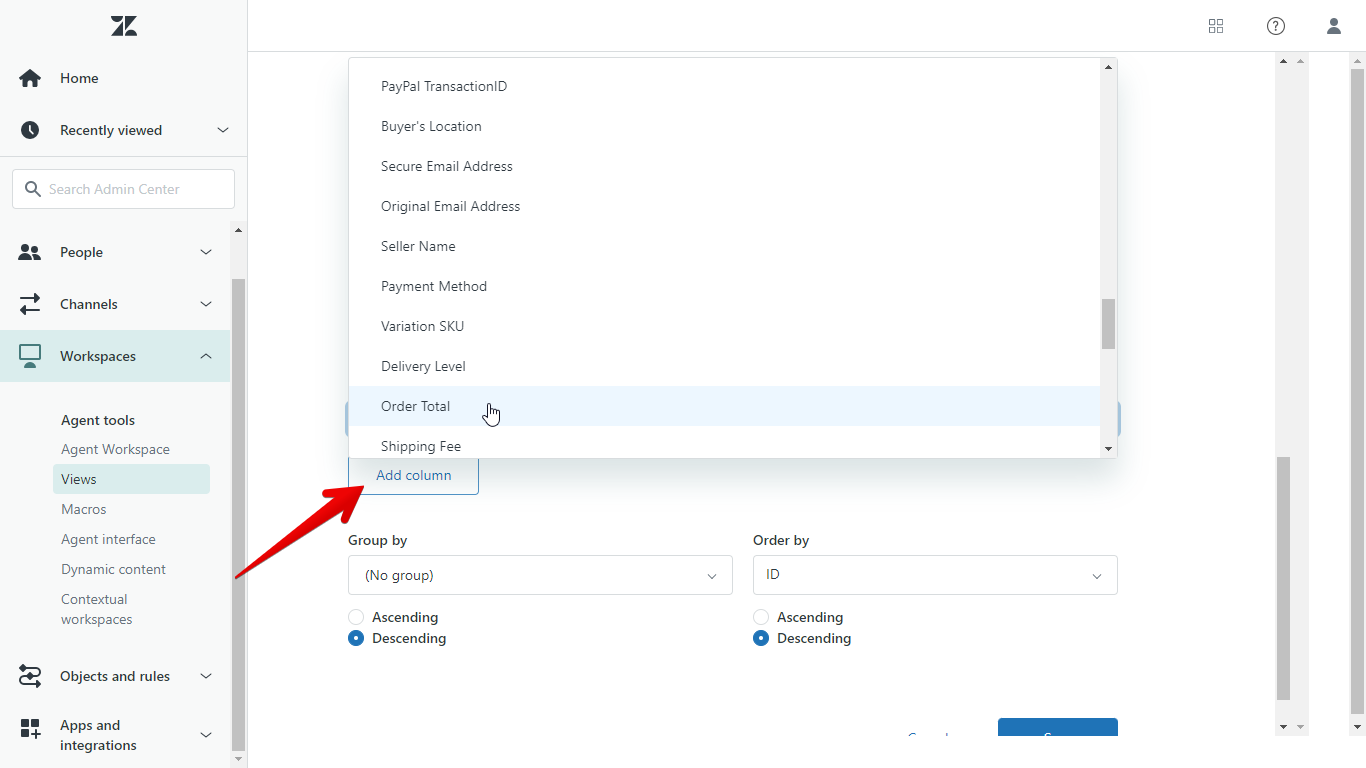
Click "Add Column" to create a column with custom fields. You'll be able to choose any of your fields from the menu that appears.
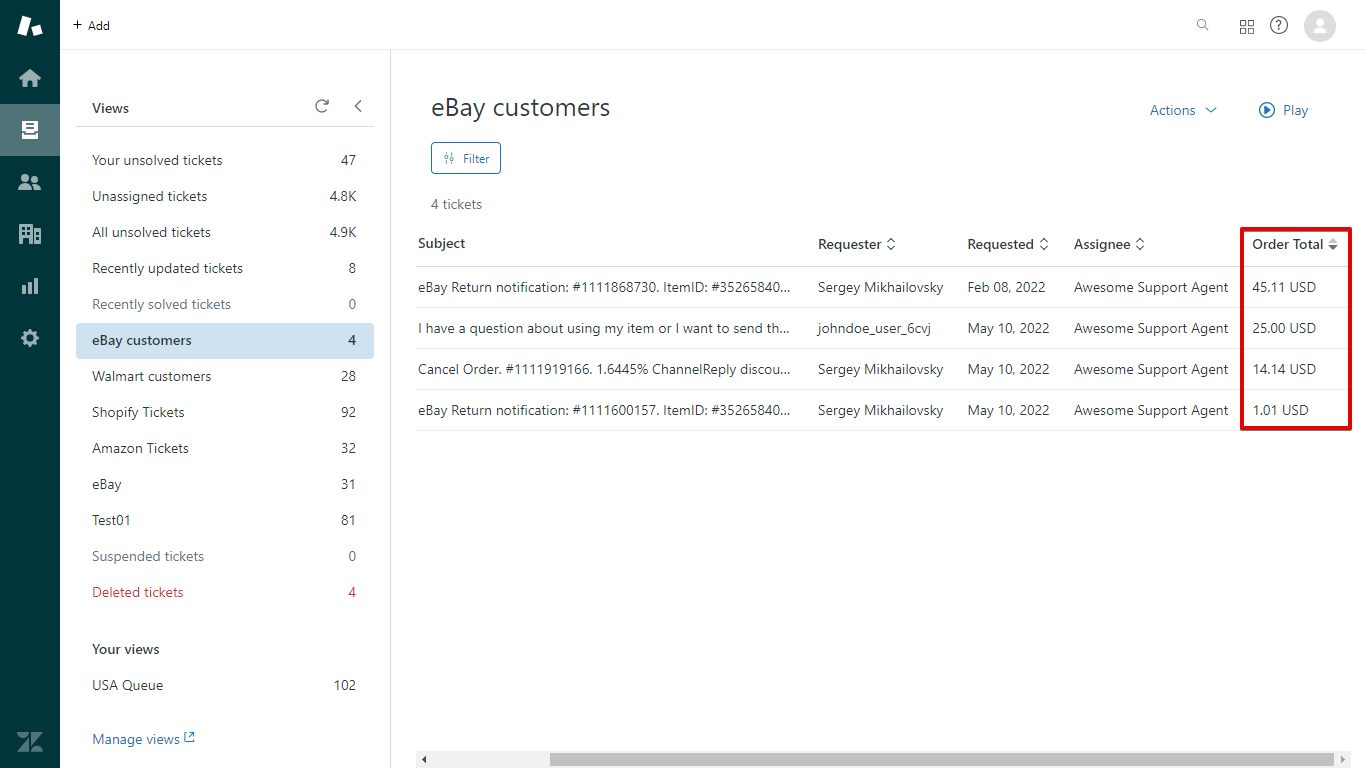
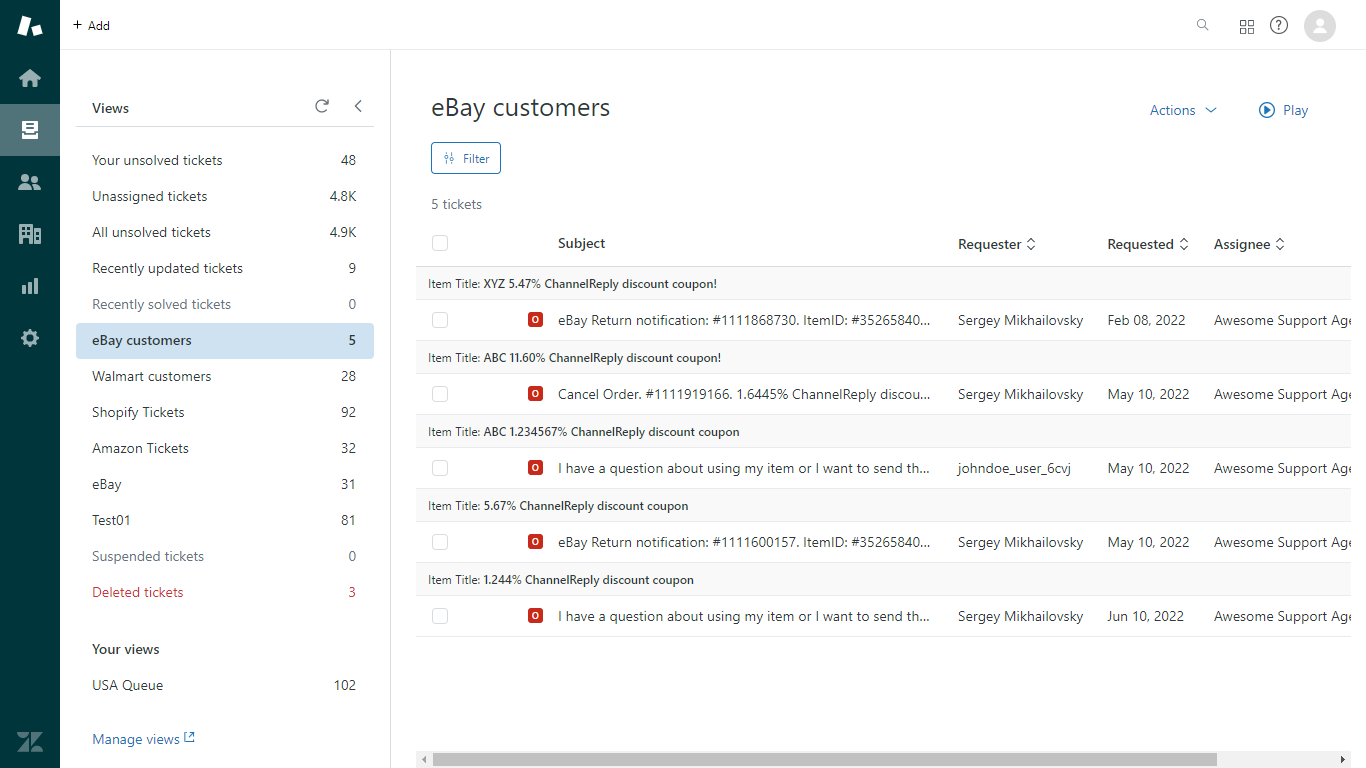
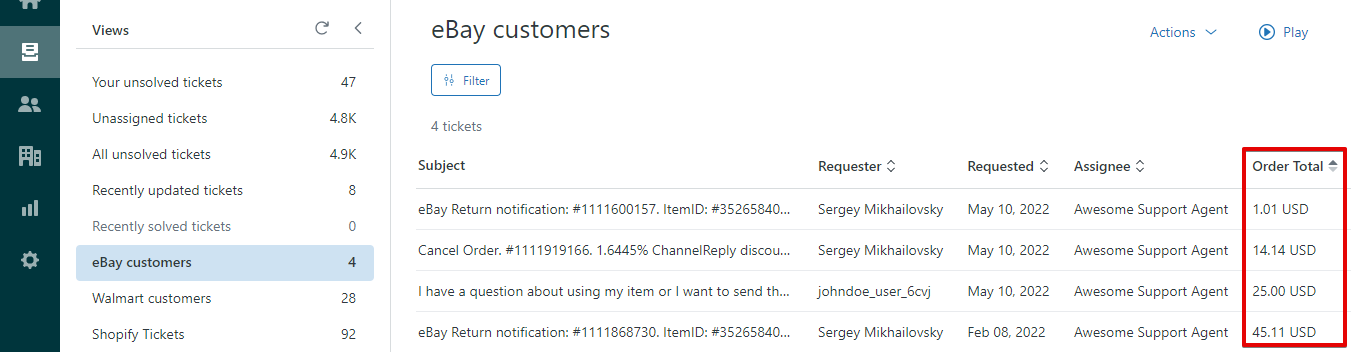
Once you've added the column and saved your changes, you'll see the field in each ticket's summary in your view. You can even use this to sort the tickets according to field contents. In the view below, we've used the Order Total custom field to sort our eBay tickets according to the value of the customer's order.
You can also divide your tickets using the "Group by" feature. For example, when we group by our Item Title custom field, it separates all tickets in the view according to which item(s) the ticket is about.
Finally, you can change the column that Zendesk uses by default to sort tickets in this view using "Order by." That way, you can always have tickets sorted by a custom field without having to click on a column header every time you open the view.
With either "Order by" or "Group by," you can set by ascending order (lowest value to highest value)...
...or by descending order (highest value to lowest value).
Whatever settings you choose for your view, remember to click "Save!"
Advanced Options & Troubleshooting
Creating Placeholders Manually in Zendesk
It's usually fastest to copy placeholders from ChannelReply. But if you don't want to leave Zendesk, here's how to create them manually.
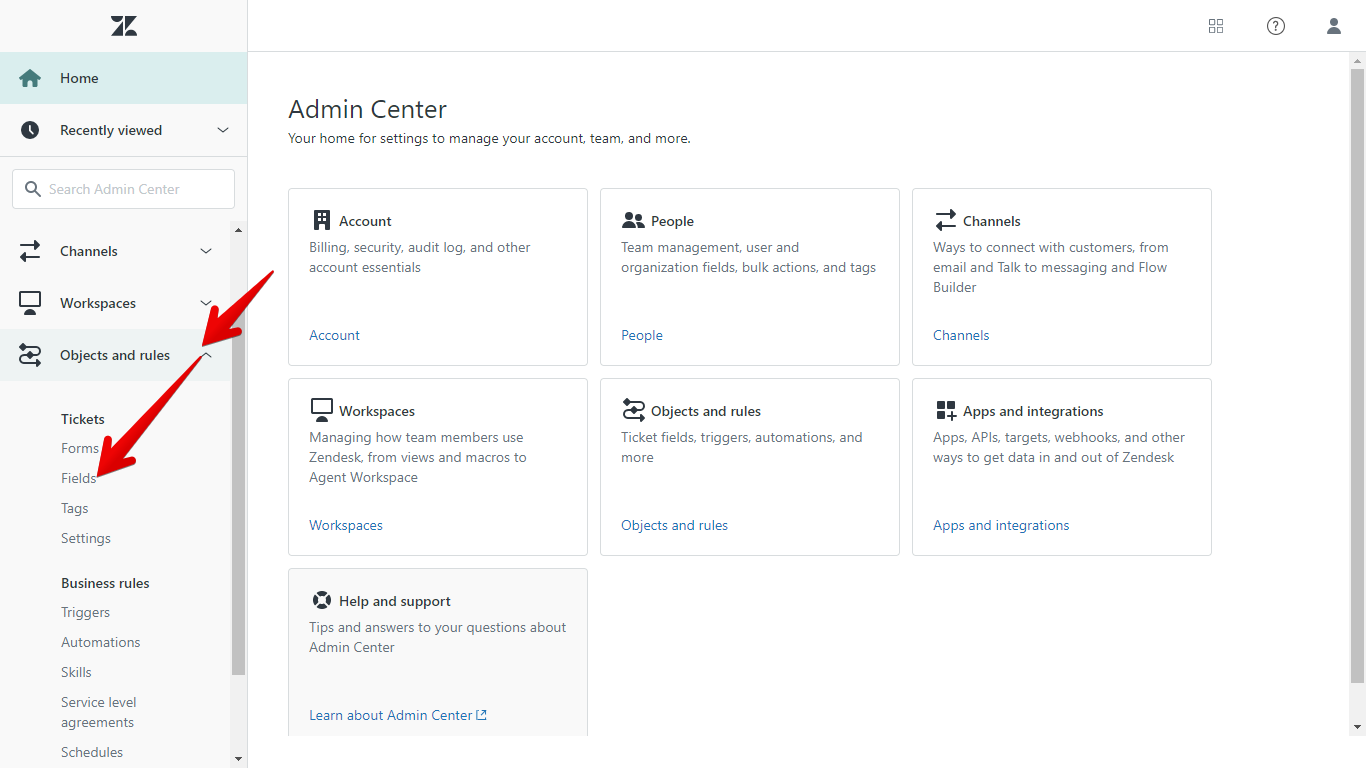
In your Zendesk Admin Center, open the "Objects and rules" menu on the left and click "Fields."
Along with all your Zendesk system fields and any other custom fields you may have, you’ll find your ChannelReply custom fields.
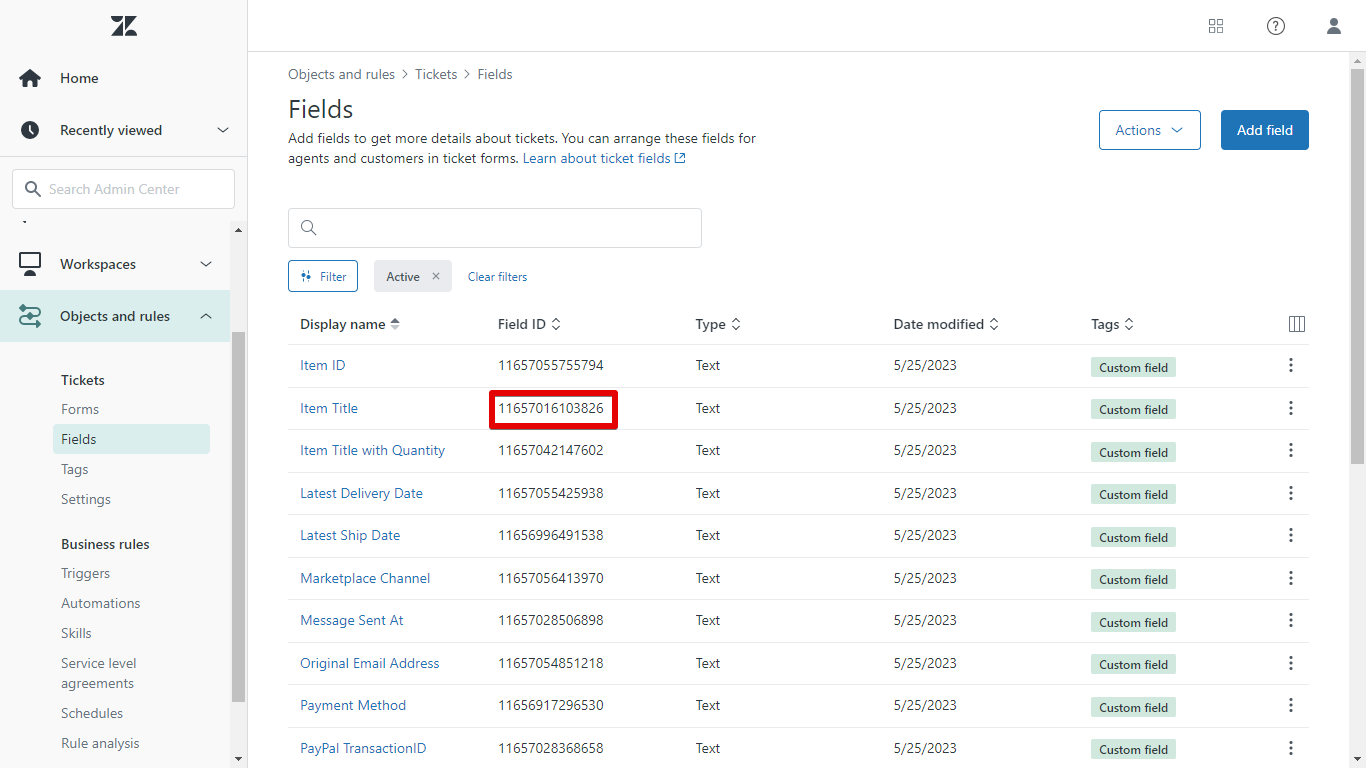
Find the one you want to use in a macro or autoresponder. Copy the number from the “Field ID” column. Paste it somewhere for safekeeping, such as a Notepad file. (Alternatively, keep this screen open so you can copy and paste as needed, then continue in a new browser tab.)
Wherever you want to enter your custom field in your macro or auto-reply, use the following placeholder: {{ticket.ticket_field_xxxxxxxx}}
Simply replace "xxxxxxxx" with the number you copied earlier. So, if your custom field ID number was 12345678, you would enter the following: {{ticket.ticket_field_12345678}}
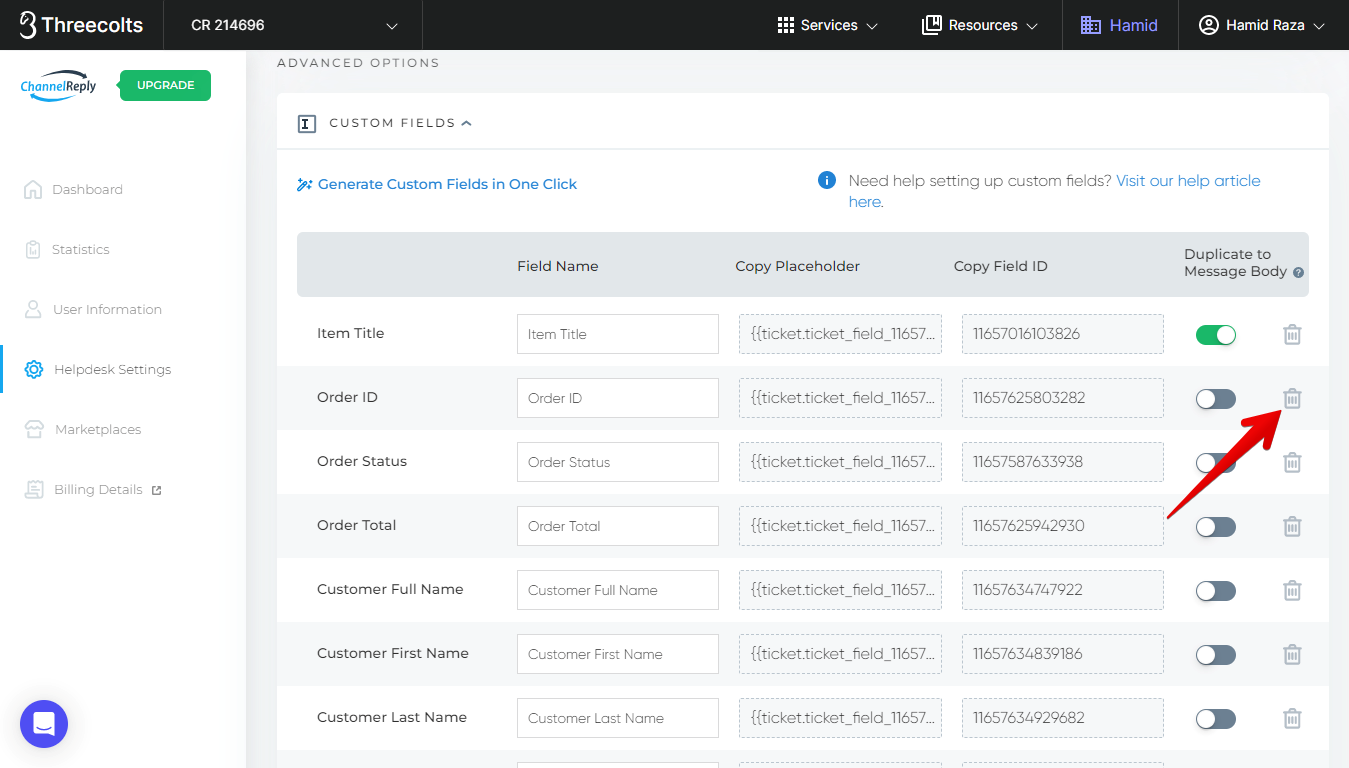
Deleting Custom Fields in ChannelReply
If you want to delete a custom field you have already created, click the trash can button that appears on its far right. The button indicated in the screenshot below applies to the Order ID field.
This will delete the current title, placeholder, and field ID for that field and erase it from existing tickets in Zendesk. All associated data will be lost, so make sure you're certain about this decision!
If you ever want to recreate the field, simply type in a new title. Hit "Enter" or click outside the box to save your changes. Note that it will have a new field ID (and therefore a different placeholder), so you will have to update any macros, triggers etc. that used the old ID.
Editing Custom Fields in ChannelReply
To edit a custom field name, simply click on the field name and make any desired changes.
Hit "Enter" on your keyboard or click outside the box to save your changes. The name of the field will update everywhere in Zendesk, and your old placeholders and rule conditions will still work. Refreshing your Zendesk screen will cause the update to appear.
If you have any trouble with changes going through, see "Troubleshooting Zendesk Connection Issues." See if your account is on Classic Setup. If it is, switch to OAuth Setup.
For info on managing your custom fields from within Zendesk, see their article, “Editing and managing your ticket fields.”
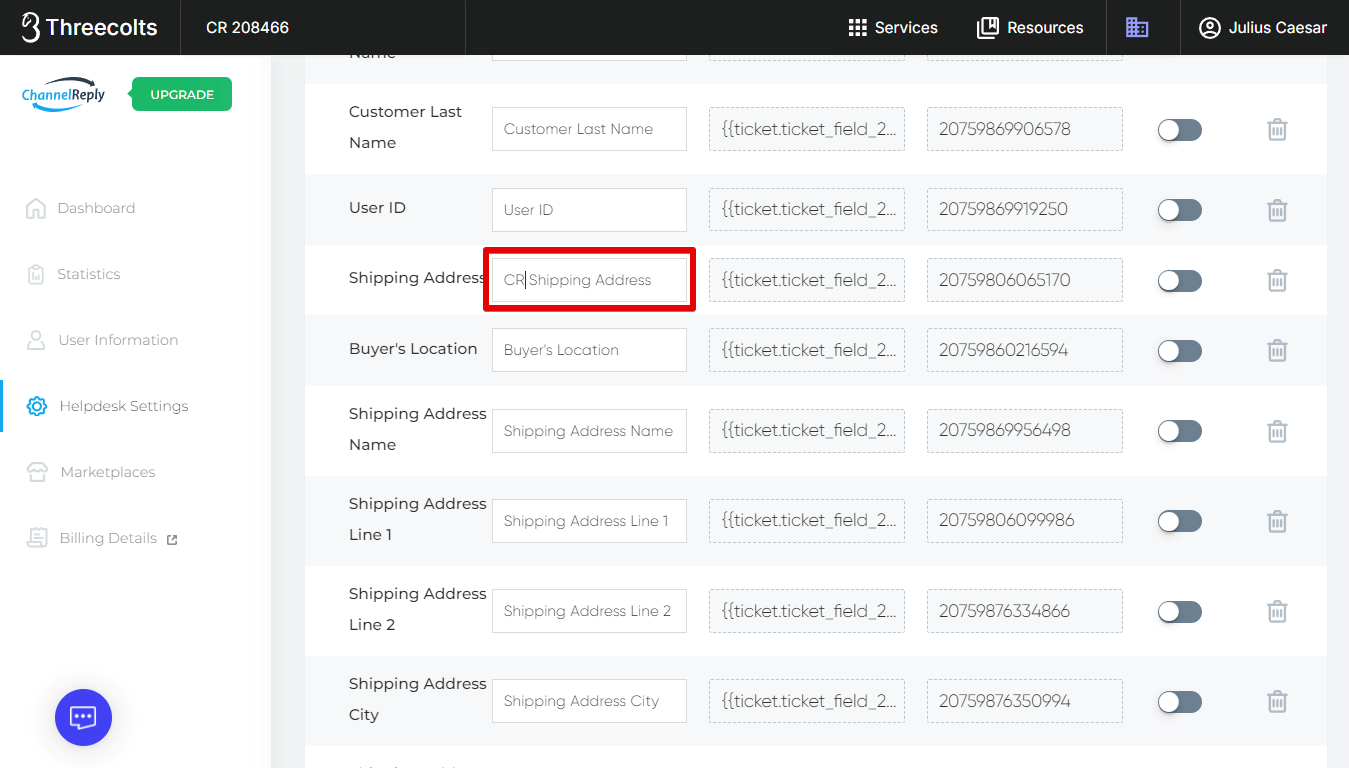
Tips on Dealing with Multiple Fields with the Same Name
It's possible to end up with multiple copies of a custom field with the same name. For example, maybe you created a "Shipping Address" custom field before you started using ChannelReply. Only the one created by ChannelReply will automatically fill in shipping addresses from Amazon, eBay etc.
This can be a real problem. It's all too easy to pick the wrong one, leaving you with broken triggers, empty views, and blank spaces in macros.
The simplest solution? Rename the ChannelReply field as shown above, under "Editing Custom Fields in ChannelReply." The ChannelReply field will have its new name in Zendesk as soon as you refresh your screen. If you want, you can then delete the unwanted fields and change the name of your ChannelReply field back.
If you want to avoid the back-and-forth, here's an alternative solution:
Open your custom fields in ChannelReply by going to Helpdesk Settings > CUSTOM FIELDS.
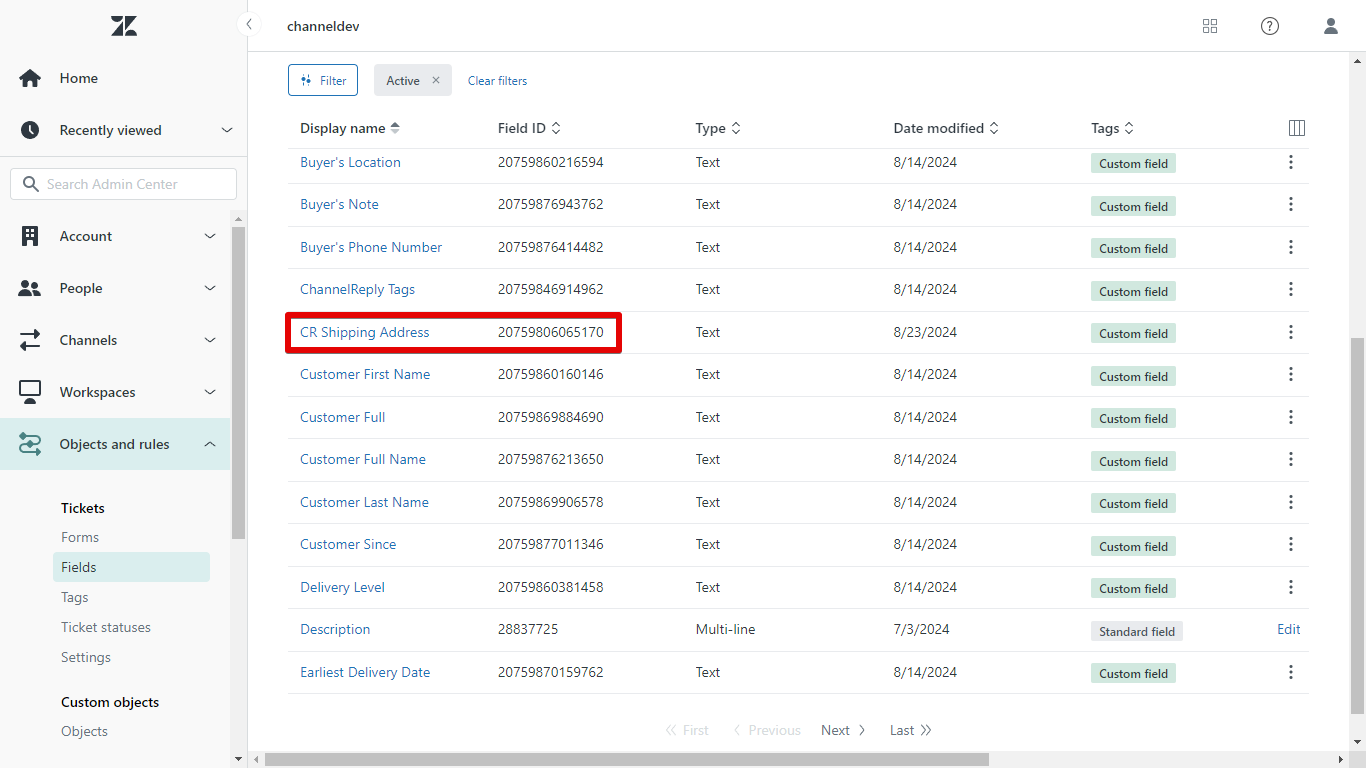
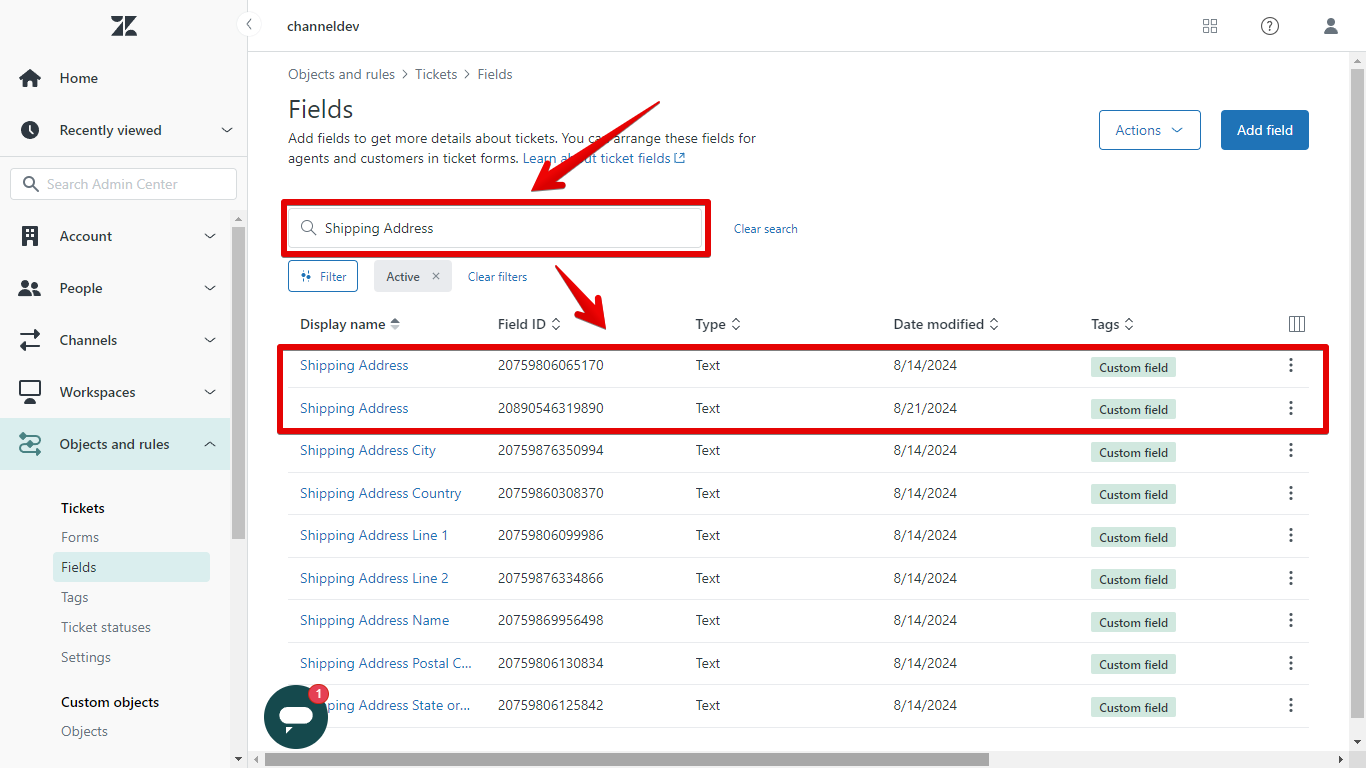
Find the custom field that has duplicates in Zendesk. Copy the Field Name (the text in the furthest left field).
Next, open your ticket fields in Zendesk. Go to Admin > Admin Center > Objects and Rules > Fields.
Paste the Field Name into the search bar, and you'll see all fields with the same name. (With fields like Shipping Address, you might see other fields as well, so just pay attention to the exact matches.)
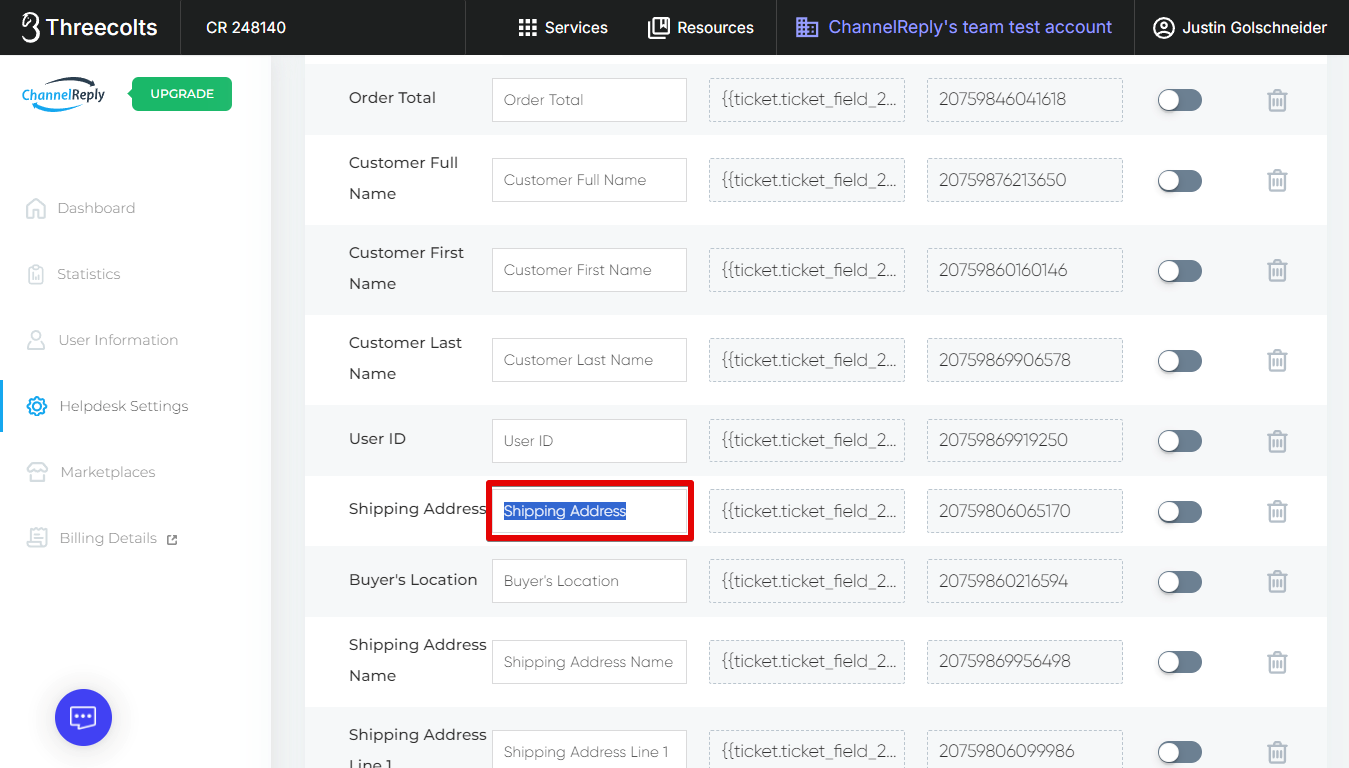
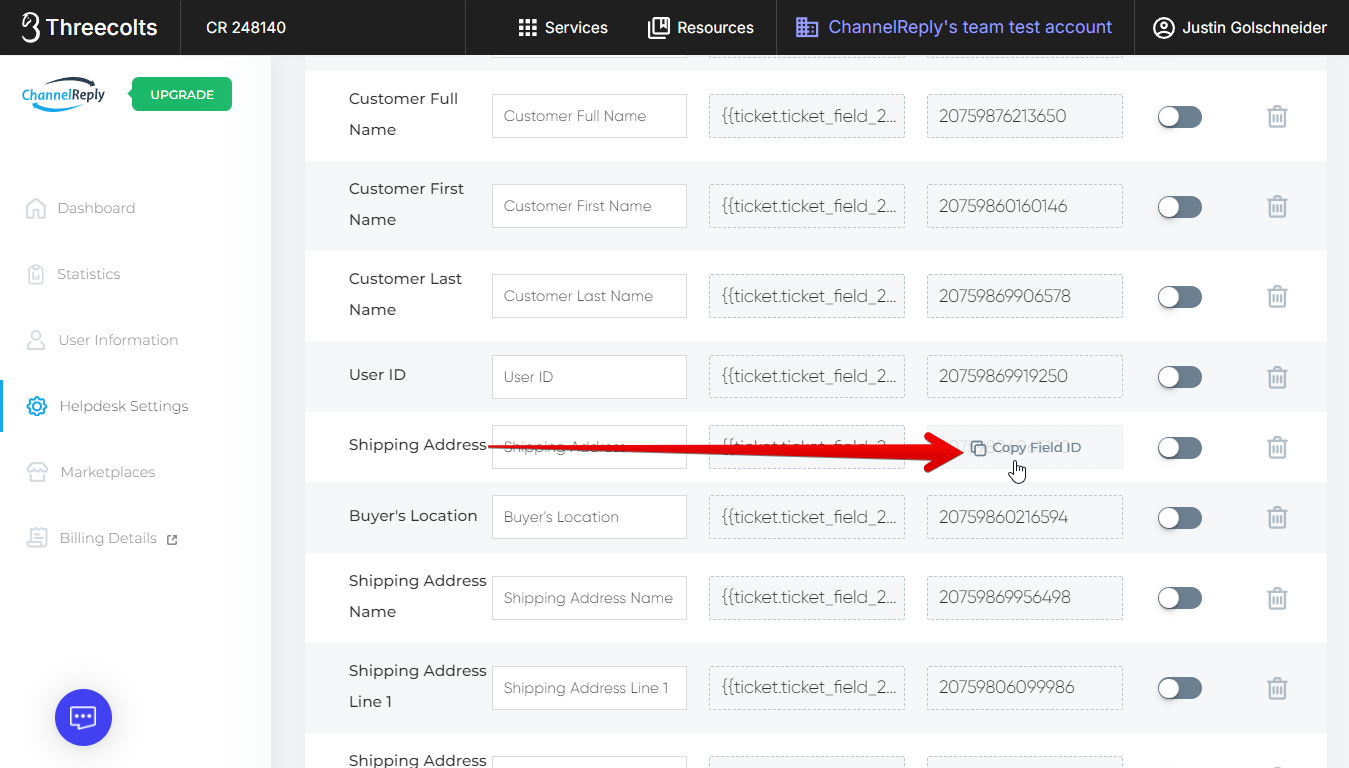
Return to ChannelReply. Click on the custom field's Field ID (the field on the far right) to copy it.
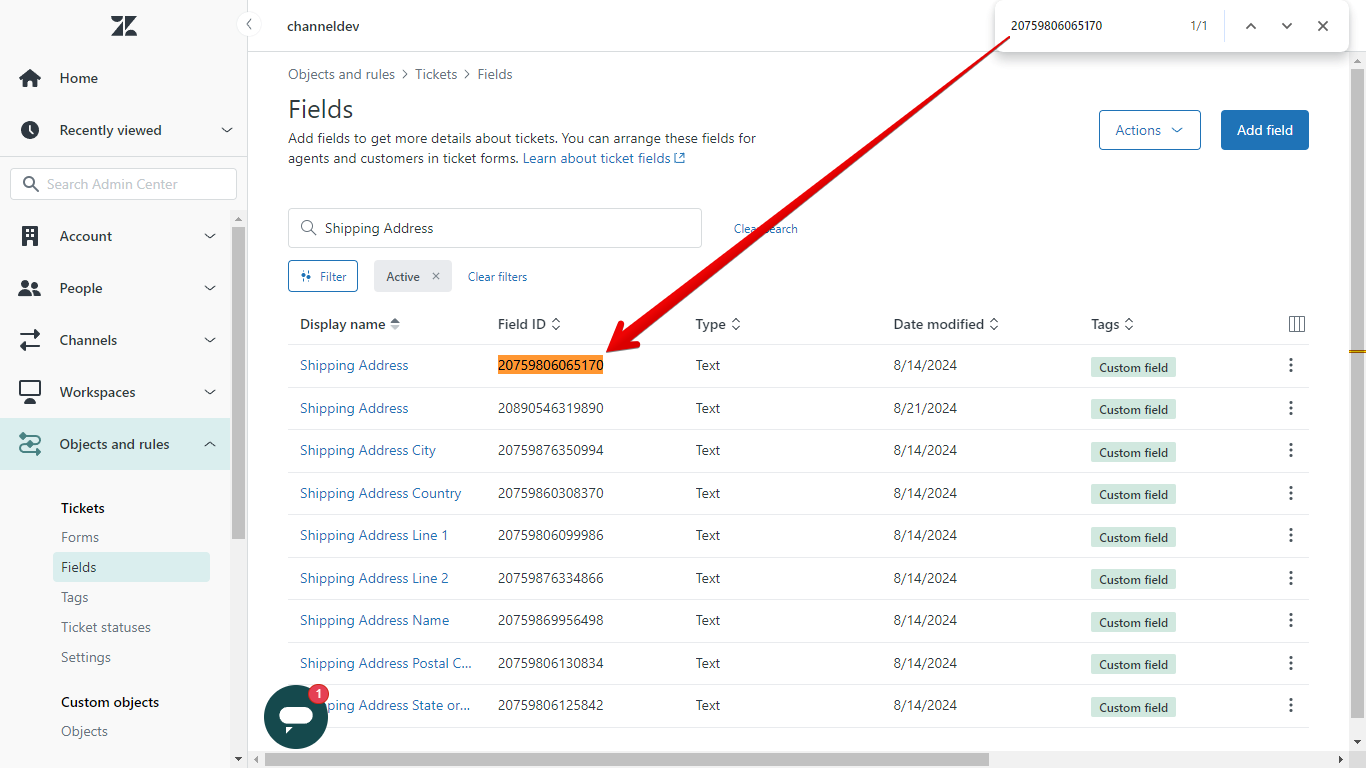
In Zendesk, hit Ctrl + F on PC or Command + F on Mac. Paste your Field ID into the search bar that appears. The field that gets highlighted is your active field!
You can now be sure that the other fields with the same name are the duplicates.
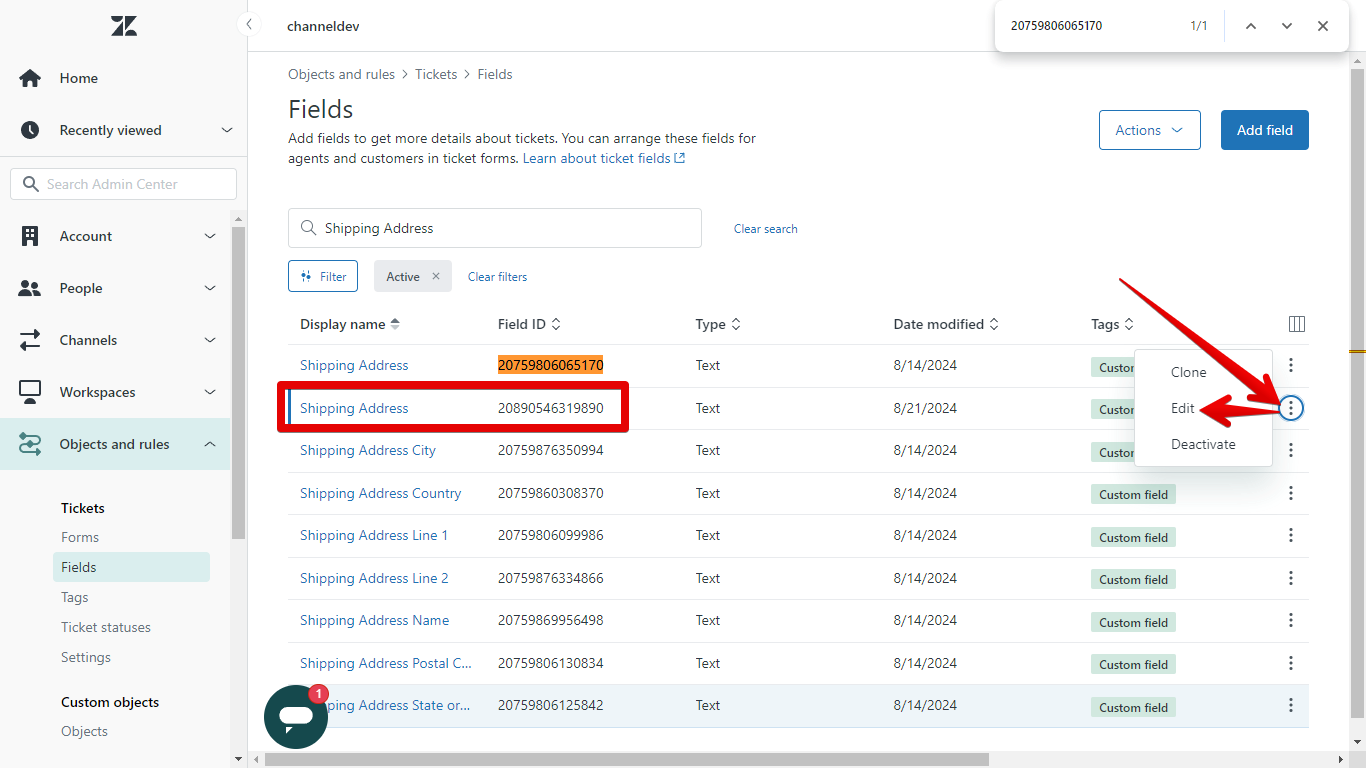
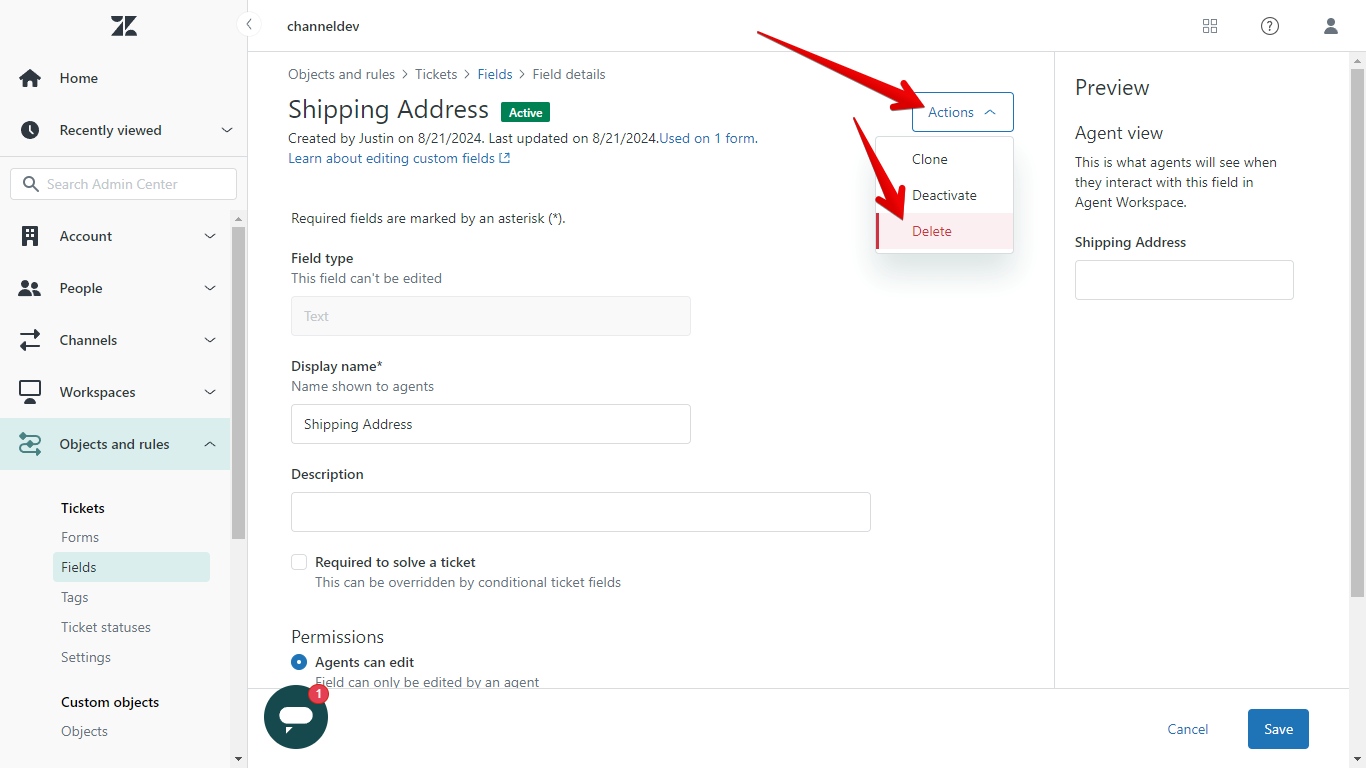
Click on the column of three dots on the far right of a duplicate. Choose "Edit."
To get rid of an unwanted field for good, hit "Actions" and choose "Delete." (If you feel uncertain, you can choose "Deactivate" instead.)
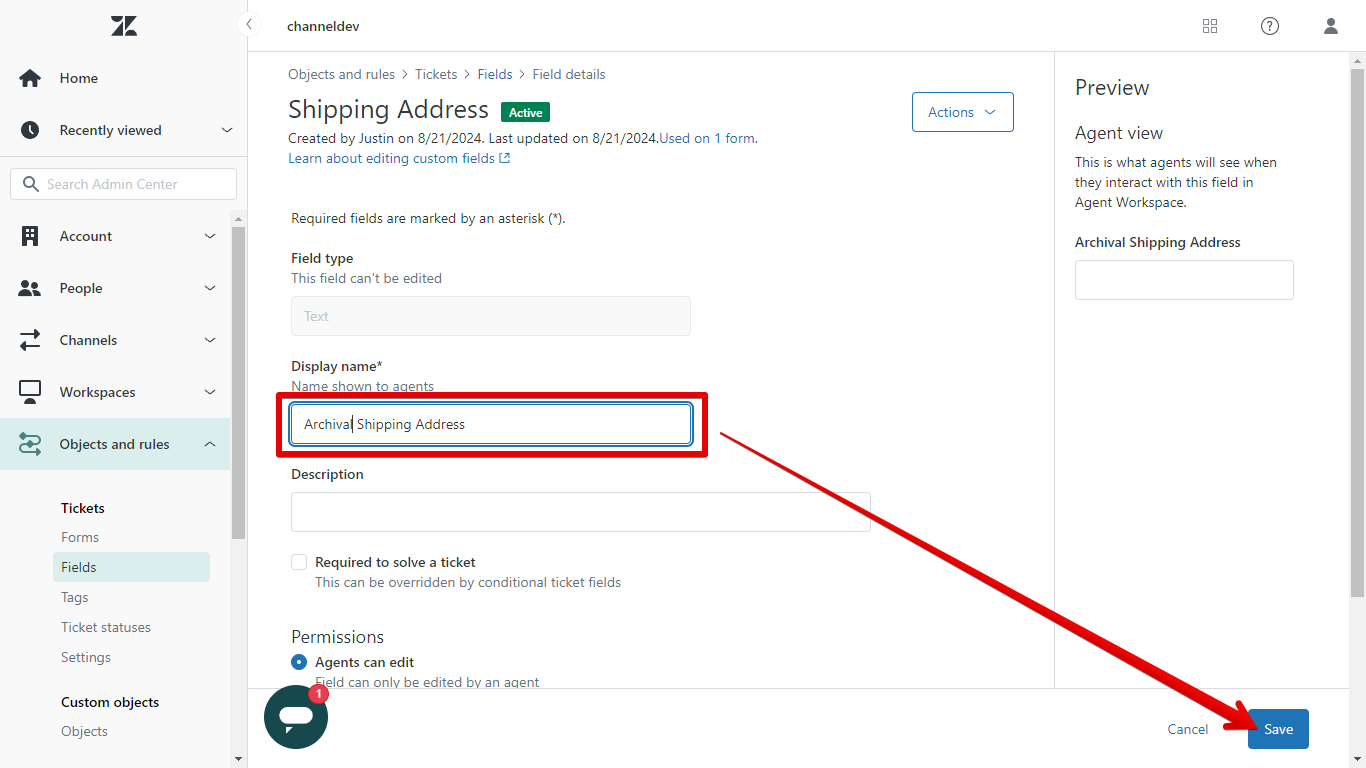
If you want to keep the field but make sure you can't confuse it with the ChannelReply field, give it a new display name. Then click "Save."
Be sure to deal with any other duplicates the same way if there were more than one.
Need help? Contact us and one of our agents will be in touch.
Looking for more ways to make Zendesk more effective for ecommerce support? Check out our guides to creating Zendesk views and setting up a marketplace autoresponder.