Our free Shopify integration with Zendesk, Freshdesk, Re:amaze, Help Scout, Zoho Desk, Kustomer or Onsite Support takes only 4 minutes to set up. All you need is ChannelReply! Follow these instructions and soon you'll have Shopify messages and order data in your helpdesk.
Click on any image to view it at full size.
1. Prepare for Setup
If You Already Have a ChannelReply Account
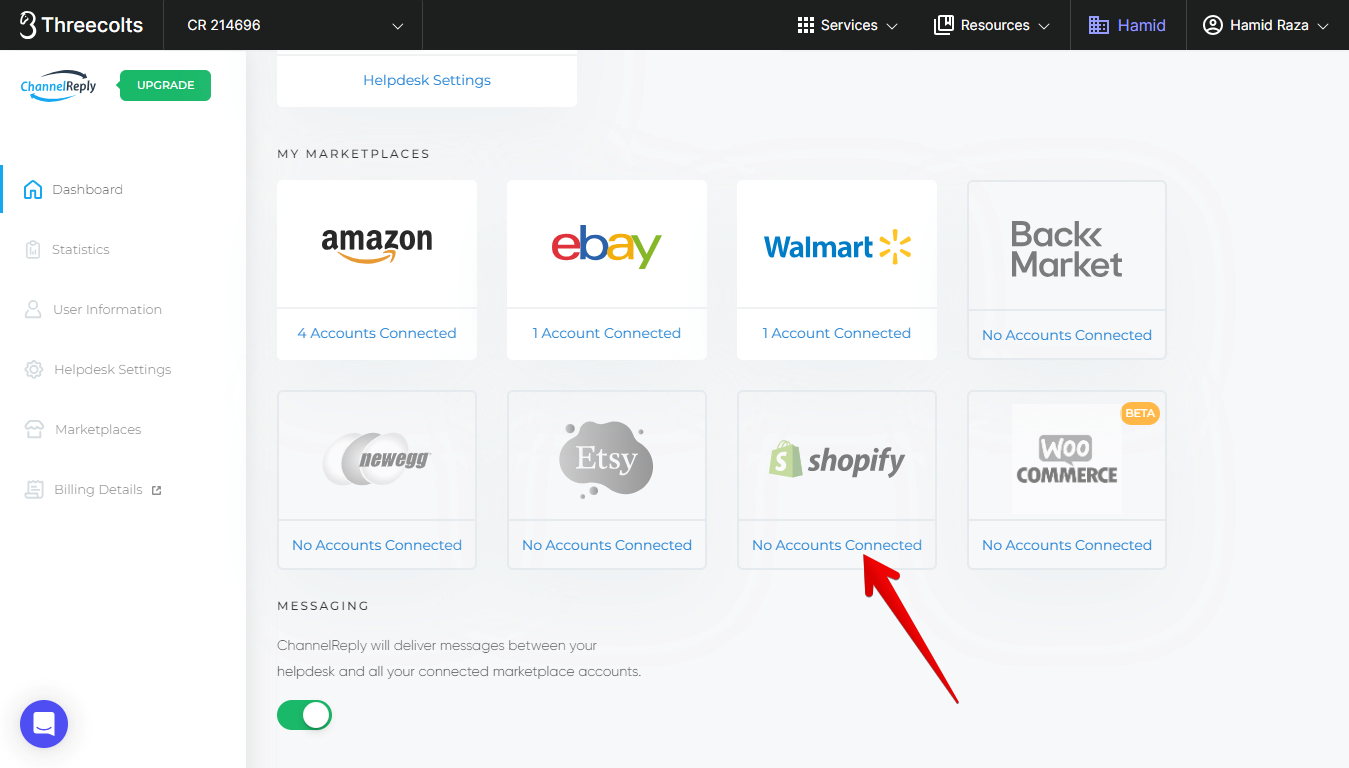
Sign in. Then choose Shopify on the dashboard. (Note that you may have to scroll down to find it in the list of marketplaces.)
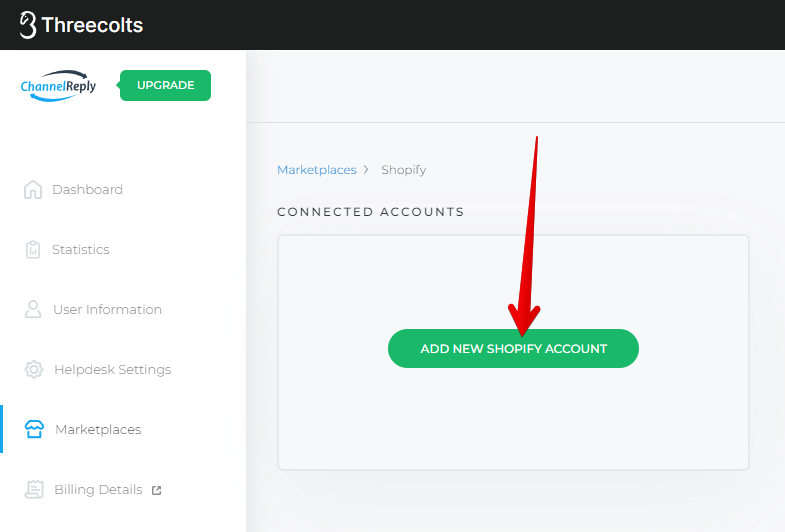
Click “ADD NEW SHOPIFY ACCOUNT,” then go to step 2.
If You Don’t Have a ChannelReply Account
Start your free 14-day trial here.
If you don't plan to integrate other channels like Amazon or eBay, choose our Shopify Only plan to use ChannelReply for free after your trial ends. (Onsite Support users, note that you do not have to change your plan to continue using ChannelReply for free.)
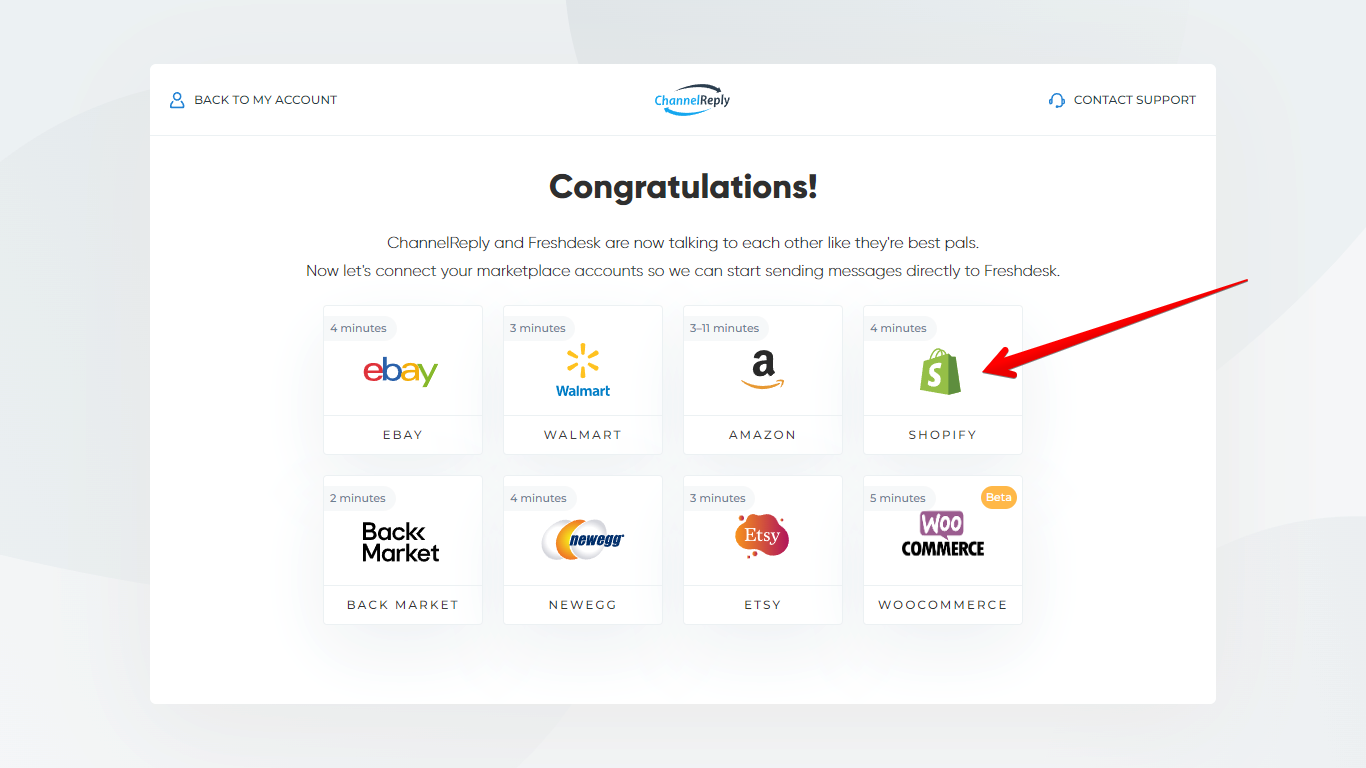
Next, connect your helpdesk by following one of the guides below:
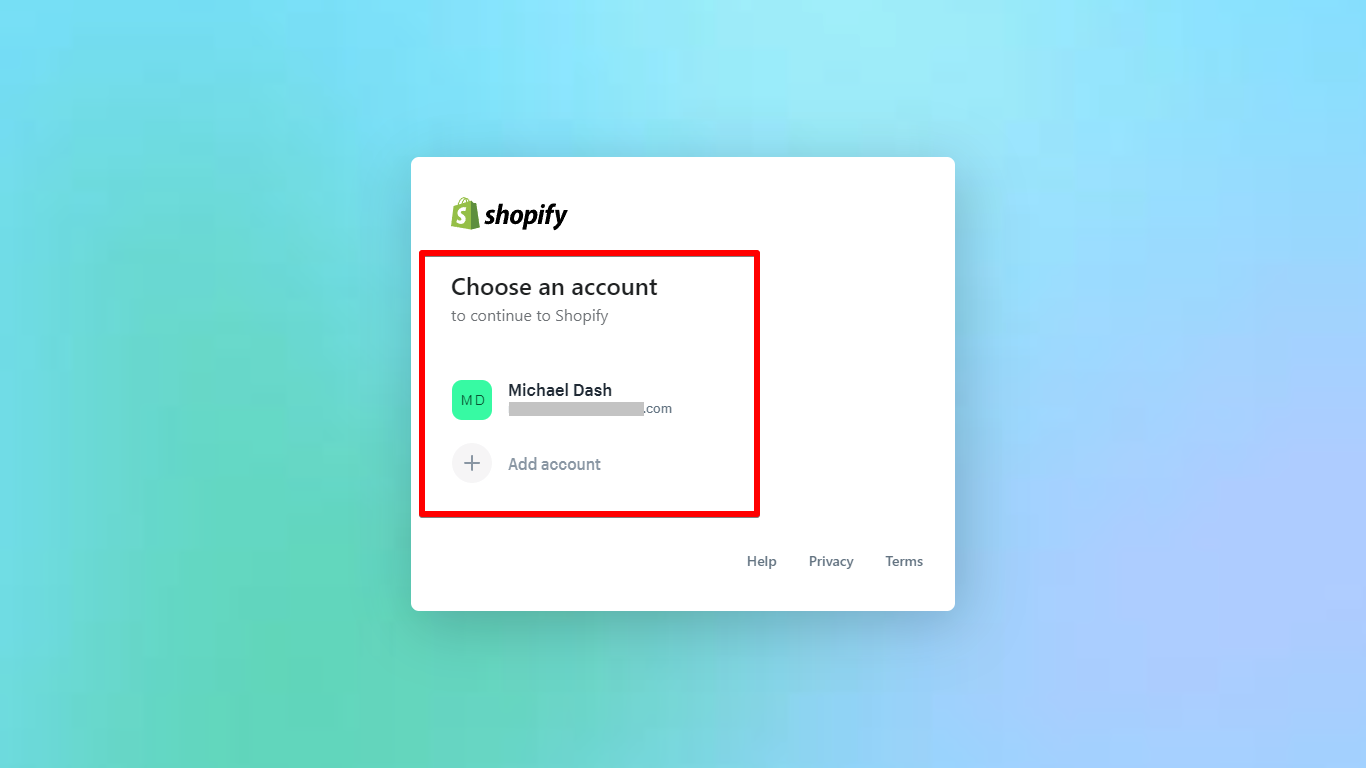
When you reach a screen like the one shown below, choose Shopify.
2. Install the ChannelReply App
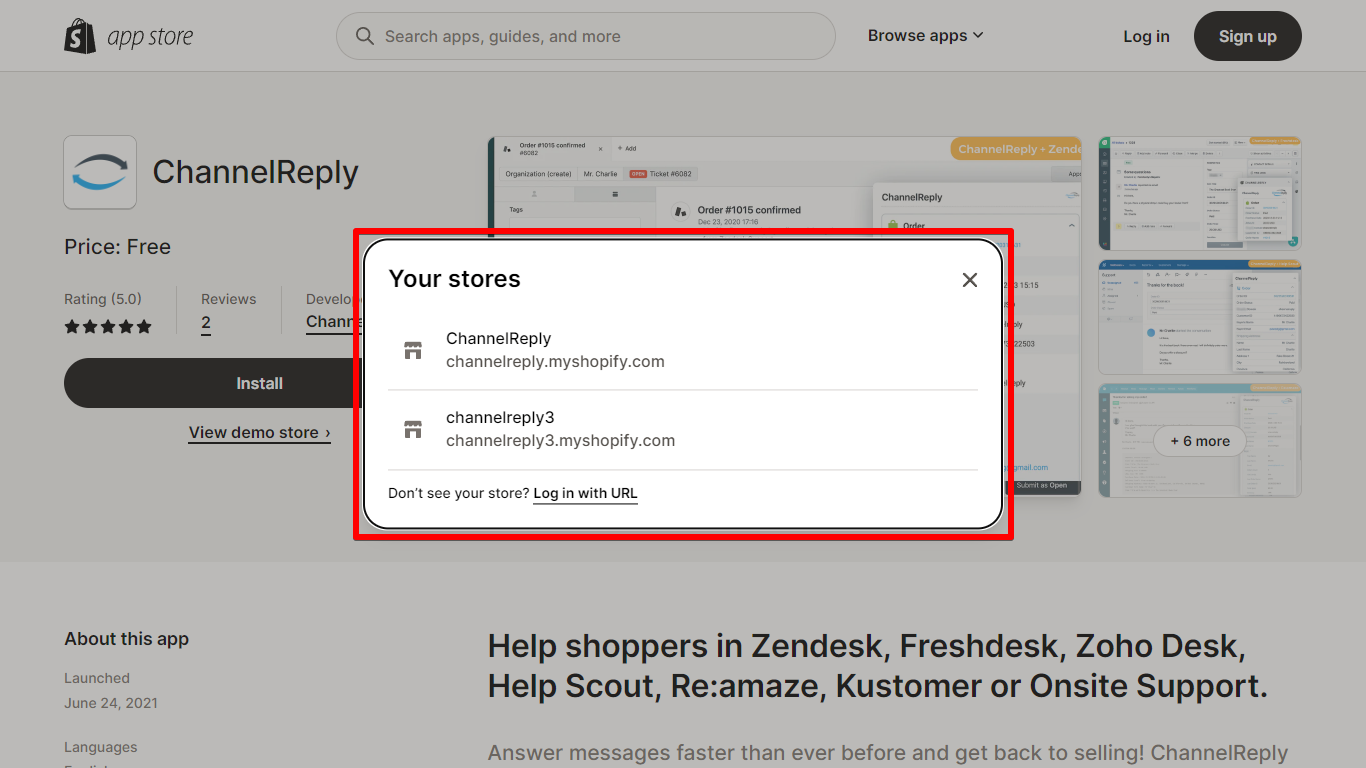
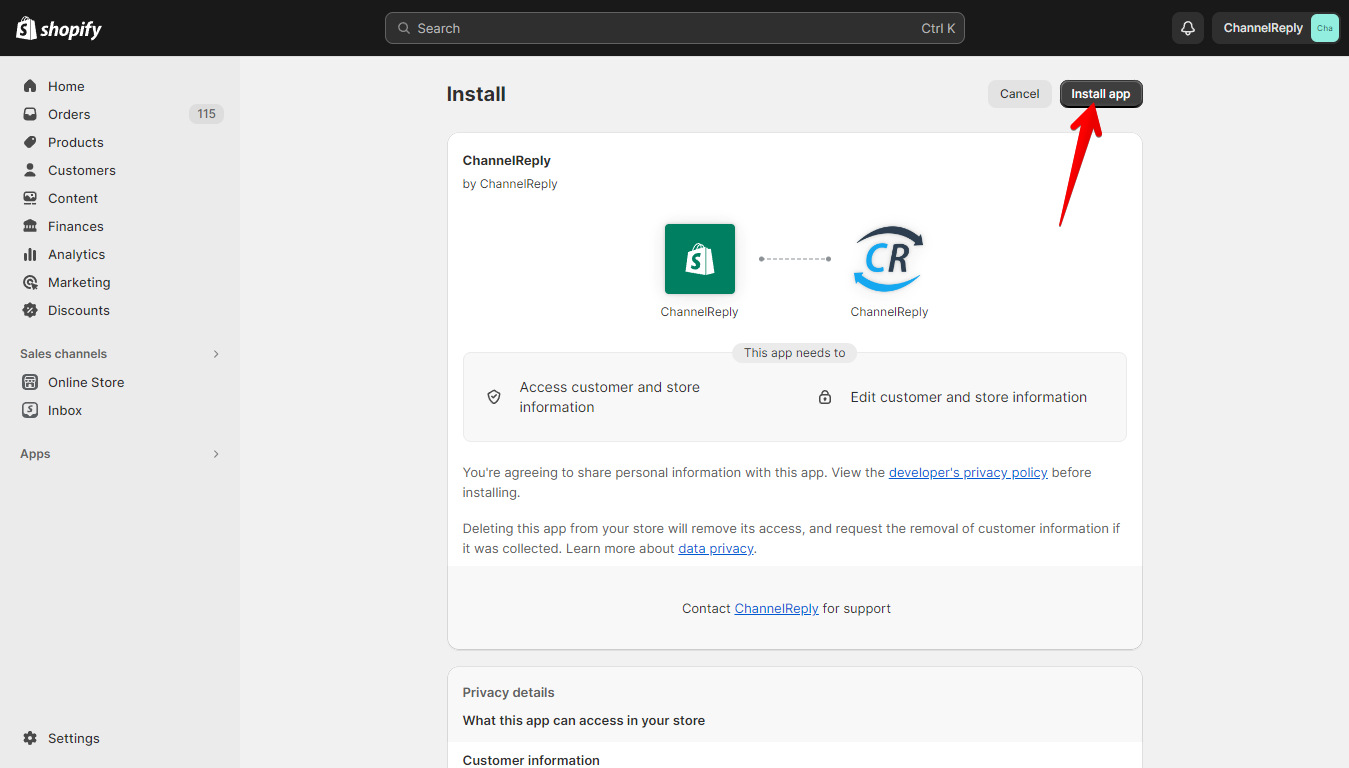
You'll arrive on the ChannelReply app listing in Shopify. Click "Install."
If you were not already logged in to a Shopify admin account, you'll be prompted to log in now. Be sure to log in as an admin of the Shopify store you wish to integrate with ChannelReply.
If you have more than one Shopify store on your account, you'll have the chance to choose which store you wish to integrate now.
You'll be prompted to select an account to use for the integration, even if you just logged in. Select the admin who should be responsible for managing the Shopify integration. (Note that the admin you select will get notifications from Shopify about any issues affecting the ChannelReply app.)
You'll be taken to a screen explaining the permissions that you're granting to ChannelReply. If you agree, click "Install app" in the upper right or bottom right of the screen.
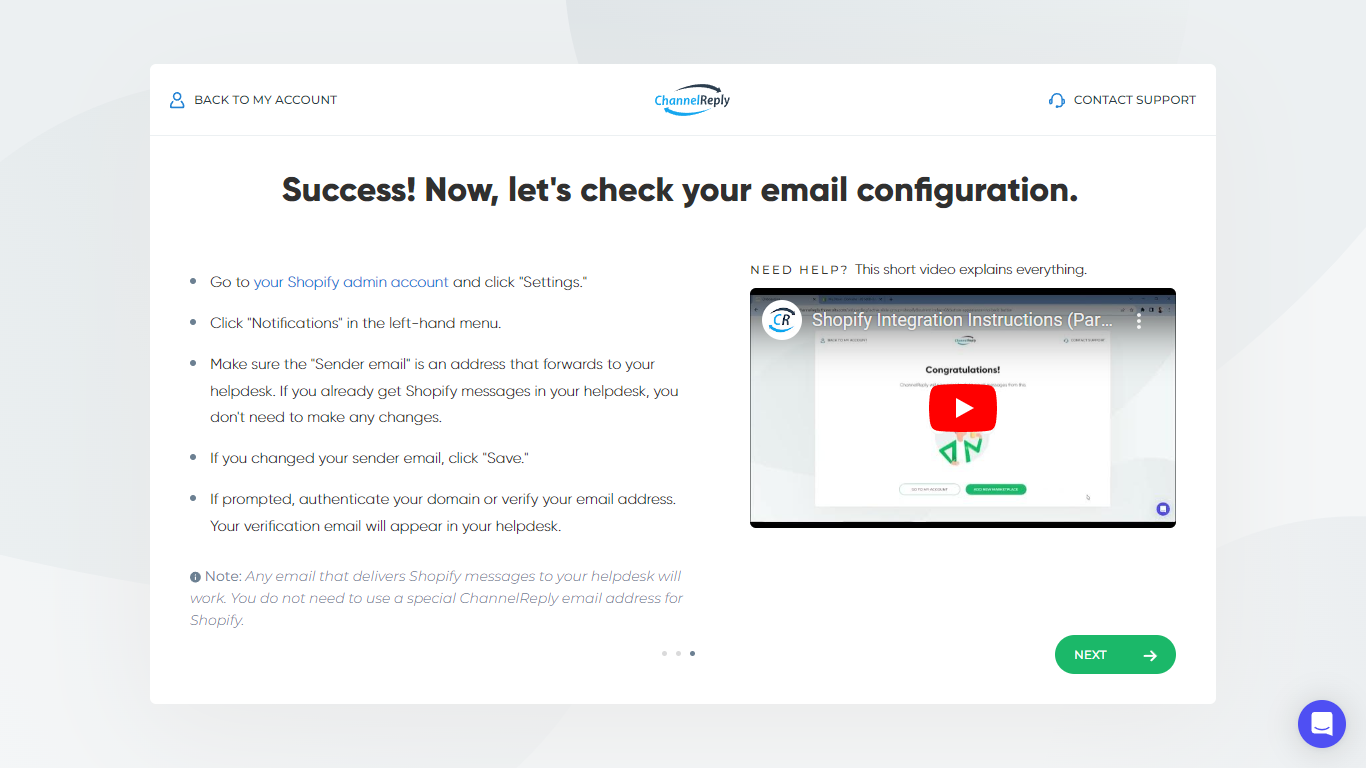
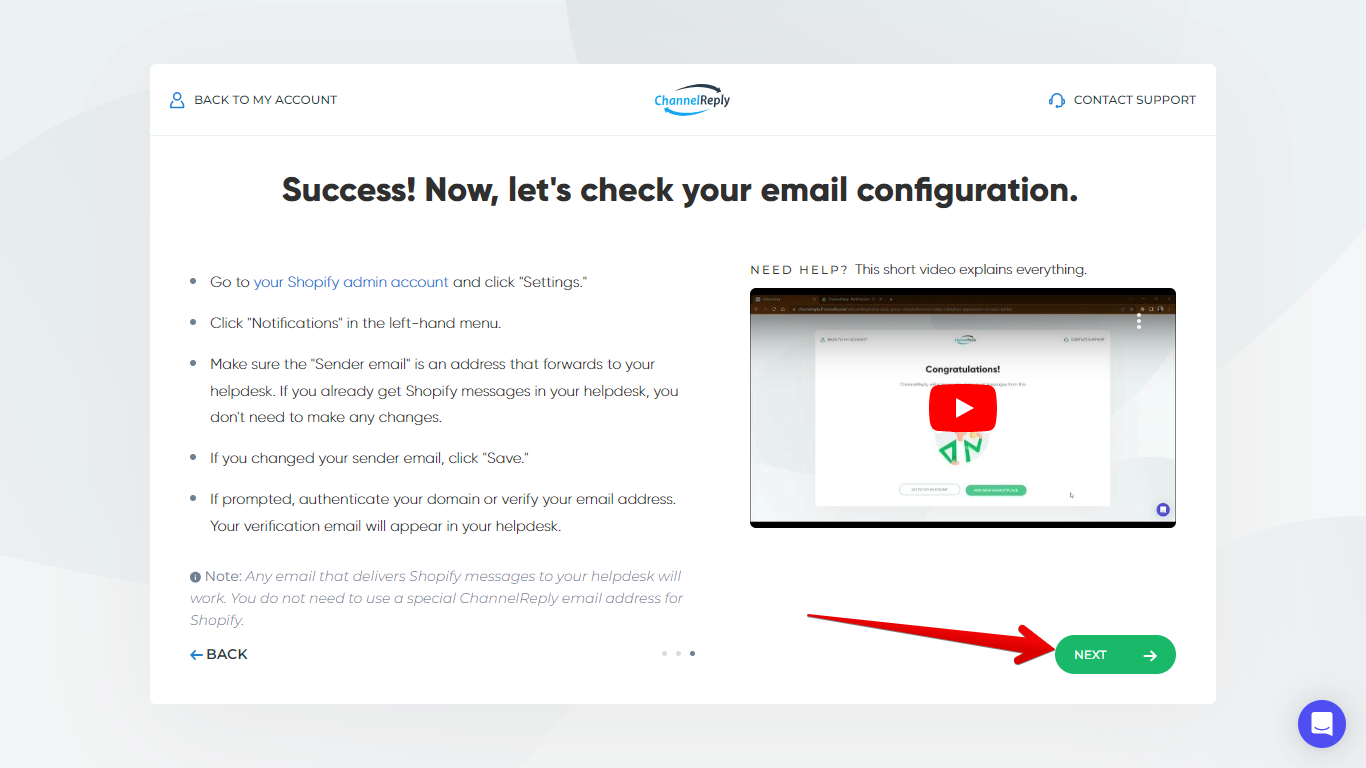
You will be redirected to your ChannelReply account, where you'll land on a screen that says "Success! Now, let's check your email configuration.”
The ChannelReply app is now successfully installed!
3. Email Configuration
If You Already Get Shopify Messages in Your Helpdesk
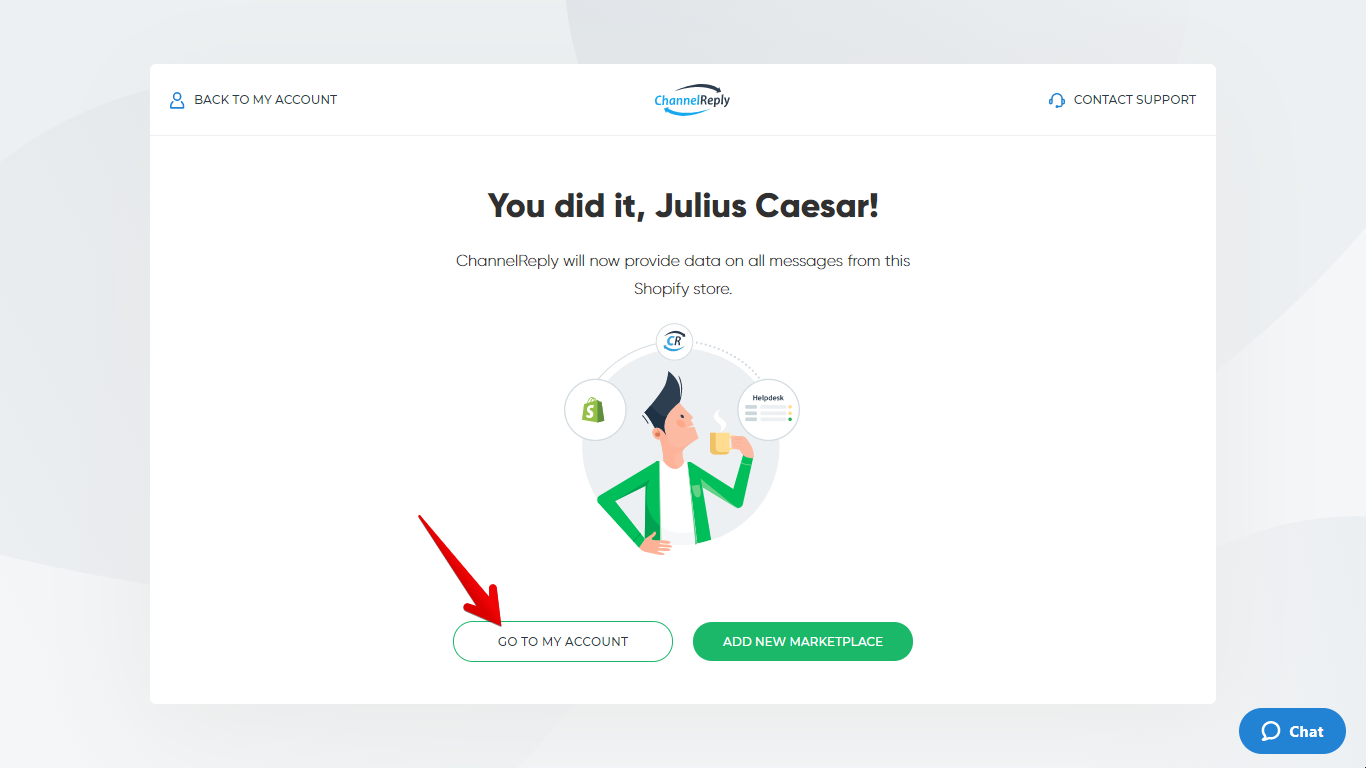
If you already get Shopify messages in Zendesk, Freshdesk, Re:amaze, Help Scout, Zoho Desk, Kustomer or Onsite Support, you’re done with setup! Data will begin appearing on all messages from this Shopify store in your helpdesk. Click “Next” to finish up.
Then, go ahead and jump to Advanced Setup.
If You Don’t Get Shopify Messages in Your Helpdesk Yet
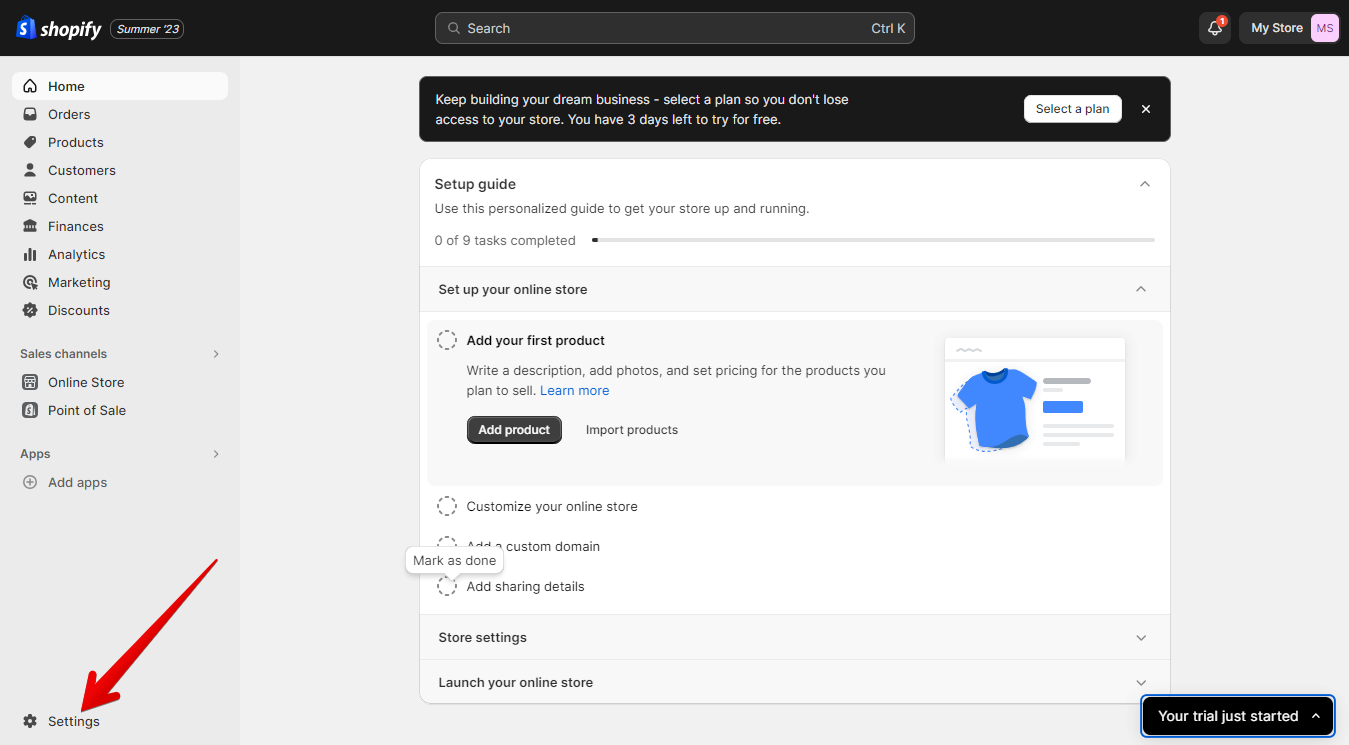
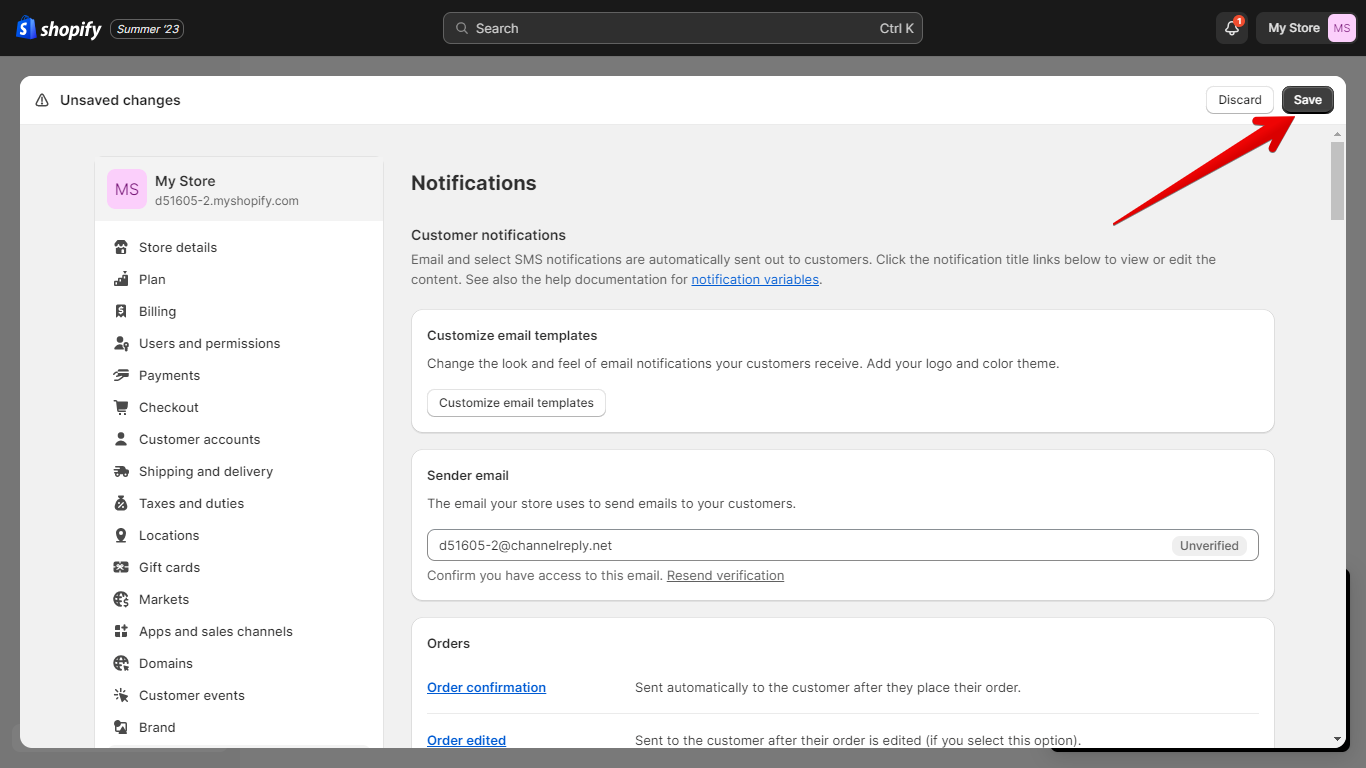
Open your Shopify store admin in a new tab. Click "Settings" in the lower-left corner.
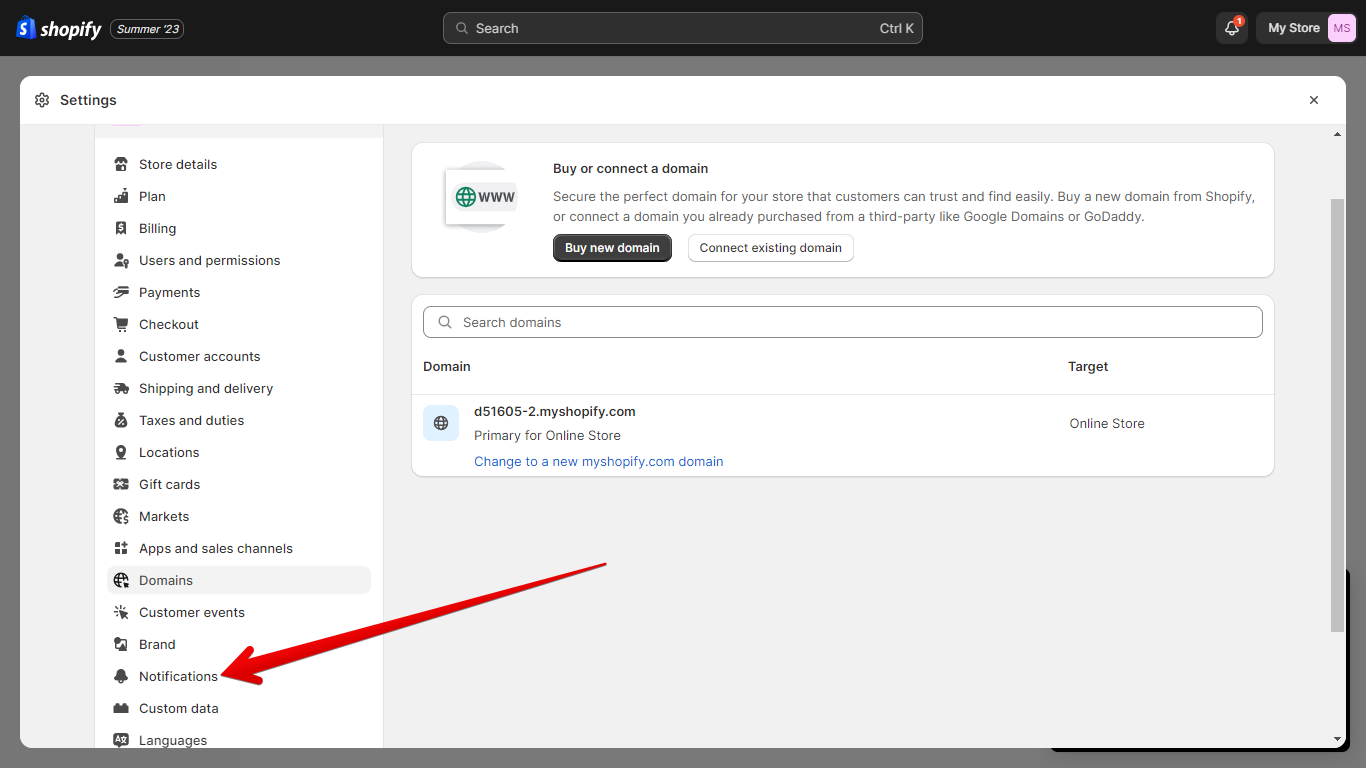
Then, click "Notifications" in the left-hand menu of your "Settings" screen.
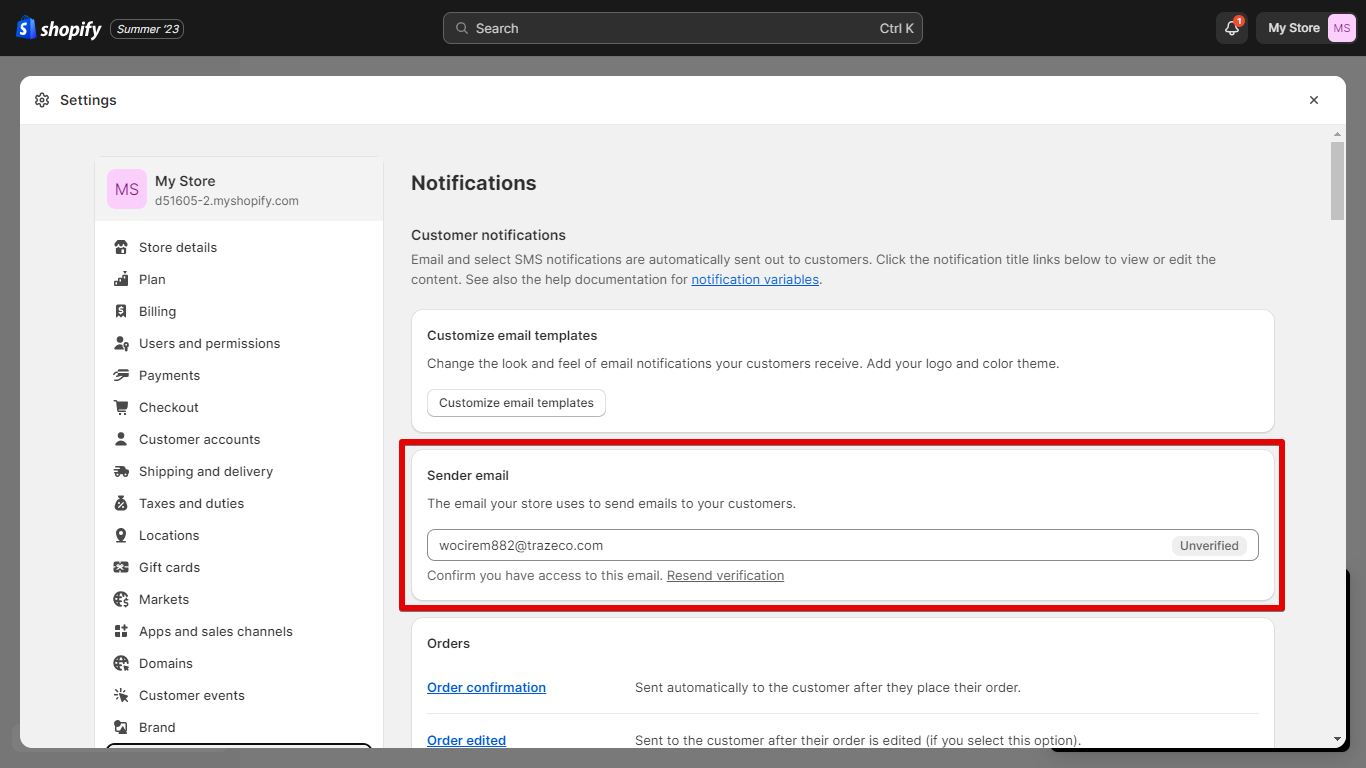
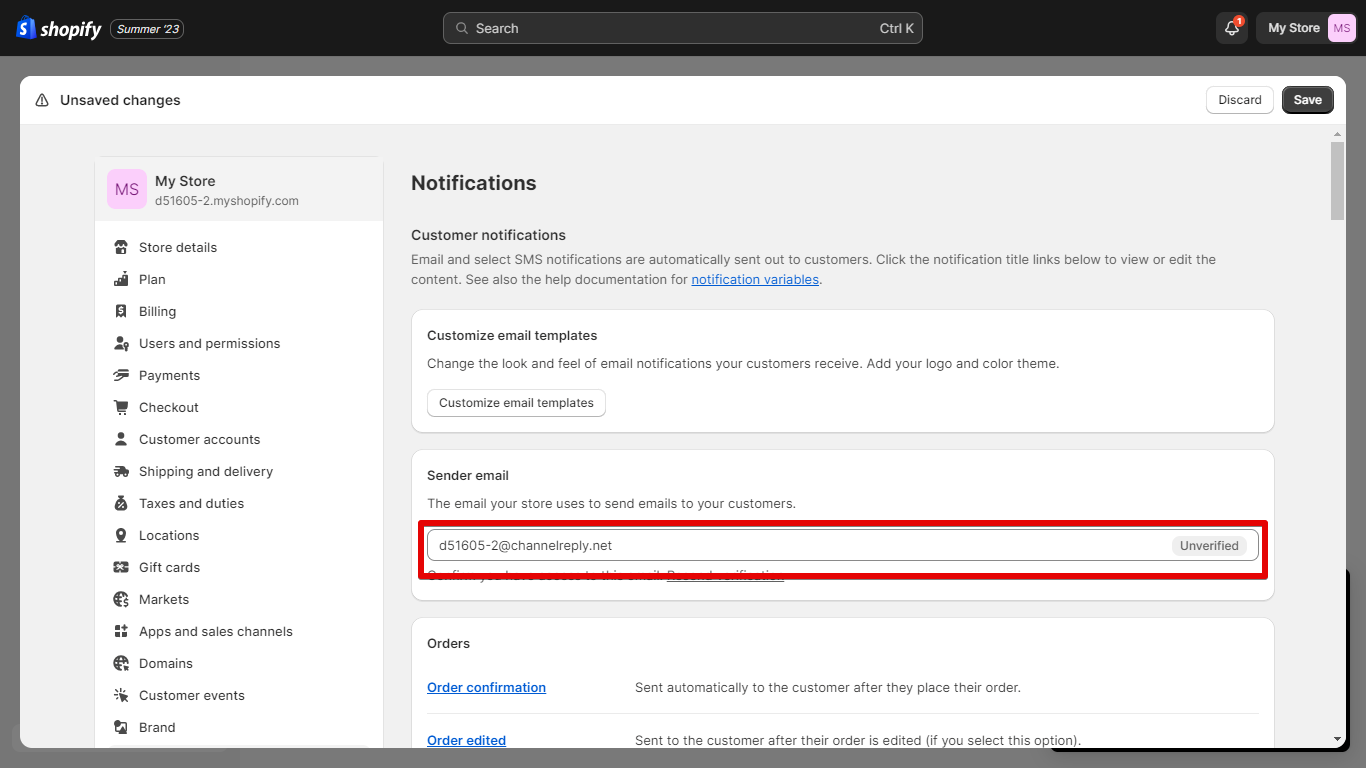
You'll see a "Sender email" field.
Change this to any email address that forwards to your helpdesk. Just be aware that customers will see the email address you enter here, so it's best to use an address ending in your unique website domain. (Using an email from a domain you own is also the only way to make sure your address never appears as being sent "via shopifyemail.com" or even as from "no-reply@shopify.com.")
If you know what address you want to enter here, skip down to "Save and Authenticate or Verify."
What if I Don’t Know What Email Address to Enter?
Don’t worry. We’ve already generated an email address for you. Just return to ChannelReply and hit “NEXT.”
Exit setup completely by clicking “GO TO MY ACCOUNT.”
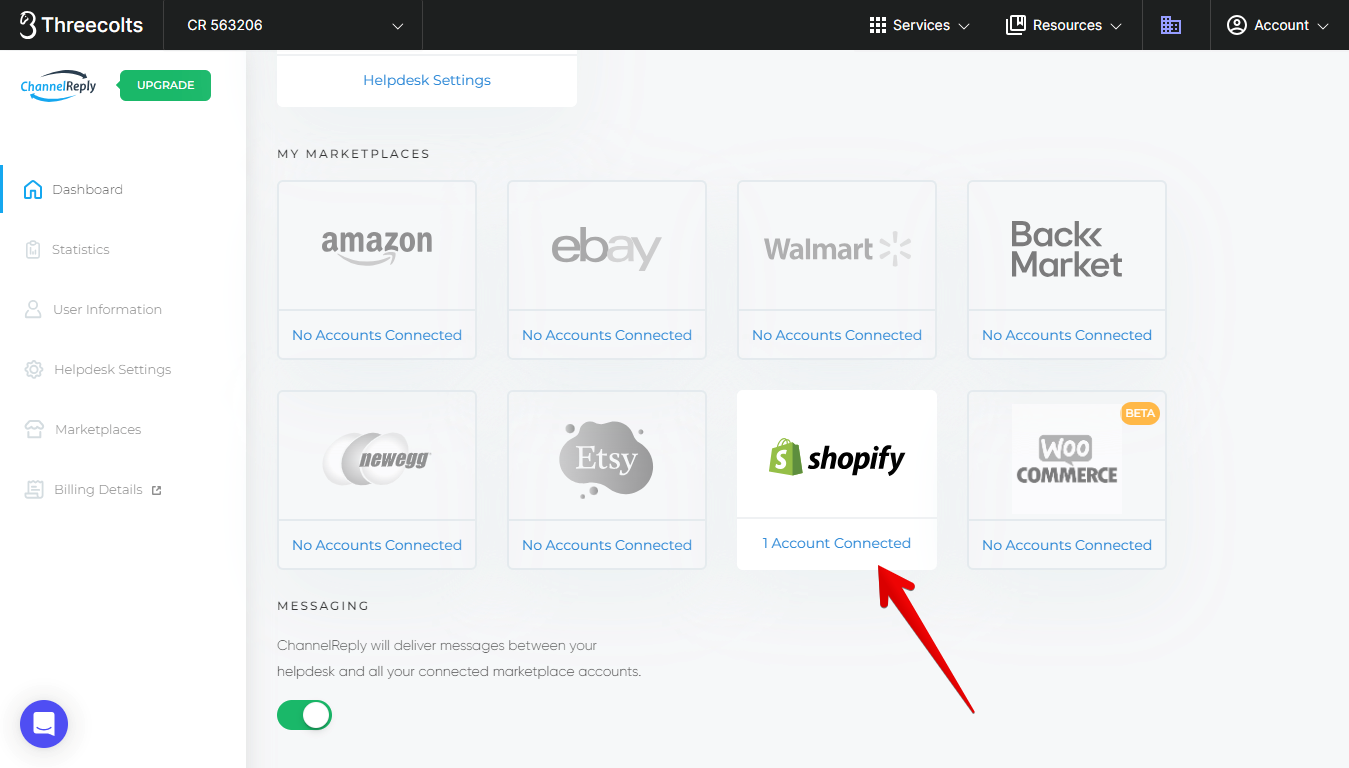
Click “Shopify” on the dashboard.
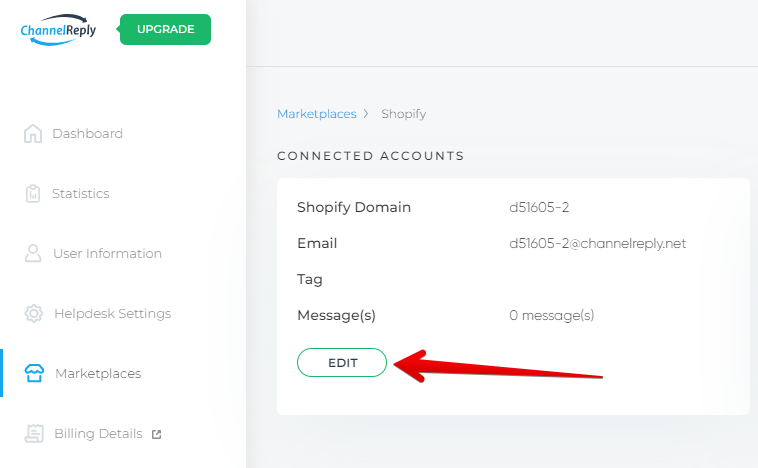
Next, hit “EDIT” under your newly connected Shopify store. (If you connected this store a long time ago and see "UPGRADE" instead of "EDIT," see our "What to Do..." section at the end of this article.)
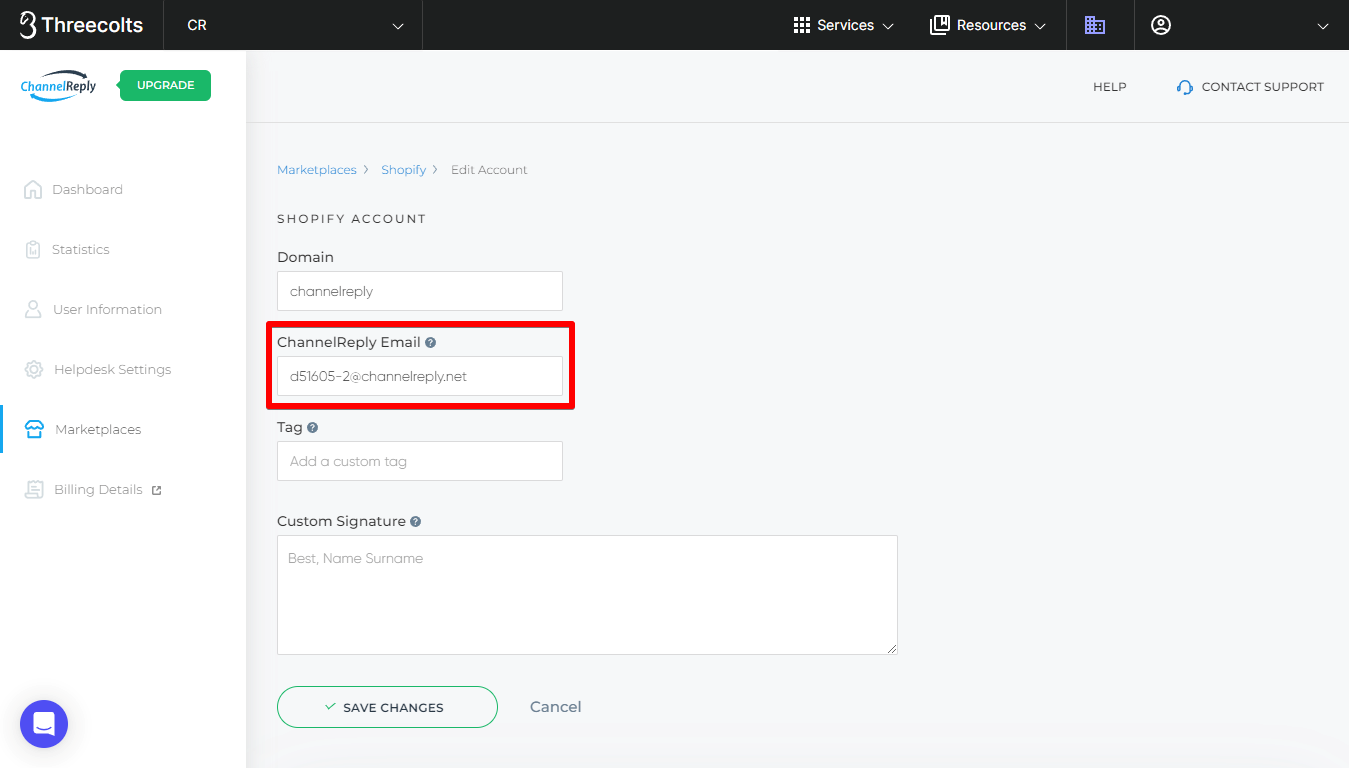
You’ll find a ChannelReply Email field here. Copy this email address.
Return to Shopify and paste it into the "Sender email" field.
Save and Authenticate or Verify
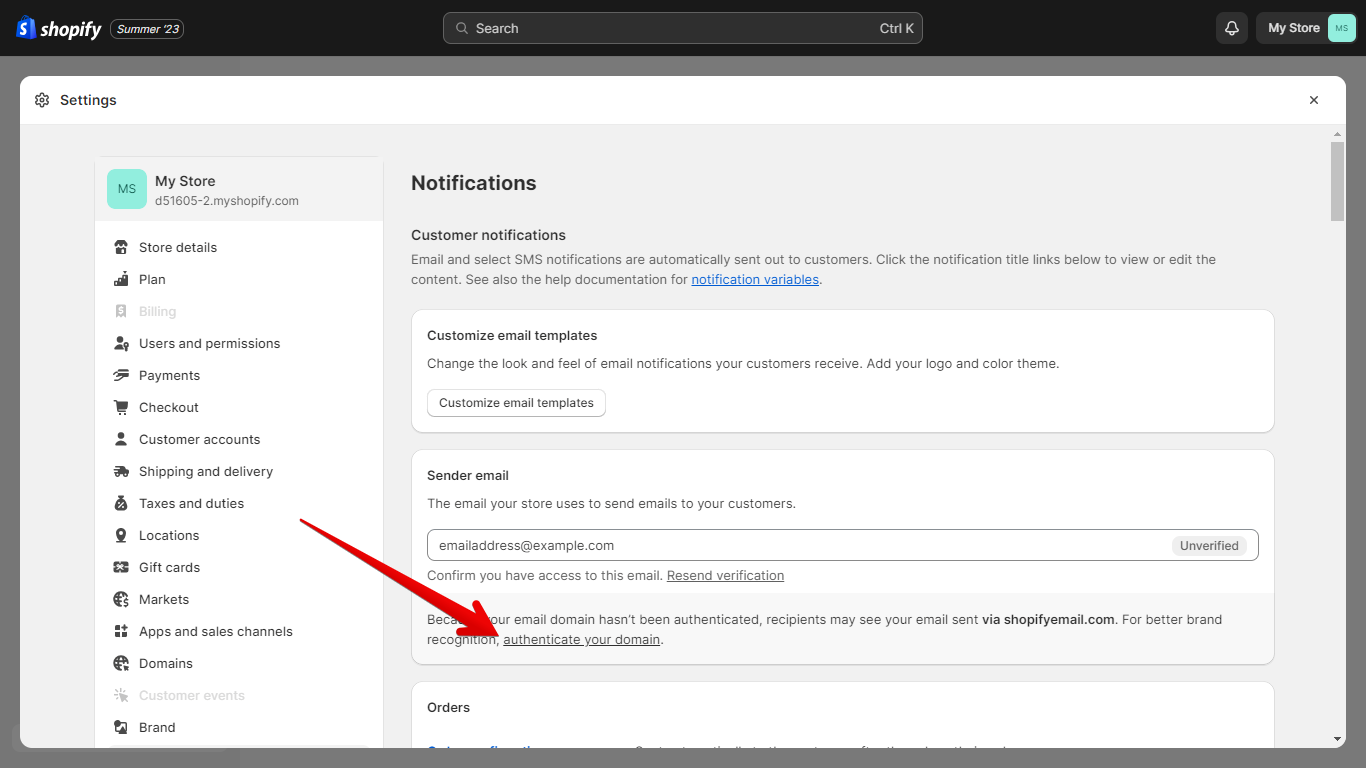
Once you have entered an email address in the "Sender email" field, click "Save."
Unless the email address you've entered is from a domain you have already authenticated, Shopify will ask you to confirm that you have access to it.
If you own the domain your email address is hosted on, click "authenticate your domain" and follow the instructions provided by Shopify. Authenticating your domain will automatically verify your email address.
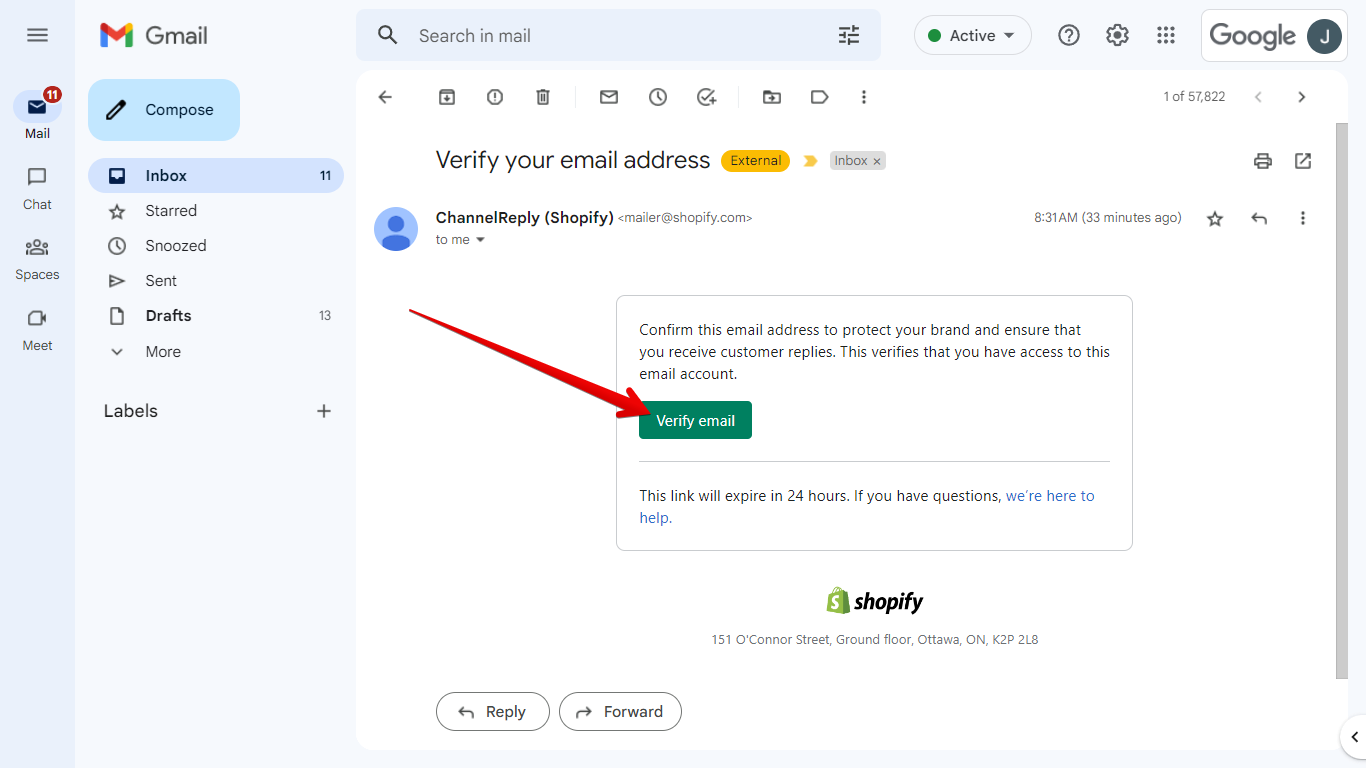
If you don't own the domain, you should verify your email address instead. Log in to your helpdesk and you'll see a new message from mailer@shopify.com with the subject line "Verify your email address." Open it and click "Verify email."
Congratulations—you’re done! You can click “Next” in ChannelReply to exit Shopify setup, then skip to Advanced Setup.
Advanced Email Options: “Process External Messages” and Custom SMTP
After finishing your Shopify integration, you can view your settings by clicking Shopify on the dashboard…
…then “EDIT” under your newly connected store. (If you connected this store a long time ago and see "UPGRADE" instead of "EDIT," see our "What to Do..." section at the end of this article.)
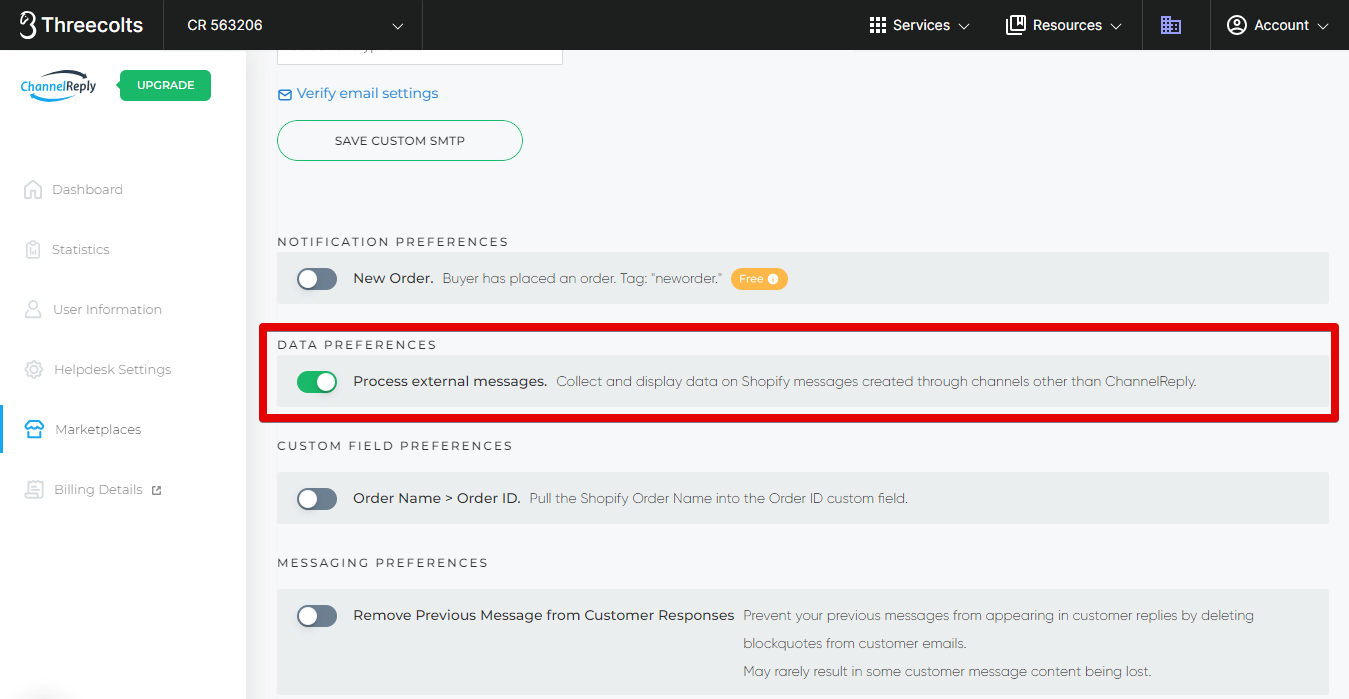
Down near the bottom of the screen, you’ll find a setting labeled “Process external messages.”
We recommend that most users just leave “Process external messages” turned on. It gets the best results for the least amount of work.
As long as this is enabled, ChannelReply will check every ticket in your helpdesk. If the email address matches a customer from your Shopify store, we will display that customer’s order info in the ChannelReply app.
This is recommended because it allows ChannelReply to show data on virtually every ticket from your Shopify store. It works even on messages delivered by other apps or through your preferred customer service email.
If you want to disable this, you have two options:
- Use your ChannelReply Email as described under “What if I Don’t Know What Email Address to Enter?” Warning: Customers will see your ChannelReply Email rather than your preferred address.
- Follow our instructions for email forwarding with custom SMTP so you can use your own email address instead. Warning: This is much more complicated!
Once you’ve completed either of the options above, you can disable “Process external messages.” ChannelReply will then only process Shopify messages that we have actually delivered to your helpdesk.
Advanced Setup (Optional)
Interested in setting up advanced ChannelReply features for Shopify? Here are some of the best options available:
Tags
Account Tags
Create a tag for your Shopify account to help with ticket organization and using more advanced features. We recommend that all multichannel sellers set up account tags.
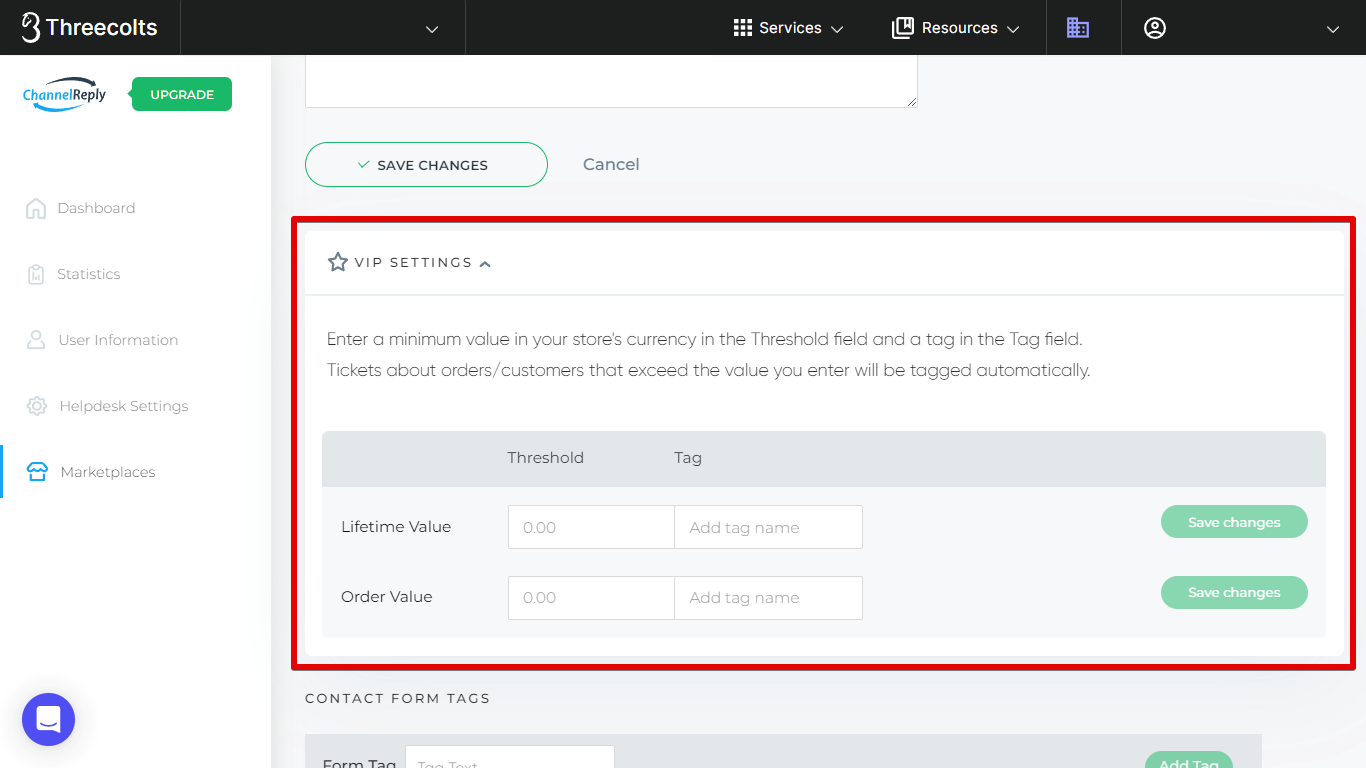
VIP Settings
The VIP Settings section lets you tag your highest-value orders and customers. These tags can be incredibly helpful for prioritizing tickets and triggering automations.
There are two settings: Lifetime Value and Order Value. Each has two fields:
- The threshold is an amount in your store’s currency. You can set this as high or low as you want.
- The tag field allows you to enter a custom tag. If an order or customer equals or exceeds your threshold, your tag will be applied to related tickets automatically.
If a customer spends enough money on your Shopify store to meet the Lifetime Value threshold, it will trigger your Lifetime Value tag. The customer can spend the money over any period of time and any number of orders. Your tag will appear on all new tickets from the customer (but not on messages from before they reached the threshold).
Our Lifetime Value calculation includes all of the customer's order totals. Each order total includes item prices, shipping, taxes and duties, minus discounts, returns and refunds. It is possible for a return/refund to drop a customer's Lifetime Value below the threshold after they've passed it. If this happens, the tag will stop appearing on new tickets from this customer, but won't be removed from tickets where it's already present.
If a single order meets the Order Value threshold, your Order Value tag will appear on all tickets about that specific order. If the same customer places an order below your threshold later on, the Order Value tag will not appear on tickets about the smaller order. The Order Value tag will also stop appearing if a return/refund of an item in the order drops the total spent below the threshold.
Note that Order Value is calculated as total item prices - discounts + shipping + taxes + duties - returns/refunds. In other words, it's the amount the customer has actually spent on the order as of the time the ticket was created.
Be sure to hit Save Changes after creating or editing a VIP tag.
We think these tags are at their best when you have our New Order notifications enabled. You'll see a tagged notification as soon as an order beats a threshold, letting you take action even if the customer hasn’t reached out.
Contact Form Tags
If you have multiple contact forms in your store, you can use our Shopify contact form tags to identify which form the customer used to contact you. Use this for advanced setups like sending different auto-replies to messages from different forms.
Custom Fields
Learn how to use custom fields to speed up support with auto-personalization and powerful, custom-built rules. Custom fields can also make it easier to build advanced reports and search for tickets based on things like what the customer ordered. Exact features depend on your helpdesk, but they can always make your life easier!
Order Name > Order ID
By default, we put Shopify's Order ID into the Order ID custom field, and place the Order Name in the Alternative Order ID custom field. However, many Shopify sellers only use the Order Name and consider that the primary Order ID.
Enabling the Order Name > Order ID option switches where each ID goes. When enabled, the Shopify Order ID gets sent to the Alternative Order ID custom field, and the Order Name goes to the Order ID custom field.
To enable this setting, click Shopify on your ChannelReply dashboard.
Then hit "EDIT" under your connected store. (If you connected this store a long time ago and see "UPGRADE" instead of "EDIT," see our "What to Do..." section at the end of this article.)
Finally, click the slider for Order Name > Order ID. The change will save automatically.
Autoresponders
ChannelReply lets you turn your helpdesk into a Shopify autoresponder. You can use any of our ecommerce autoresponder systems for Zendesk, Freshdesk, Re:amaze, Help Scout, Zoho Desk, Kustomer or Onsite Support with Shopify. Standard Zendesk trigger and Kustomer business rule autoresponders are also compatible with Shopify.
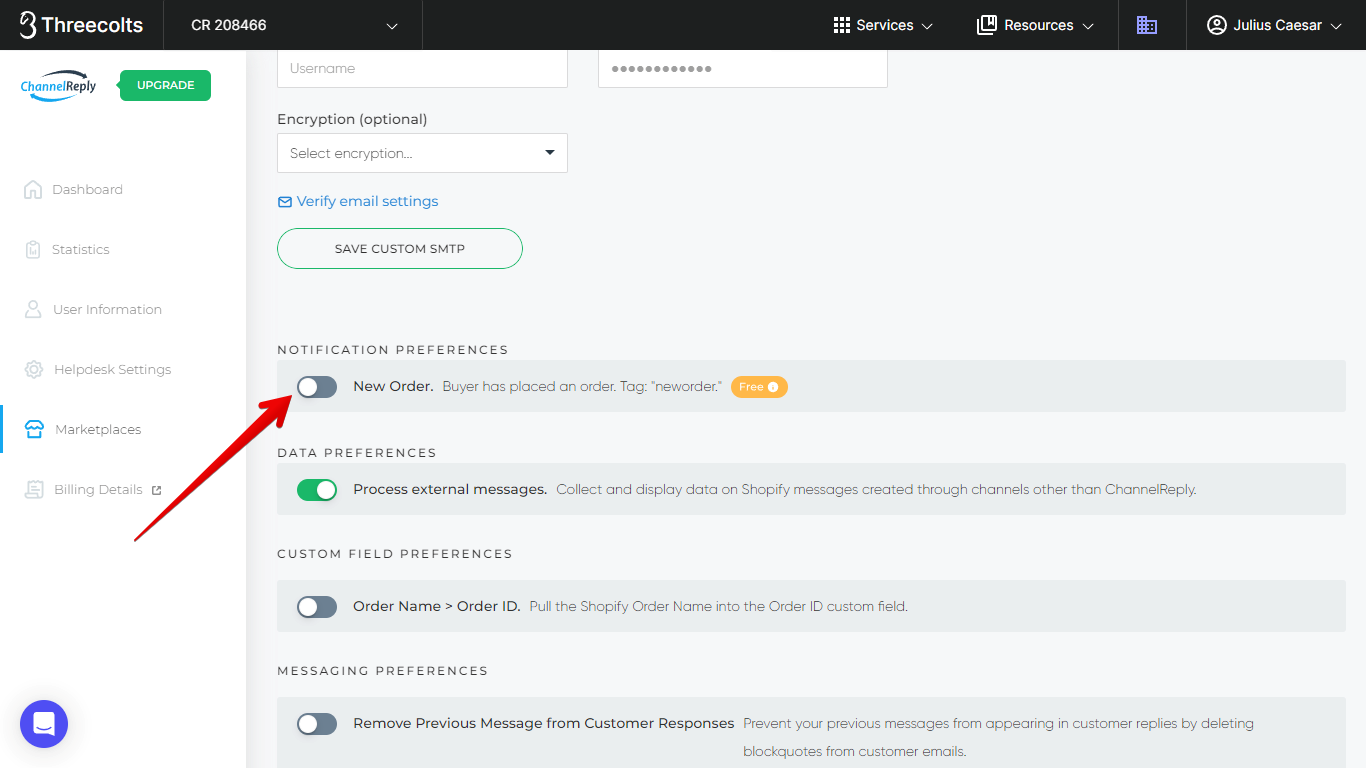
New Order Notifications
Our free New Order notifications don't count toward your monthly message limit. And unlike default Shopify order notifications, they come complete with data, tags, and custom fields. You can even reply to them directly or set up an autoresponder just for your new orders!
To turn these on, click Shopify on your ChannelReply dashboard.
Then hit "EDIT" under your connected store. (If you connected this store a long time ago and see "UPGRADE" instead of "EDIT," see our "What to Do..." section at the end of this article.)
Scroll down to Notification Preferences and enable the "New Order" slider. The change will be saved automatically.
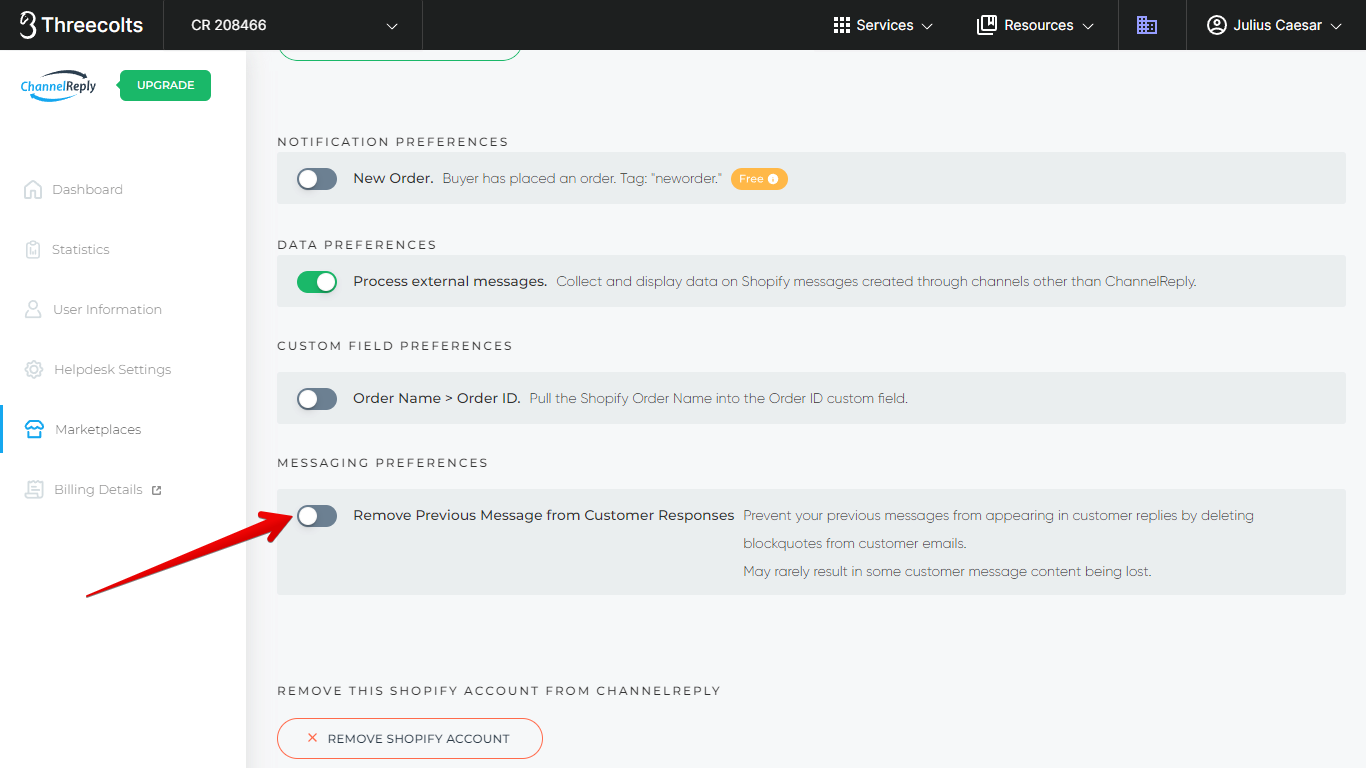
Remove Previous Message from Customer Responses
Some helpdesks will show your last message inside each response from your Shopify customers. This can result in every message you send appearing twice in the same ticket. That's a lot of unnecessary clutter!
"Remove Previous Message from Customer Responses" automatically erases all blockquotes from Shopify messages. Since most email clients display your previous message as a blockquote, this will save you from all those duplicate messages.
In most cases, this is a perfect solution. Online shoppers rarely use blockquotes in emails to sellers.
However, enabling this option does come with a risk. If one of your customers does use a blockquote in their message, ChannelReply will delete that section.
"Remove Previous Message from Customer Responses" is disabled by default. We recommend enabling it if the clutter in your helpdesk bothers you enough to make the small risk worthwhile.
Zoho Desk Departments / Help Scout Mailbox / Re:amaze Channel
If you use Zoho Desk, Help Scout or Re:amaze, you'll have an extra setting that lets you choose where to send messages from this Shopify account. In any of these cases, you can simply click the dropdown menu and choose one of the options that appears. The Zoho Desk version is pictured below.
Choosing a mailbox is important for Help Scout users, as you must have one selected in order to unlock features like Help Scout Custom Fields.
Re:amaze users may not see the channel they're looking for right away. If that happens to you, see our guide to managing Re:amaze brands and domains.
Kustomer Channel
Kustomer users will see the Kustomer Channel option. If you have to constantly change the "From" address in Kustomer to get your replies to go through or display properly, this setting can help. You can enter the "From" address you want to use and it will be set as the default for Shopify tickets in the future.
Since email templates can be tied to a specific "From" address, this allows you to avoid problematic templates that don't work well for Shopify.
Note that email templates are different from Workspace Shortcuts (canned replies). You can safely use Kustomer Shortcuts with ChannelReply.
Choosing a Kustomer Channel will not change the email address seen by your customers. The customer will still see your Sender Email instead (in this case, your ChannelReply Email, unless you used custom SMTP).
For Kustomer Channel to work with Shopify, you must either use your ChannelReply Email as your Sender Email or set up email forwarding with custom SMTP to use a branded email.
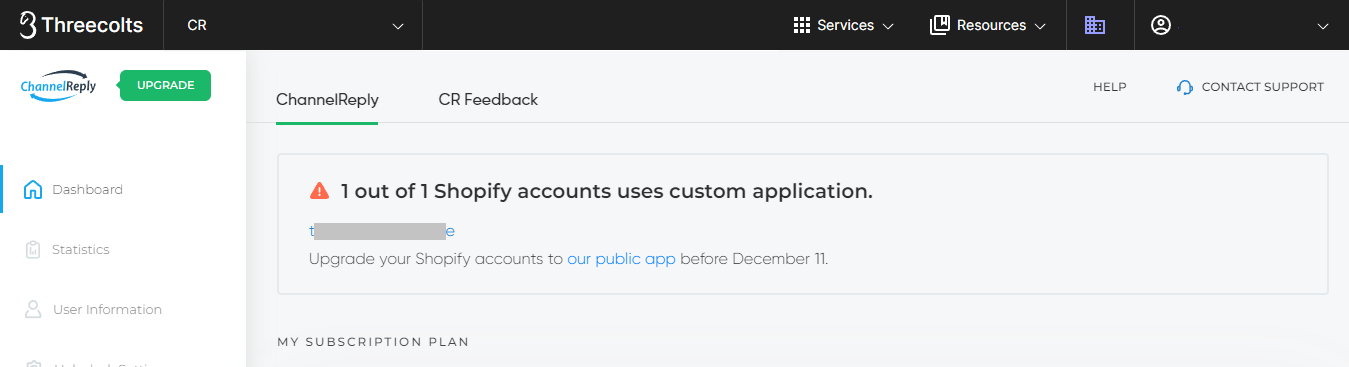
What to Do if You Have a Warning about Custom Apps or See "UPGRADE" Instead of "EDIT"
If any of your Shopify stores are currently on our old custom app or private app, you will see a warning on your ChannelReply dashboard. This will include a list of all stores with an outdated app.
You will also see "UPGRADE" instead of "EDIT" on the tiles of these stores. If this is the case, you will need to upgrade to our public Shopify app before you can edit your account. This is quick and easy and will not disrupt messaging or lose your settings.
Click the "UPGRADE" button to get started.
This will take you to our public listing on the Shopify App Store. Click "Install."
If you were not already logged in to a Shopify admin account, you'll be prompted to log in now. Be sure to log in as an admin of the Shopify store you need to upgrade.
If you have more than one Shopify store on your account, you'll have the chance to choose which store you wish to upgrade.
You'll then be prompted to select an account to use for the integration, even if you just logged in. Select the admin who should be responsible for managing the Shopify integration. (Note that the admin you select will get notifications from Shopify about any issues affecting the ChannelReply app.)
You'll be taken to a screen explaining the permissions that you're granting to ChannelReply. If you agree, click "Install app" in the upper right or bottom right of the screen.
Finally, you'll be taken back to your ChannelReply dashboard. The upgraded account will no longer be listed in the warning at the top of the screen, and if that was the only affected account, the warning will be gone. When you go to edit your account again, the button will have changed back to "EDIT" instead of "UPGRADE."
Stuck? Have questions? We’re here to help! Contact us and our team will get back to you shortly.