Need help finding your way around ChannelReply? This article shows how to navigate your account and update your settings, and explains what everything does.
Click on any screenshot to see the full-sized image.
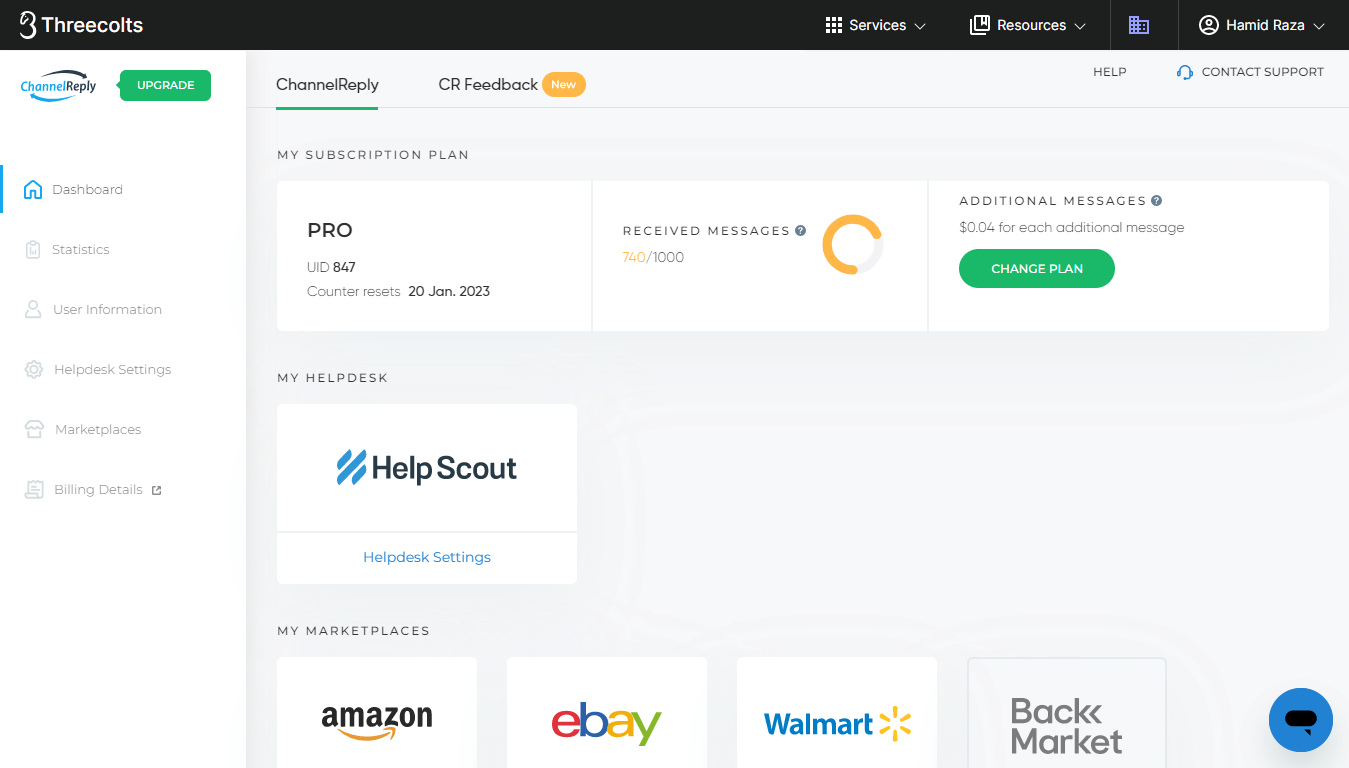
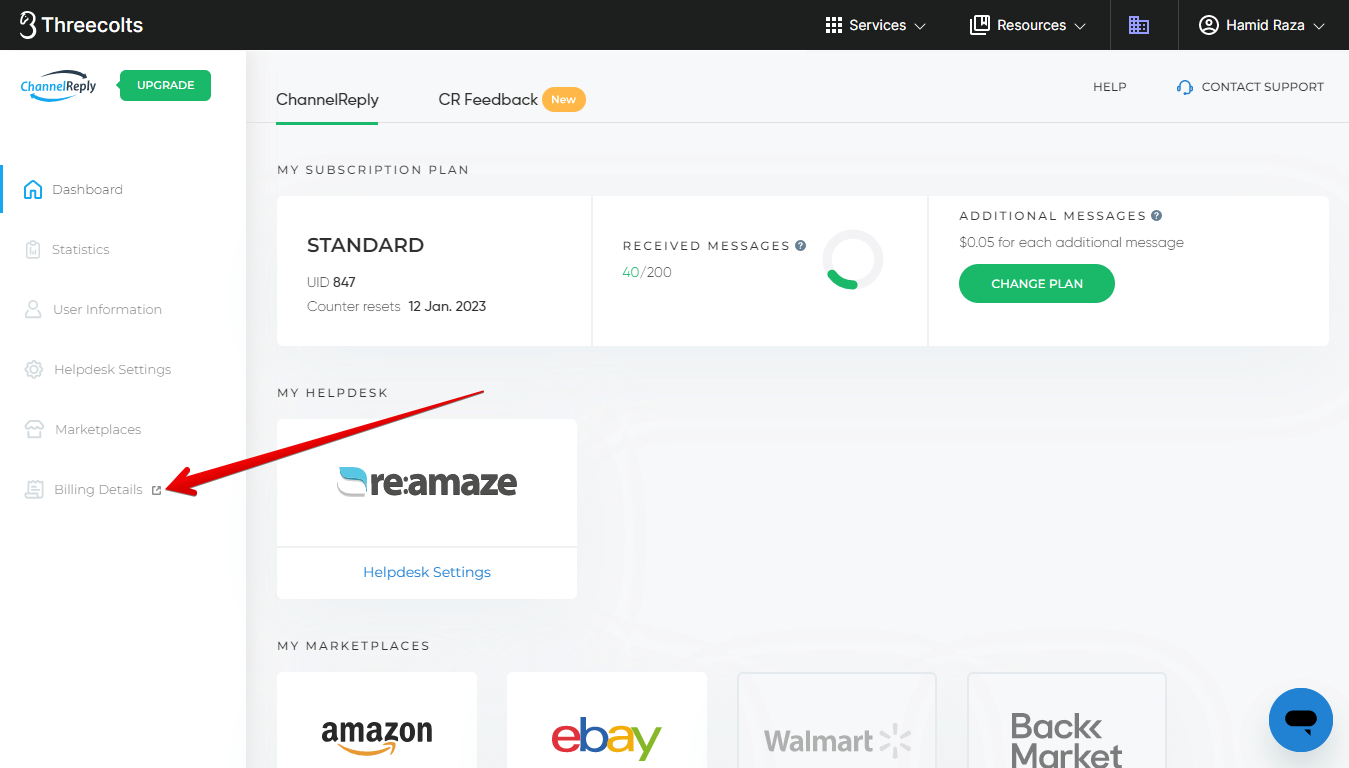
The ChannelReply Dashboard
The dashboard is the first screen that appears when you sign in. You can also access it by clicking “Dashboard.”
The ChannelReply dashboard includes five sections:
1. MY SUBSCRIPTION PLAN
This block shows the following info:
- Your current ChannelReply plan.
- UID: Your user ID, a number used by ChannelReply support staff to identify your account.
- Counter resets: The start date of your next billing month, shown in DD Mon. YYYY format (e.g. 6 Feb. 2021). Any monthly charges on your account will be billed on this date, and your message counter will be reset once payments are confirmed.
- TRIAL PERIOD: Visible only during the free trial. Shows the number of days remaining until your free trial ends.
- RECEIVED MESSAGES: The number of messages you’ve received / the number of messages included in your current plan. It will turn red if you reach or exceed your monthly message limit.
- ADDITIONAL MESSAGES: What you see here will depend on the status of your account.
- During the free trial, this will show "No charge during free trial." All messages are free during the trial, even if you pass your limit.
- Once the trial has ended, this will switch to displaying the cost for each additional message if you exceed your limit.
- If you exceed your limit, you will see the total accumulated overage charges here.
- If you have a legacy plan (with hard message limits instead of overages), you will not see this section at all.
- CHANGE PLAN: Hitting this button will take you to our “Choose a Plan” page, where you can upgrade or downgrade your account at any time.
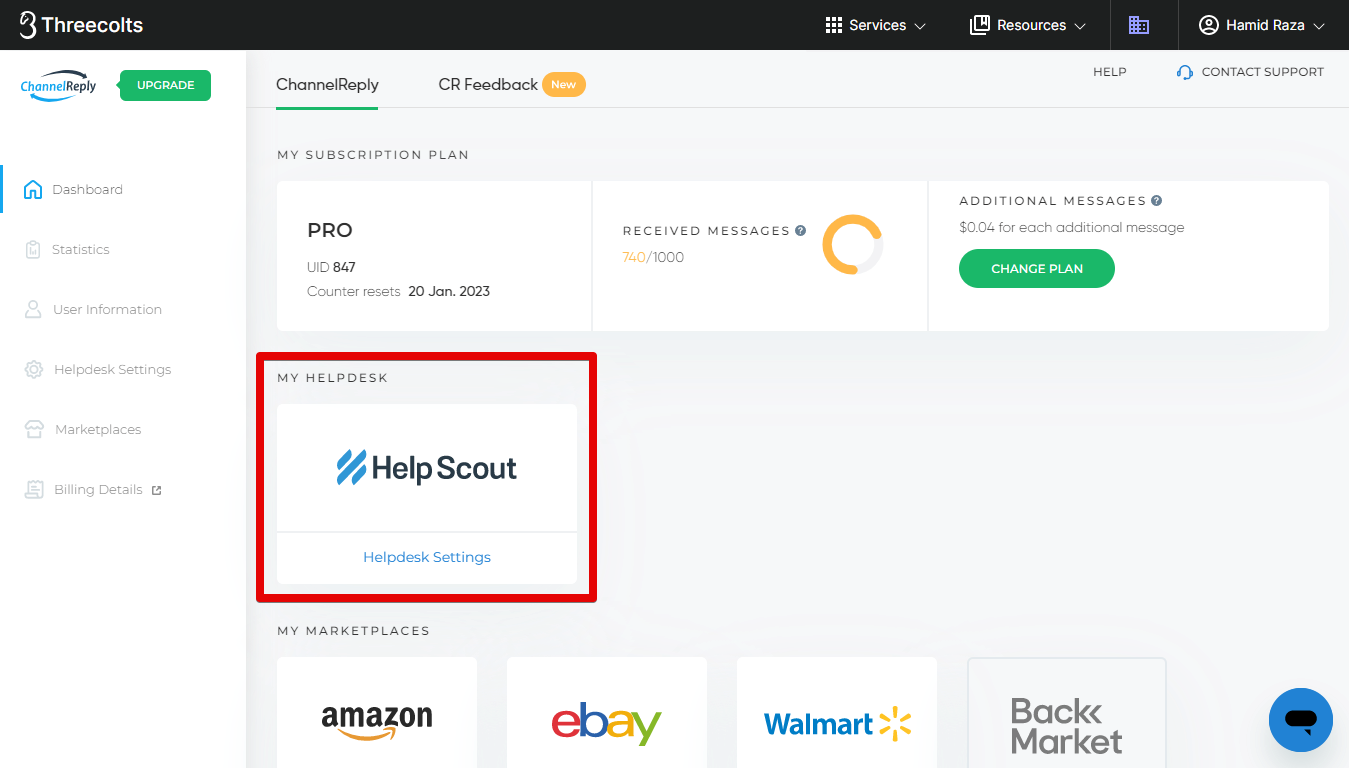
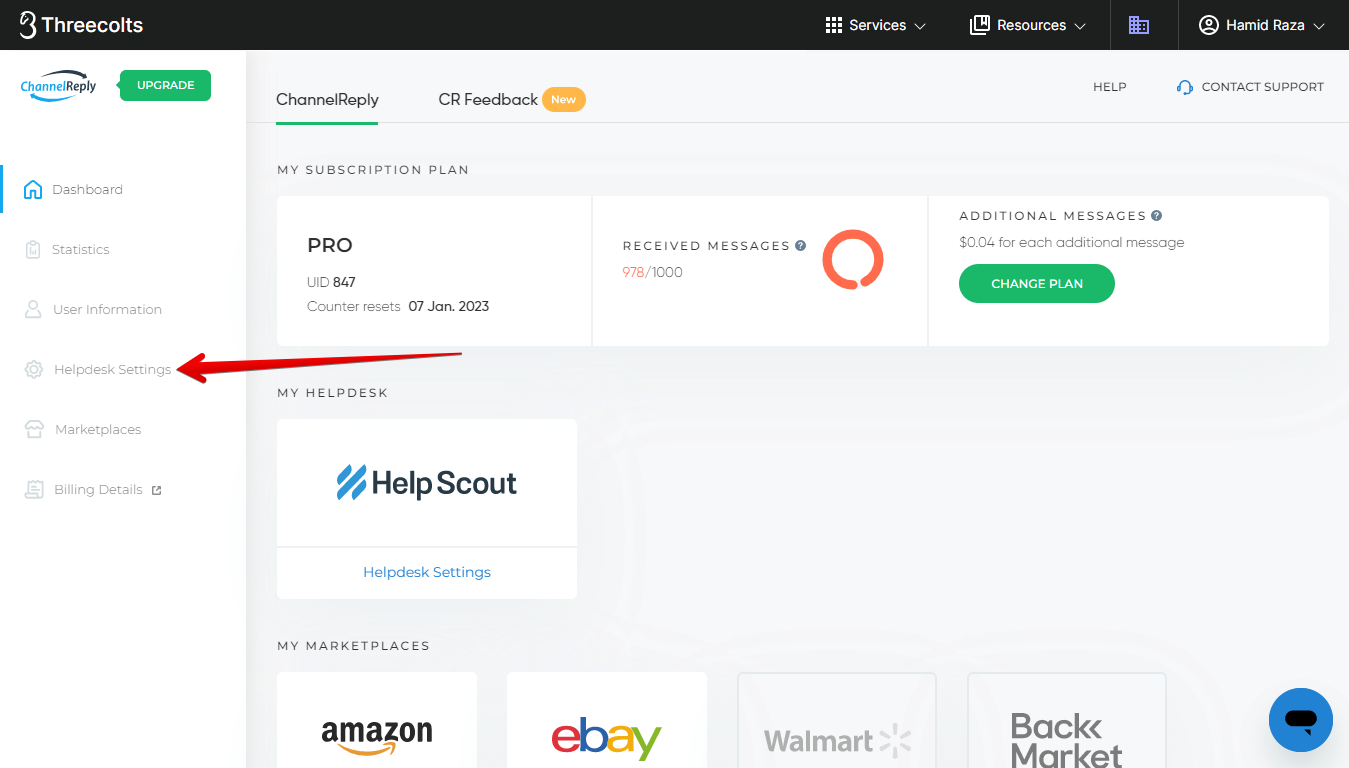
2. Helpdesk Settings or CHOOSE HELPDESK
“Helpdesk Settings” will show you the helpdesk you’ve chosen. Clicking on it will take you to Helpdesk Settings to manage your helpdesk’s options.
If you haven’t chosen a helpdesk yet, or if you’ve just disconnected one, “CHOOSE HELPDESK” will show you the list of available helpdesks. Clicking on one will take you to a setup walkthrough.
For a written guide on integrating your helpdesk, click on its name: Zendesk, Freshdesk, Help Scout, Gorgias, Zoho Desk, Kustomer or Re:amaze.
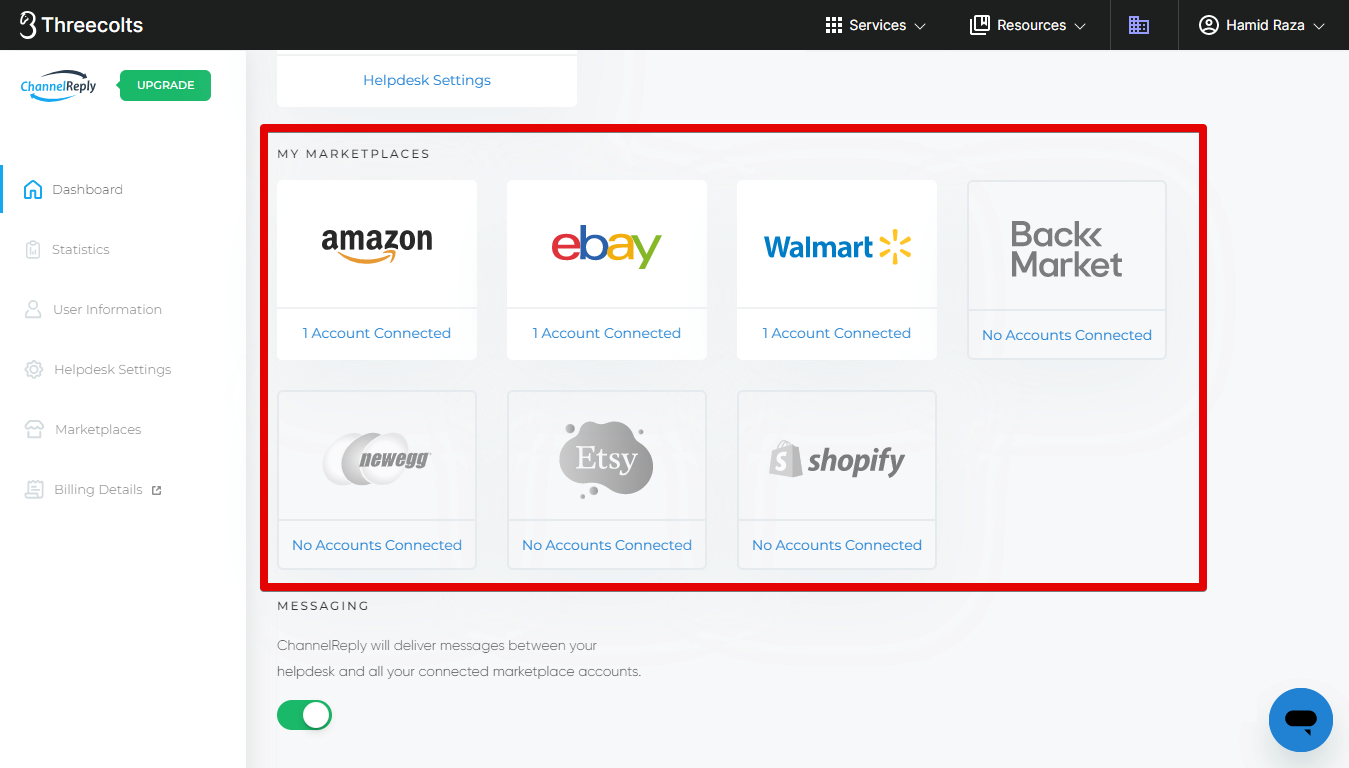
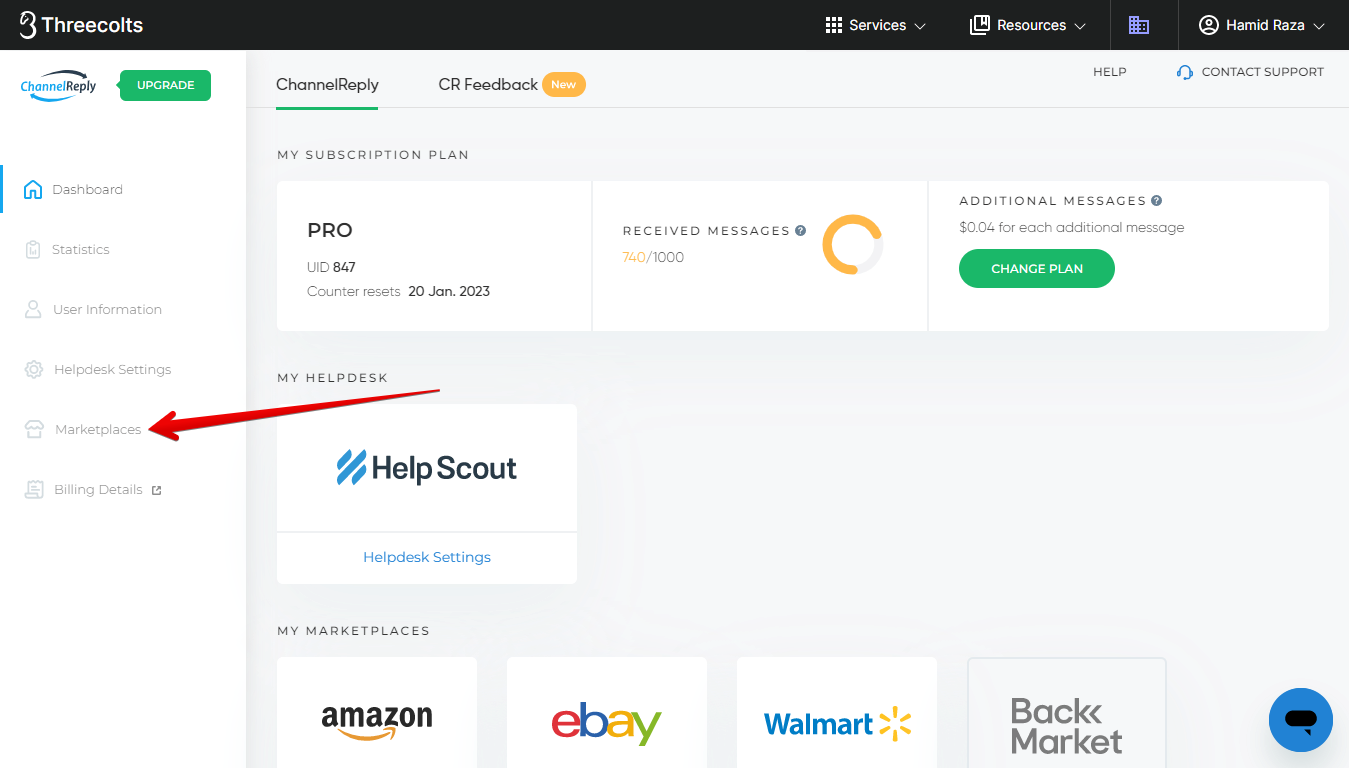
3. MY MARKETPLACES
If you haven’t connected any marketplace accounts, you will see all available marketplaces in grey. Clicking on a grey logo will take you to the setup walkthrough for connecting that marketplace.
For a written guide on connecting any marketplace, click on its name here: Amazon, Back Market, eBay, Shopify, Etsy, Newegg, Walmart US, or Walmart Canada.
Once you’ve connected a marketplace account, that marketplace’s logo will be colored in and the number of connected accounts will be shown. Clicking on it will take you to that marketplace’s management page, where you can edit connected accounts or connect new accounts.
The marketplaces shown here will depend on which helpdesk you use. All supported helpdesks have Amazon, eBay, Back Market, Etsy, Newegg and Walmart integrations available. Shopify is available for all supported helpdesks except Gorgias. (That's because Gorgias already has an exceptional native integration!)
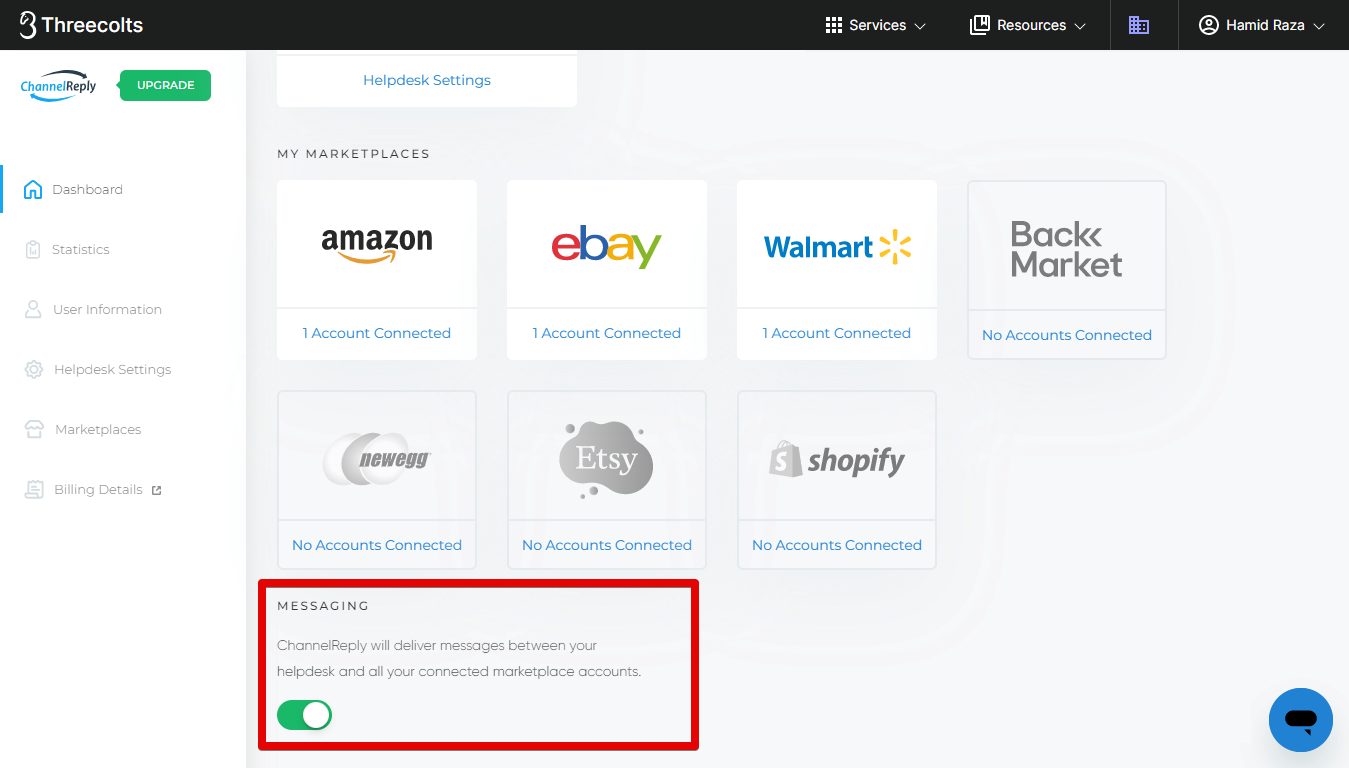
4. MESSAGING
If the slider shown here is green, it means your account is active and messages are being delivered. If it is grey, ChannelReply is not delivering messages. You must connect a helpdesk and at least one marketplace account to activate messaging.
Note that deactivating messaging does not cancel your subscription. Your subscription is managed from the “Billing Details” tab.
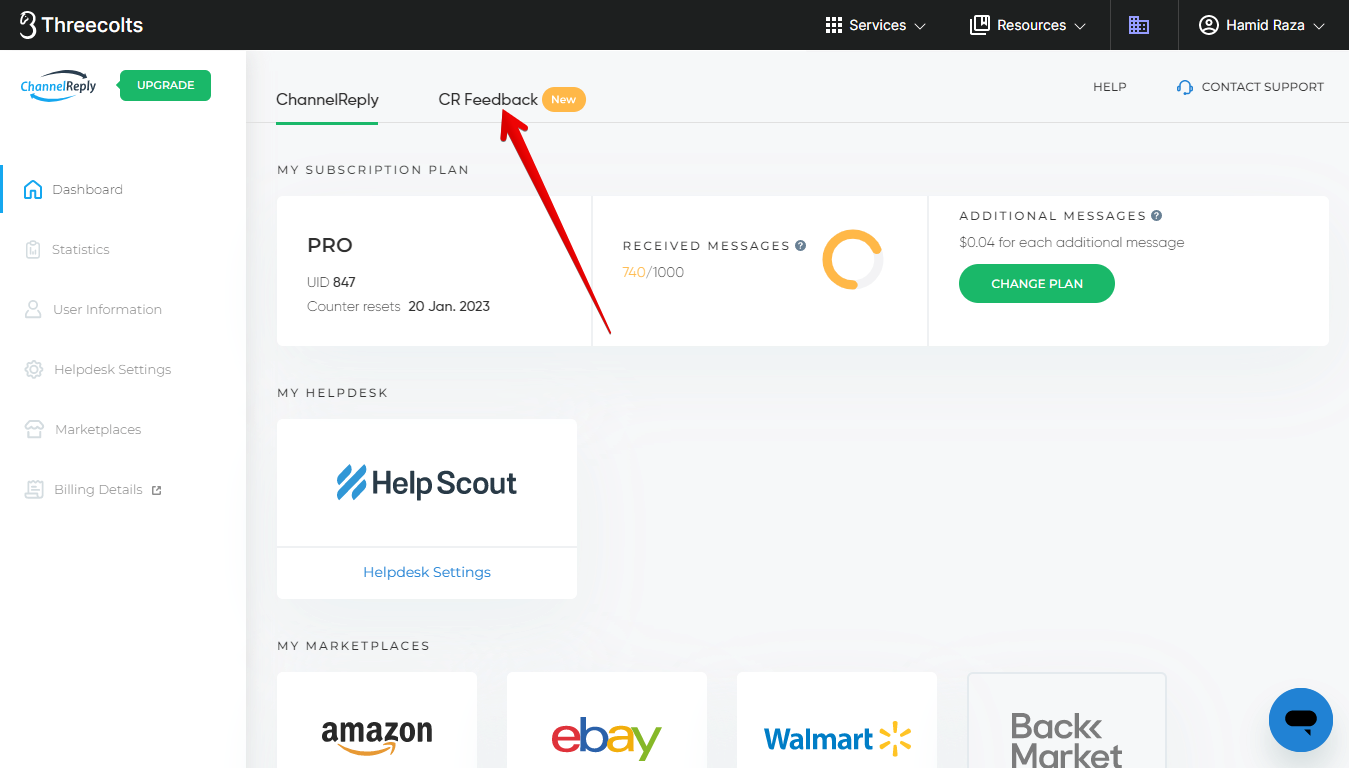
5. CR Feedback
When you're on the dashboard, you'll see CR Feedback at the top of the page.
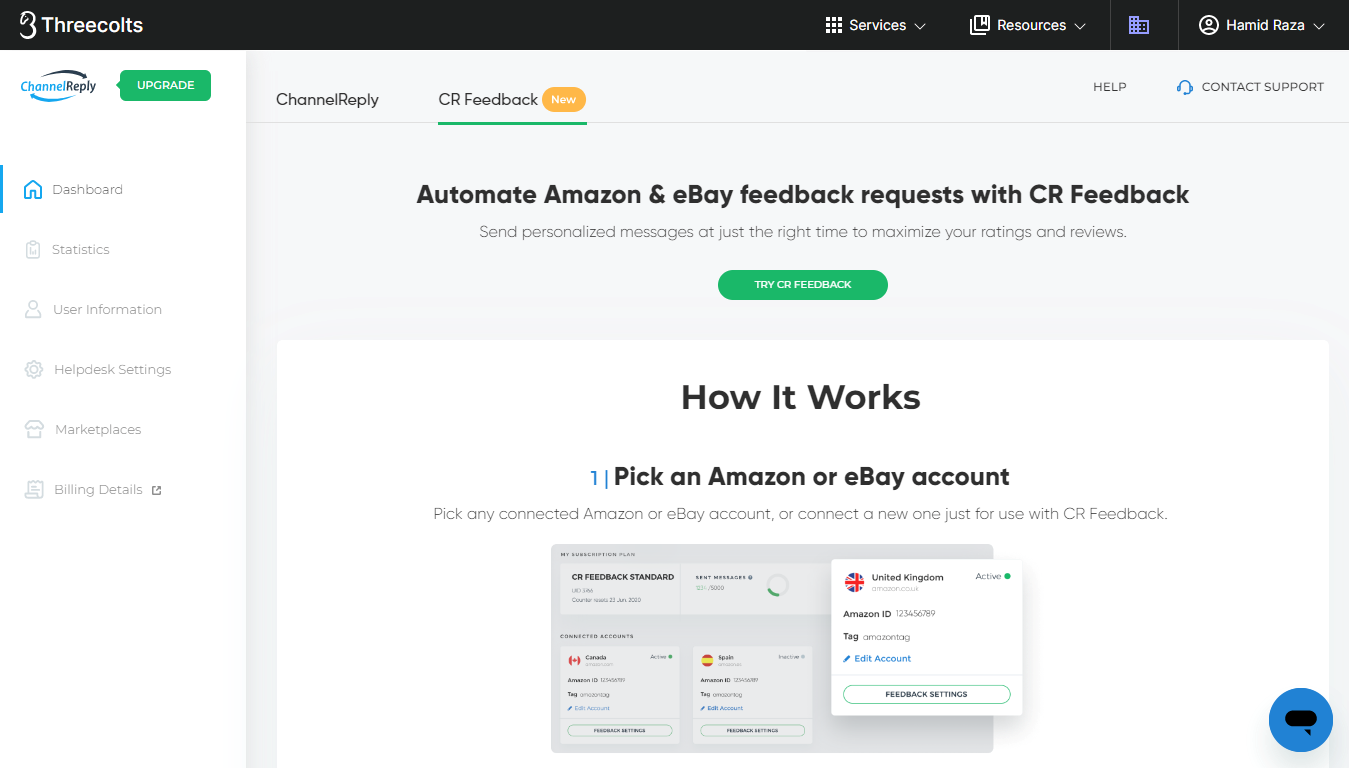
Clicking this will take you to the CR Feedback dashboard. If you don't have CR Feedback yet, you'll be able to sign up here by clicking "TRY CR FEEDBACK."
(If you don't have ChannelReply, you can start your free trial of CR Feedback here instead.)
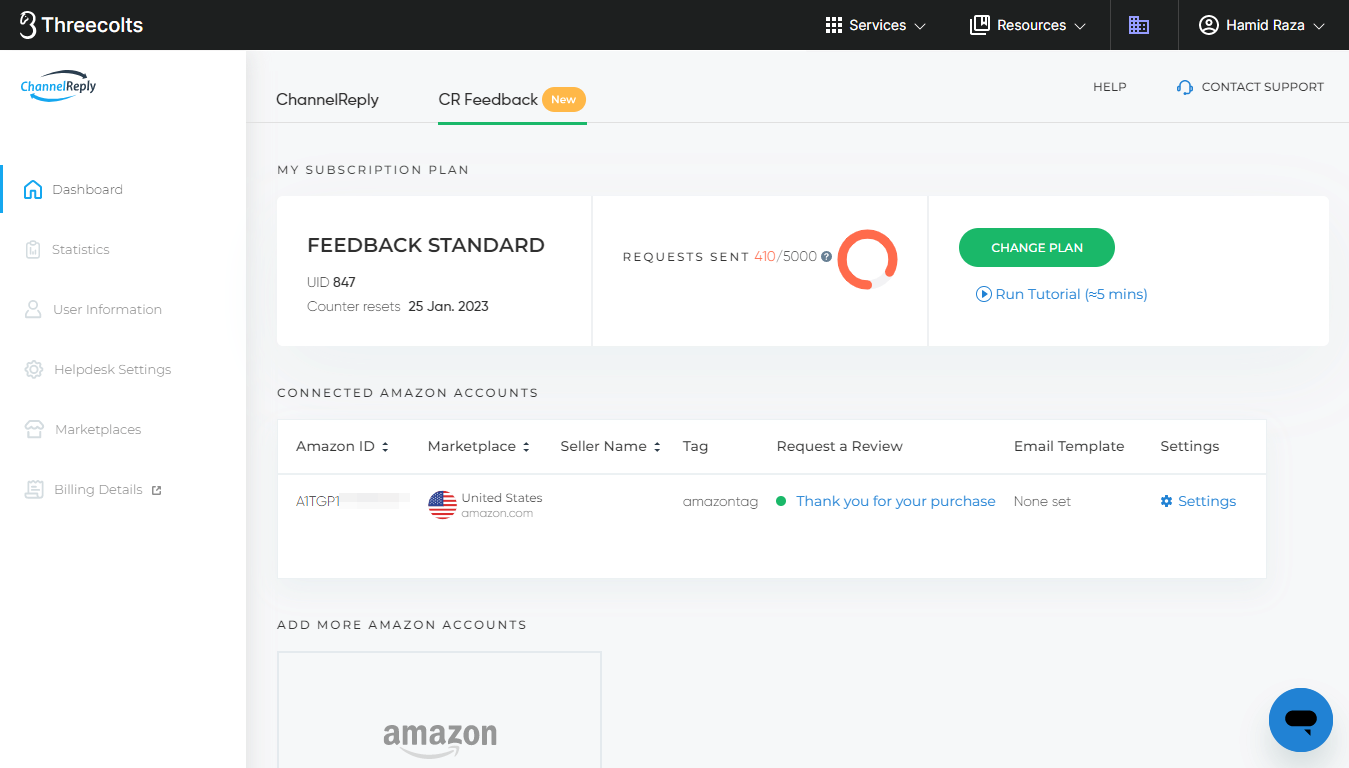
If you already have CR Feedback, you'll see all your options for managing Amazon feedback requests.
See "CR Feedback Instructions" for more info on using this powerful tool!
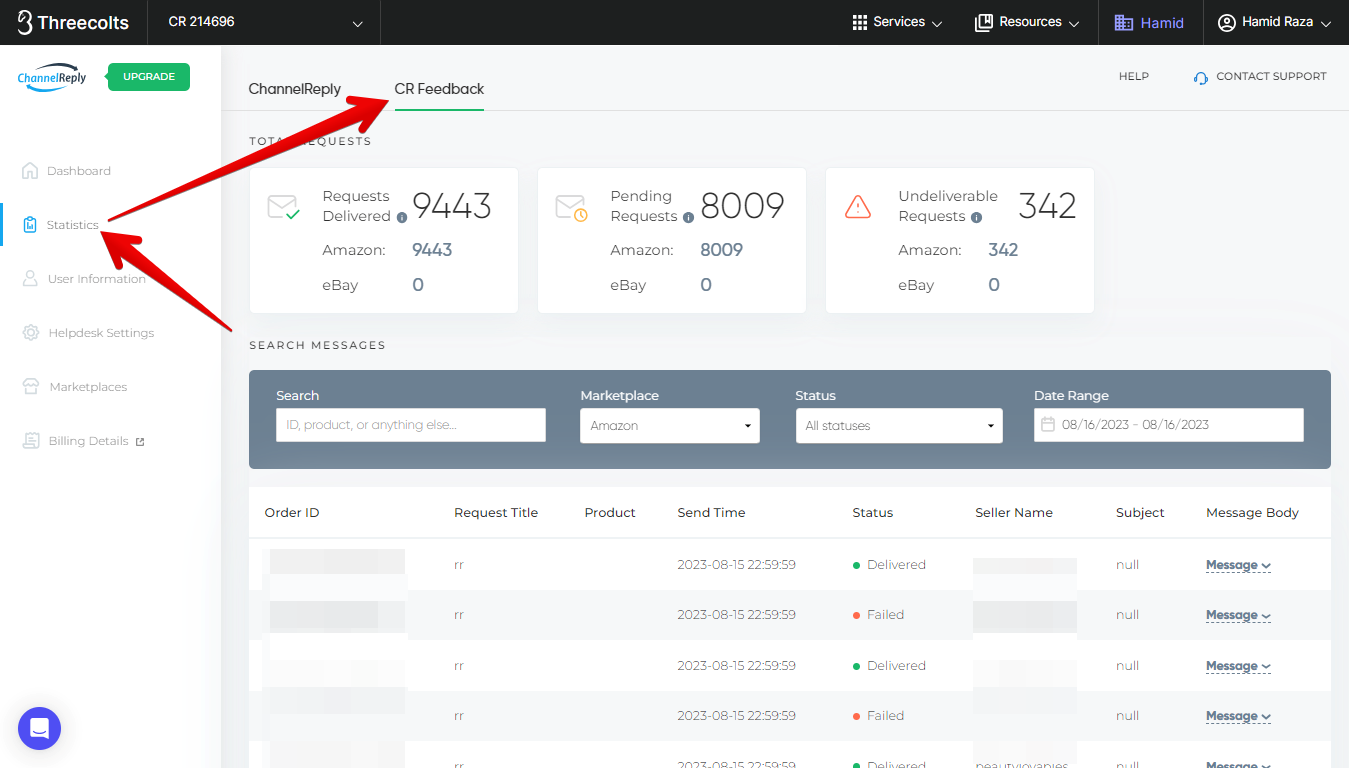
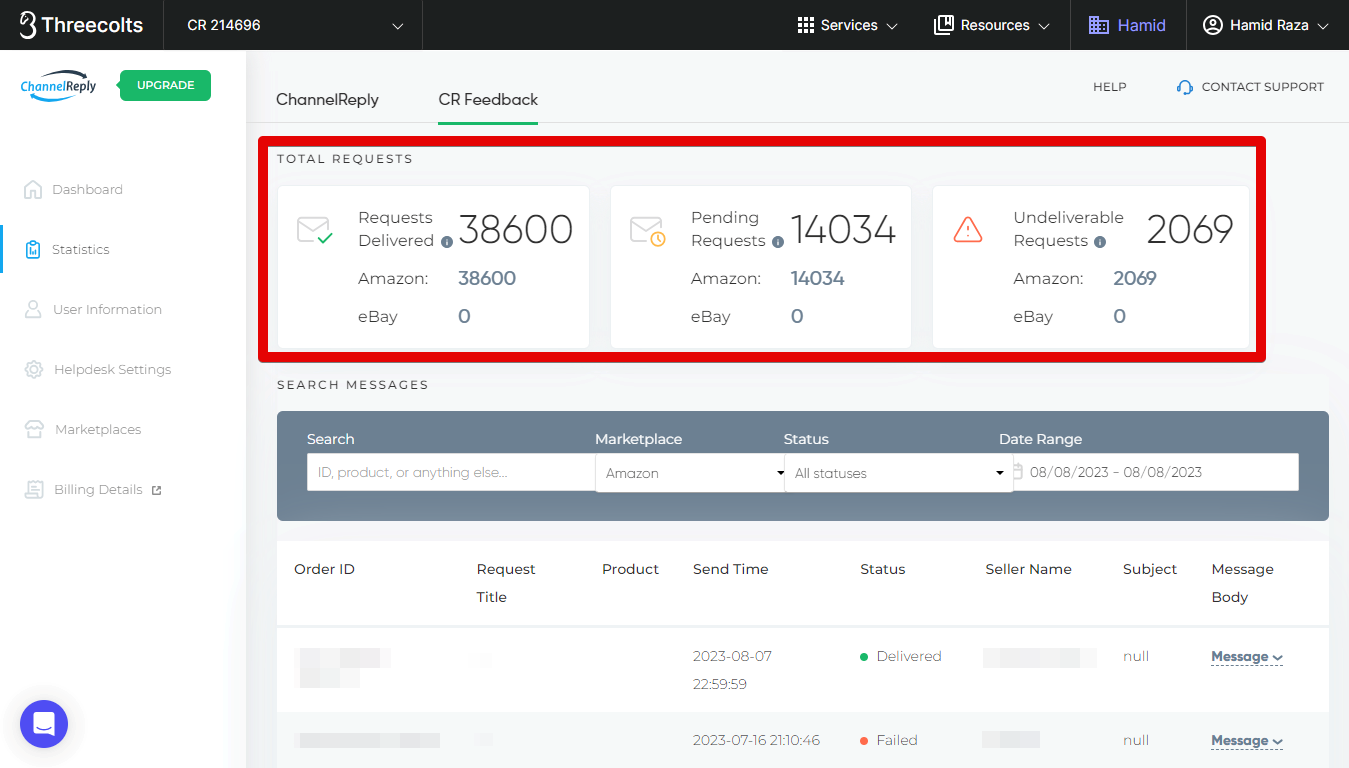
CR Feedback Statistics
You can see all your requests, including delivered, pending and failed requests across both Amazon and eBay in the Statistics section. Simply click Statistics and select CR Feedback from the top.
TOTAL REQUESTS
This section provides an overview of your total requests. Requests Delivered: Total number of requests that have been successfully delivered. Pending Requests: Requests that are currently scheduled for delivery or where we’re attempting to get order information. Undeliverable Requests: Expired requests with no data after 20 days and the ones where you’ve manually opted out of sending the requests.
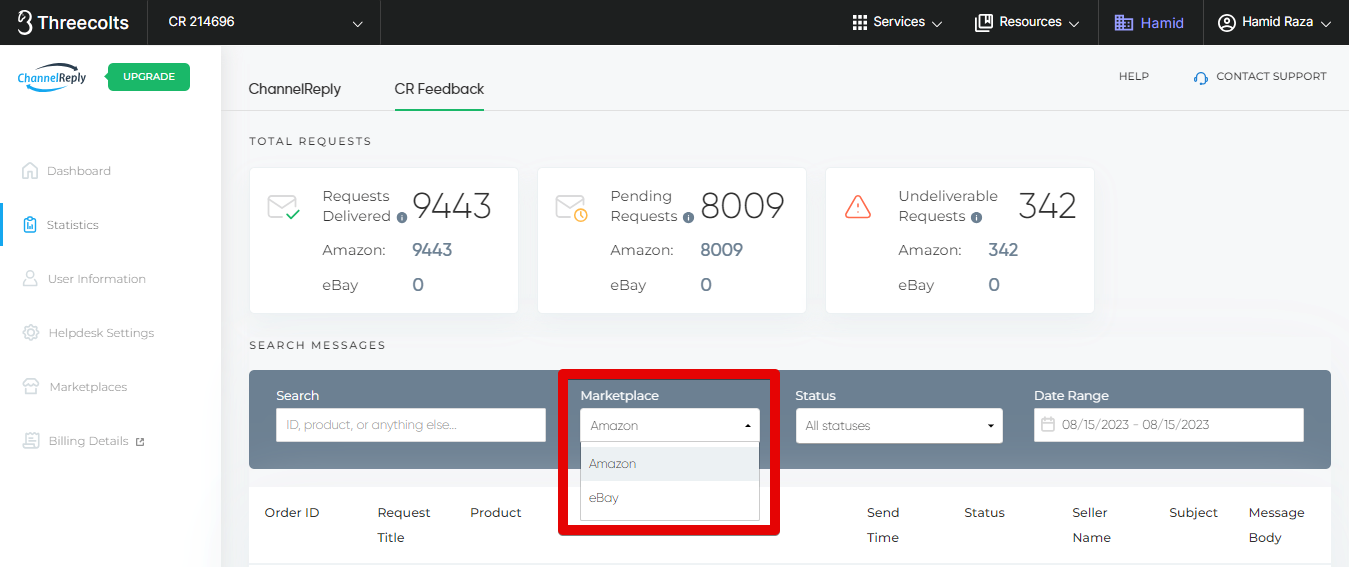
Search
You can search for anything from order ID to item title, product and more. Just type in your search term and hit enter.
Marketplace
Select whether you want to see Amazon or eBay requests.
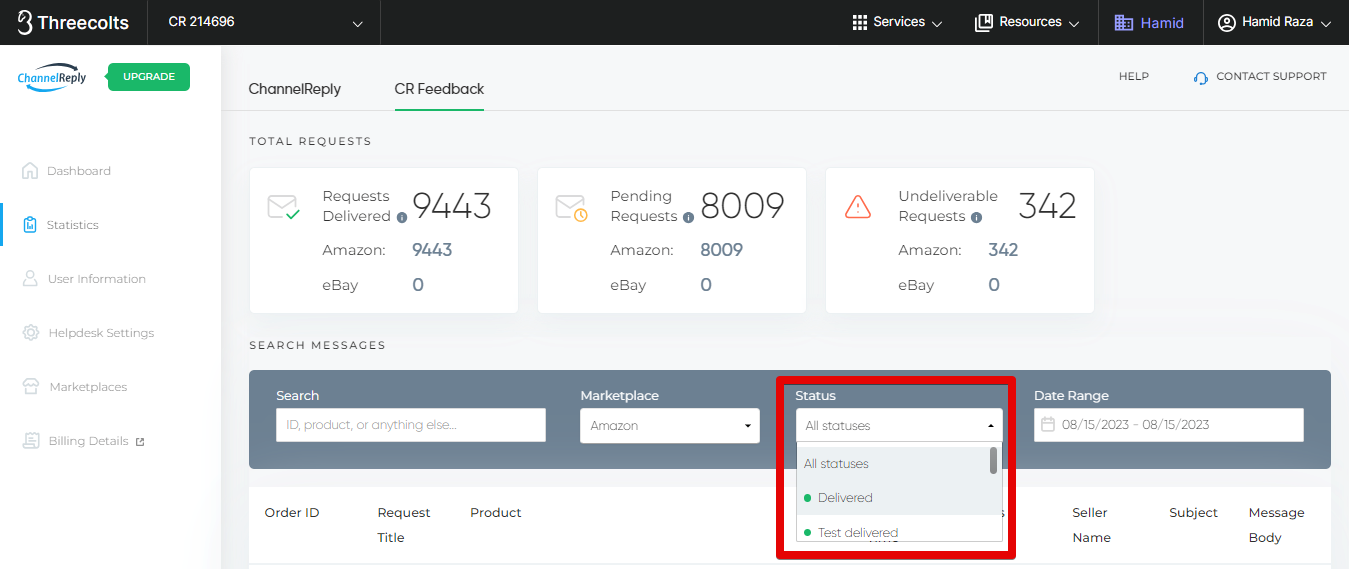
Status
Filter the feedback requests by their current status. We currently have have the following filters available:
- Delivered
- Test delivered
- Processing
- Sending
- Cancelled
- Failed
- Halted
- Stopped_thread
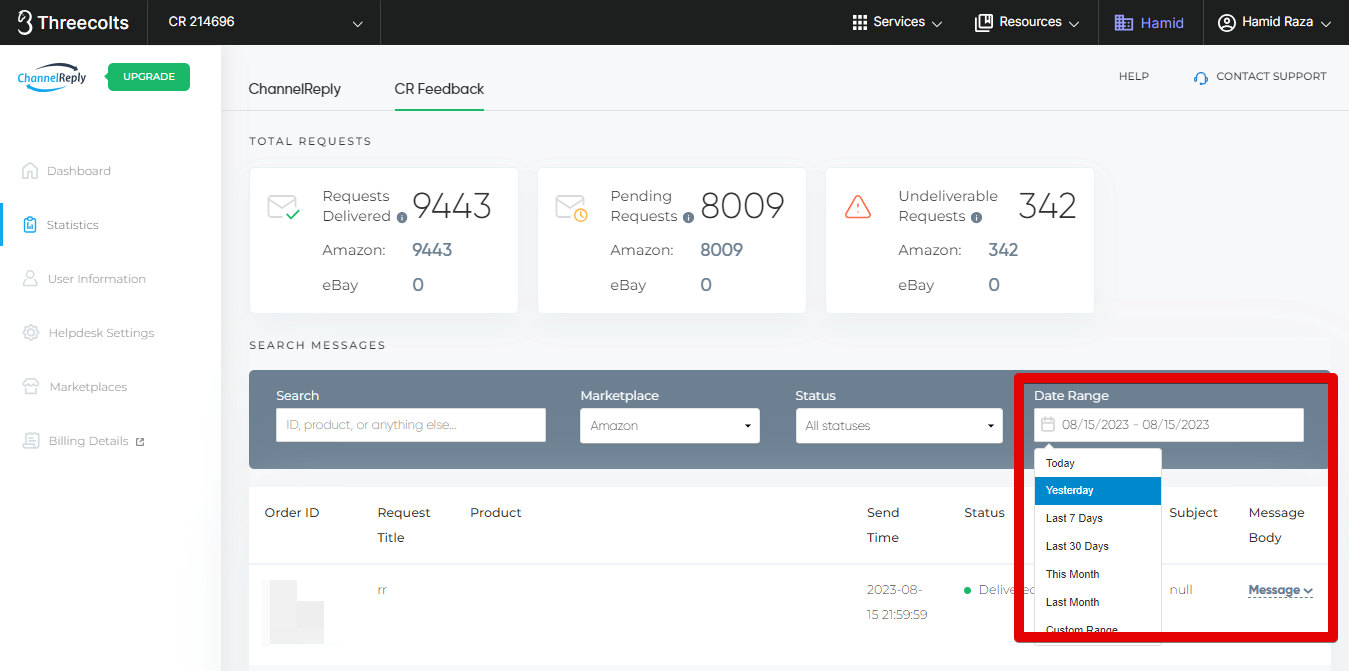
Date Range
Select a date range to see feedback requests sent only during that time frame. You can use the given options like “Today,” “Yesterday,” or “Last 7 Days,” or select “Custom Range” to enter your own date range.
Note that the way some of these requests are displayed may not be intuitive to everyone at first. We display requests on the following dates in Statistics:
Delivered and Delivered_test: Sent_at between fromDate and toDate
Sending: Send_at between fromDate and toDate
Failed: Failed_at between fromDate and toDate
The rest, that have send_at: Send_at between fromDate and toDate
The rest, that don’t have send_at: Created_at between fromDate and toDate
This means that some requests, mainly "Sending" requests, will appear on future dates in the report. So, for example, you may see that you have 200 pending requests at the top of the screen, but no yellow-status Sending requests at all if you’re looking at previous dates. You’ll need to specifically set your date range to include the future to see those scheduled requests.
Also note that the report currently defaults to only showing today's requests, so if you have low request volumes, you may not see much at first until you set a date range.
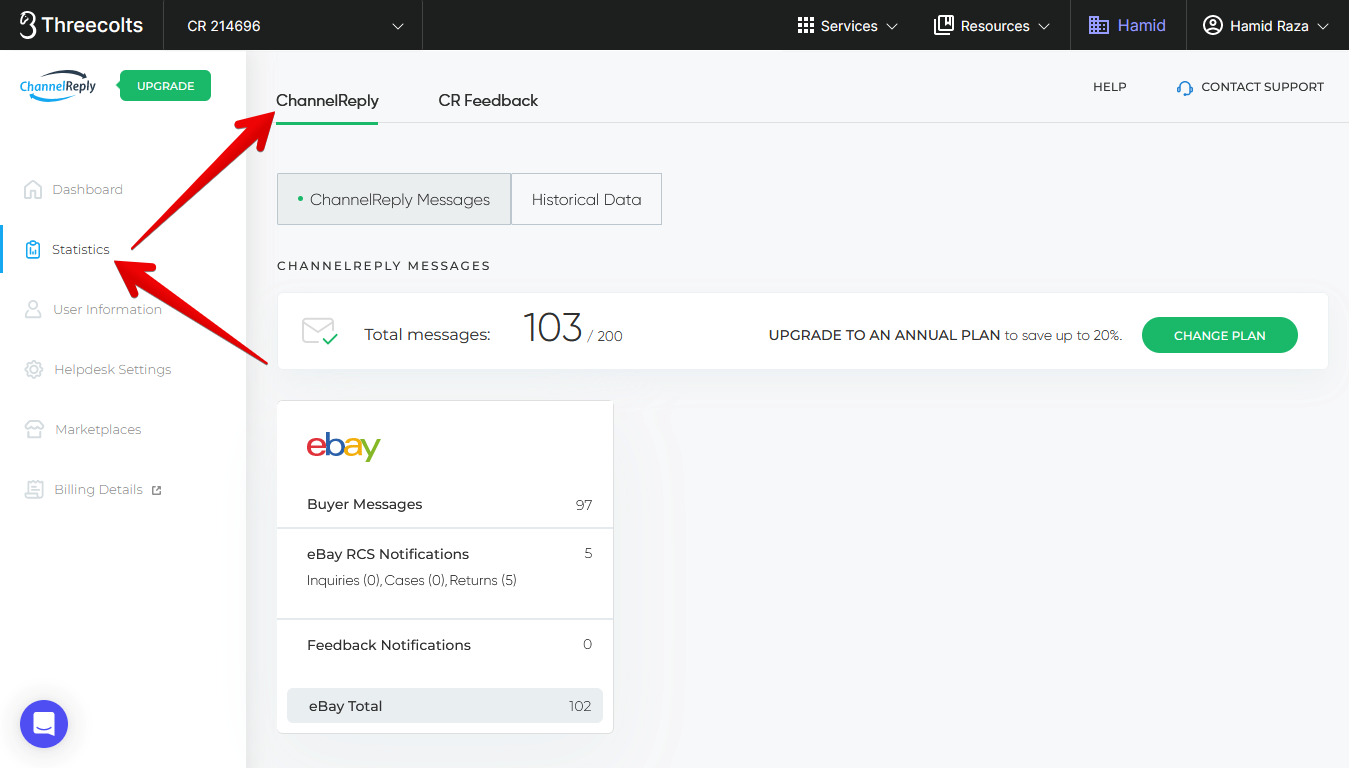
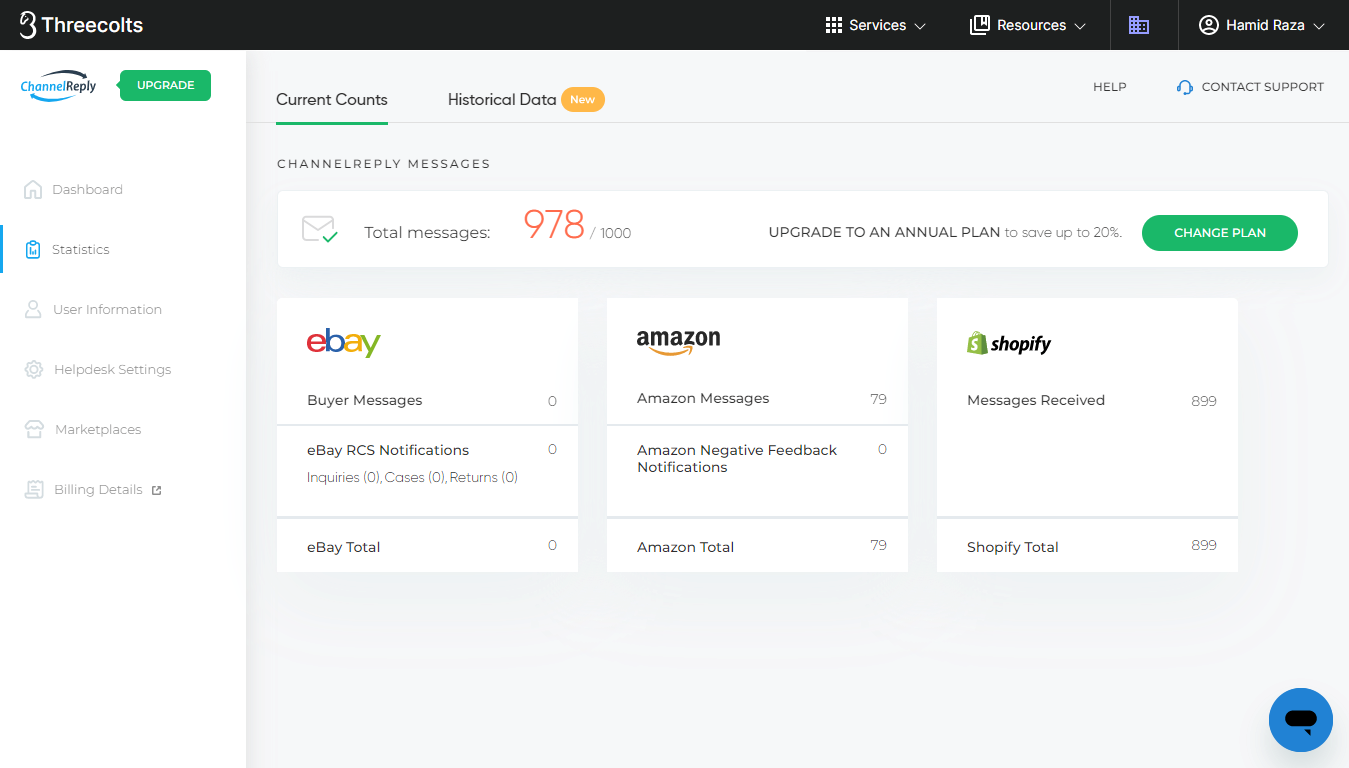
ChannelReply Statistics
You can access the ChannelReply Statistics tab anytime by clicking "Statistics" in the left-hand menu and choosing ChannelReply at the top.
On this page, you will see a tile for each marketplace you have connected to ChannelReply. (Marketplaces you have not connected will not appear.)
On each tile, you'll see your current message count for each marketplace. You'll also see some details like how many are buyer messages vs. how many are notifications that count toward your limit.
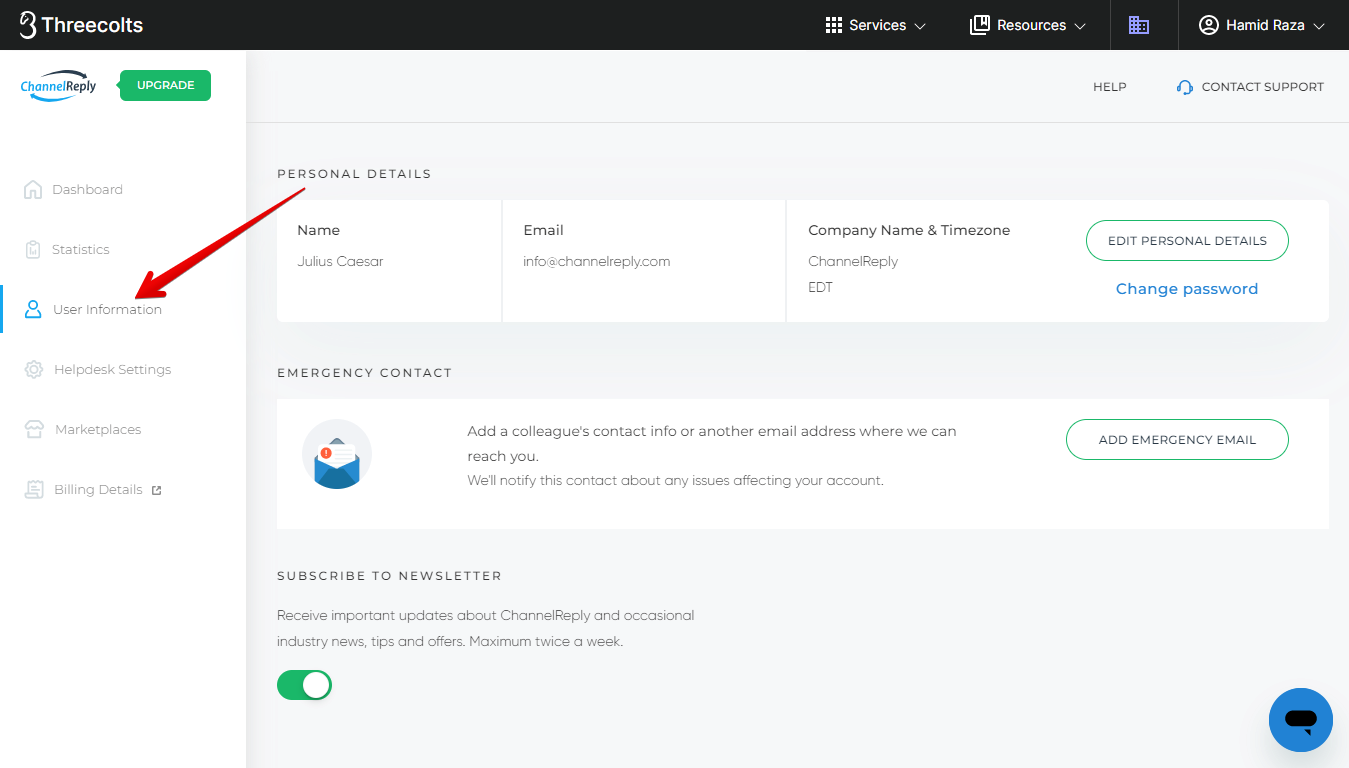
User Information
From inside your account, you can access User Information by clicking “User Information” on the left.
The User Information tab includes the following info and settings:
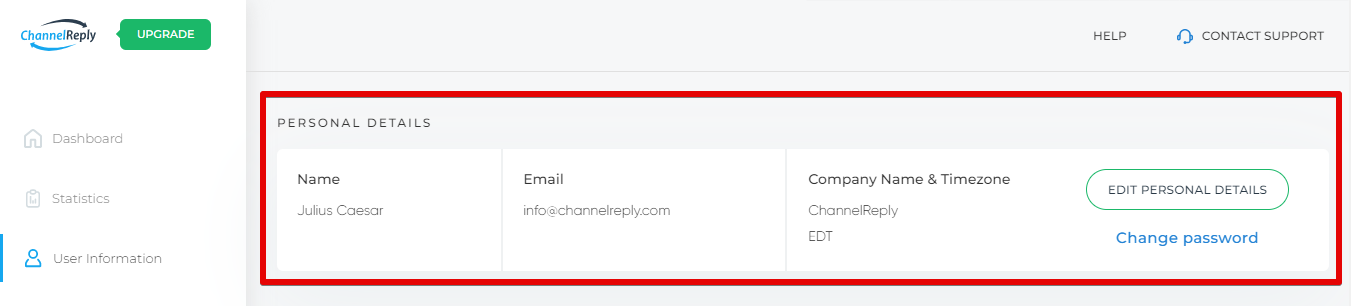
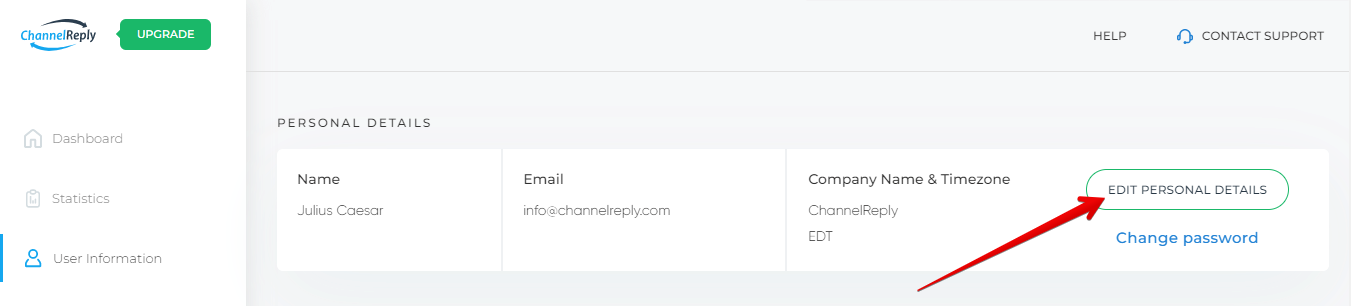
1. PERSONAL DETAILS
This section allows you to change your personal details: your name, email address, company, timezone, and password. You can make changes by clicking “EDIT PERSONAL DETAILS” on the right.
The email address listed here is the login email for your account. If you change your email address, you will need to use the new one to sign in to ChannelReply in the future. Your password will stay the same.
Note that your new address will also receive your account notifications, such as message limit warnings. Invoices and other billing notifications will continue going to your old email address. You can change your billing email under "Billing Details," as described later in this article.
Changing the timezone will change the times and dates displayed by ChannelReply in your helpdesk. By default, the timezone is set to GMT.
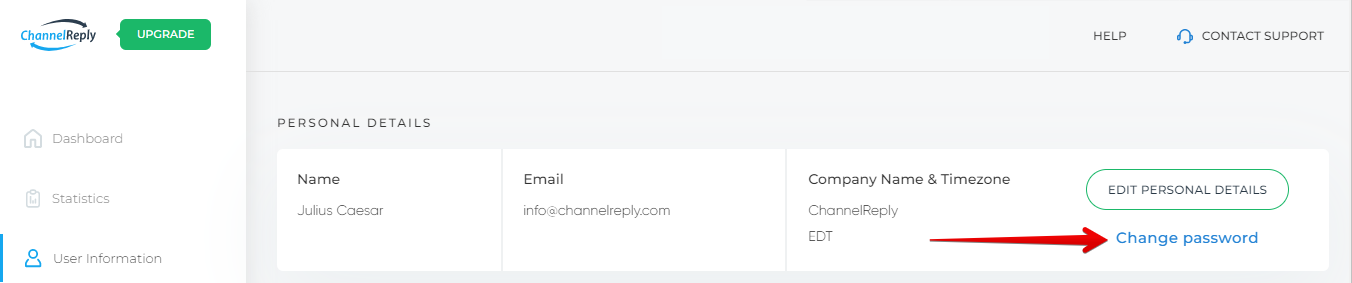
You can change your password anytime by clicking "Change password." You will simply need to enter your old password and your new password to complete the change.
Note: If you're unable to change your password from this screen, please contact us and our awesome support team will get help you with this right away!
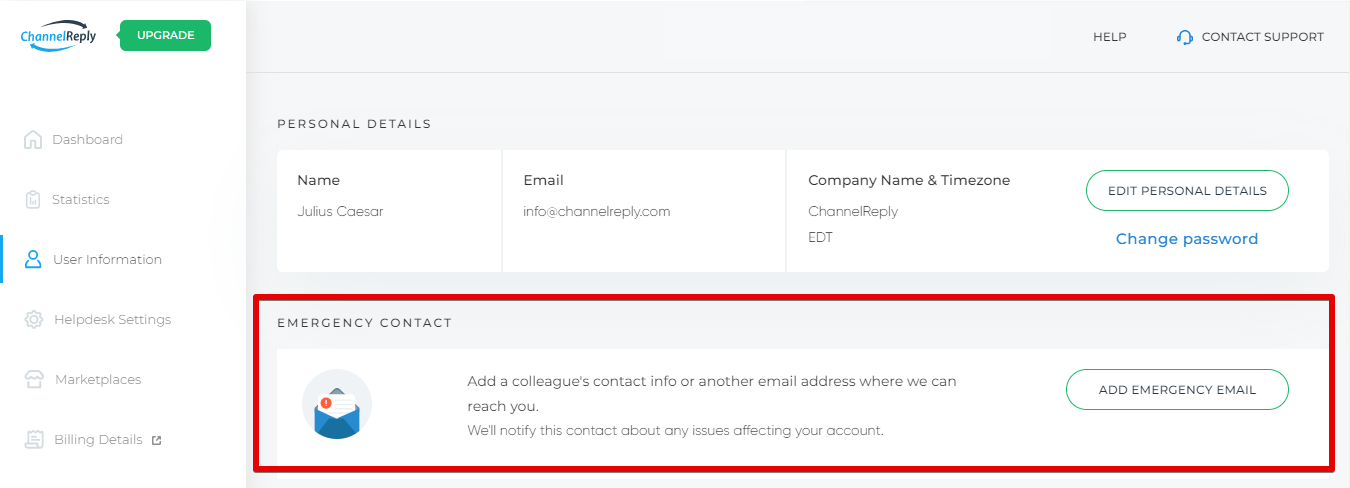
2. EMERGENCY CONTACT
Clicking "ADD EMERGENCY EMAIL" allows you to enter the name and email of a secondary contact. This contact will receive copies of all important account notifications. For example, it will get warnings about message limits and token expirations.
Make sure the email address you enter here is checked at least daily.
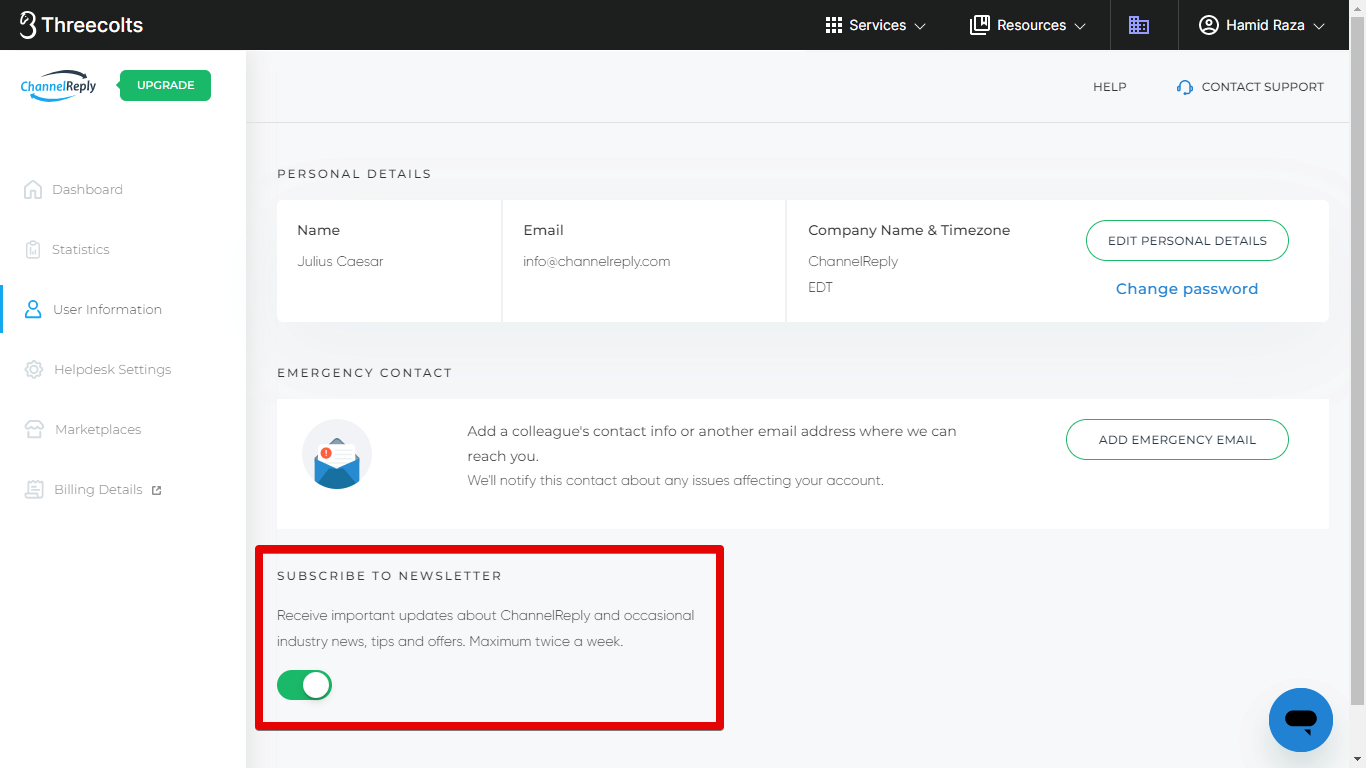
3. SUBSCRIBE TO NEWSLETTER
Use the slider at the bottom of the page to subscribe to or unsubscribe from the ChannelReply newsletter. We’re constantly adding new features, so be sure to subscribe to keep up with the latest improvements! We always try to keep our newsletters short and never send more than two per week.
Note that if you have previously unsubscribed, you may need to contact us to ask us to re-subscribe you to our newsletter. Our email system is designed to stop us from accidentally re-subscribing people without their permission. It's a good idea to reach out if you haven't received any newsletters in the last 30 days.
Helpdesk Settings
The Helpdesk Settings tab can be accessed in the left-hand menu when you are logged in to your account.
If you have not yet selected a helpdesk, you will be shown the menu of available options: Zendesk, Freshdesk, Help Scout, Zoho Desk, Kustomer, Gorgias and Re:amaze.
You will need to select one to continue with setup. If you aren’t sure which helpdesk would be best for you, you can find our advice in “Which Helpdesk Should I Use with ChannelReply?”
Once you select a helpdesk, you’ll be taken to our setup walkthrough. We also have written instructions available at the following links: Zendesk, Freshdesk, Help Scout, Gorgias, Zoho Desk, Kustomer, Re:amaze.
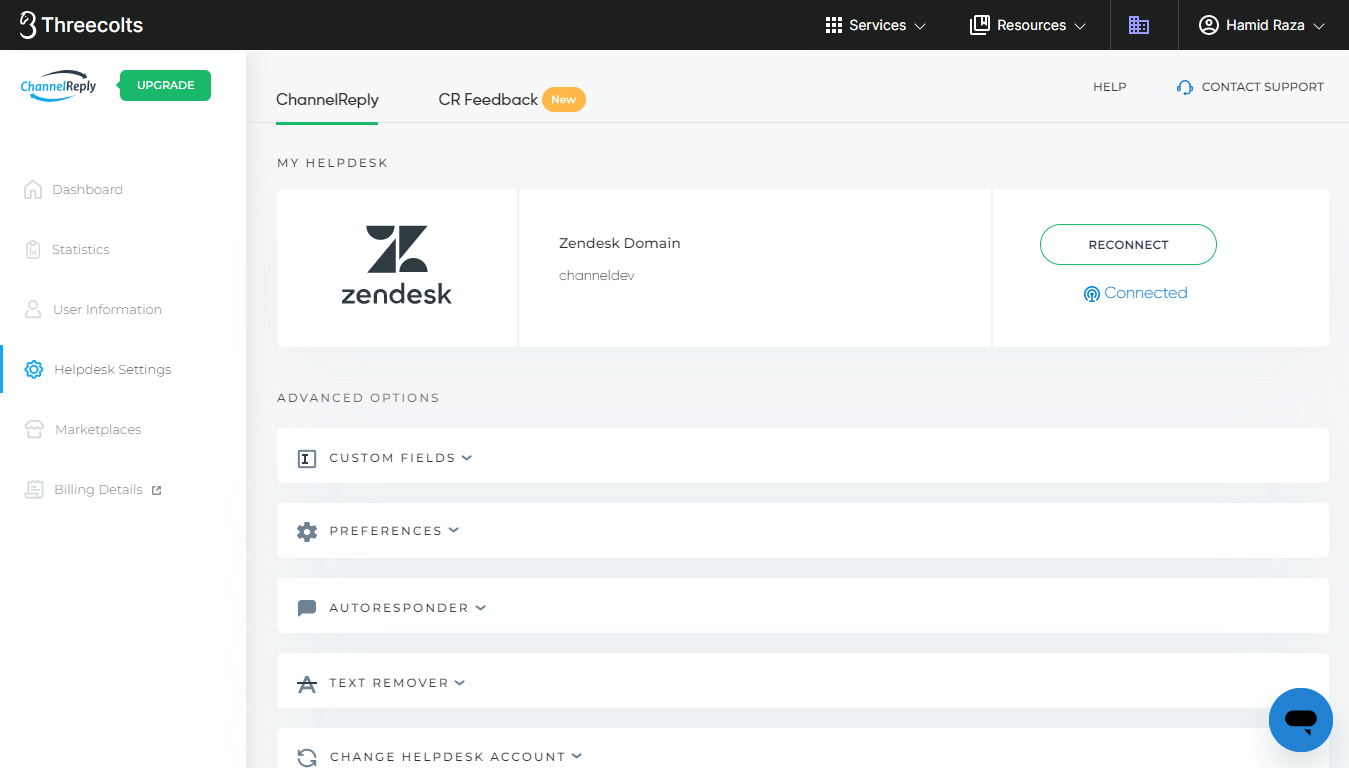
Already chose and connected a helpdesk? In that case, you will see all the options for managing your helpdesk integration here.
The exact options vary between helpdesks, but here are some of the most common features:
- Helpdesk Settings: Shows which helpdesk you have selected and basic information about the integration.
- EDIT SETTINGS / RECONNECT
- EDIT SETTINGS: This allows you to change integration credentials. For example, it may let you update your API token/key and login email address.
- RECONNECT: In helpdesks with simple OAuth credentials, you may only see one option, like RECONNECT. This re-authorizes your account.
- Test Connection / Connected / Disconnected
- Test Connection: Clicking this checks whether your connection with your helpdesk is currently working.
- Connected/Disconnected: Accounts with more modern integrations often show a Connected or Disconnected status. This status is constantly updated.
- In either case, if something is wrong, you can follow the instructions provided or contact us for help.
- ADVANCED OPTIONS
- Generally includes custom fields management.
- AUTORESPONDER: In helpdesks with complex autoresponder systems, you may see an AUTORESPONDER dropdown. This will contain tools that make it easier to create autoresponders compatible with your helpdesk. See the autoresponder guide for your helpdesk for more info: Zendesk, Freshdesk, Help Scout, Gorgias, Zoho Desk, Kustomer or Re:amaze.
- TEXT REMOVER: You can use this to automatically remove unwanted text from replies. For example, it can delete links or contact info that would violate Amazon policies.
- CHANGE HELPDESK ACCOUNT: This allows you to disconnect your current helpdesk so you can connect a new one. If you use this option, your helpdesk details will be erased, and you will be shown the menu for selecting a new helpdesk.
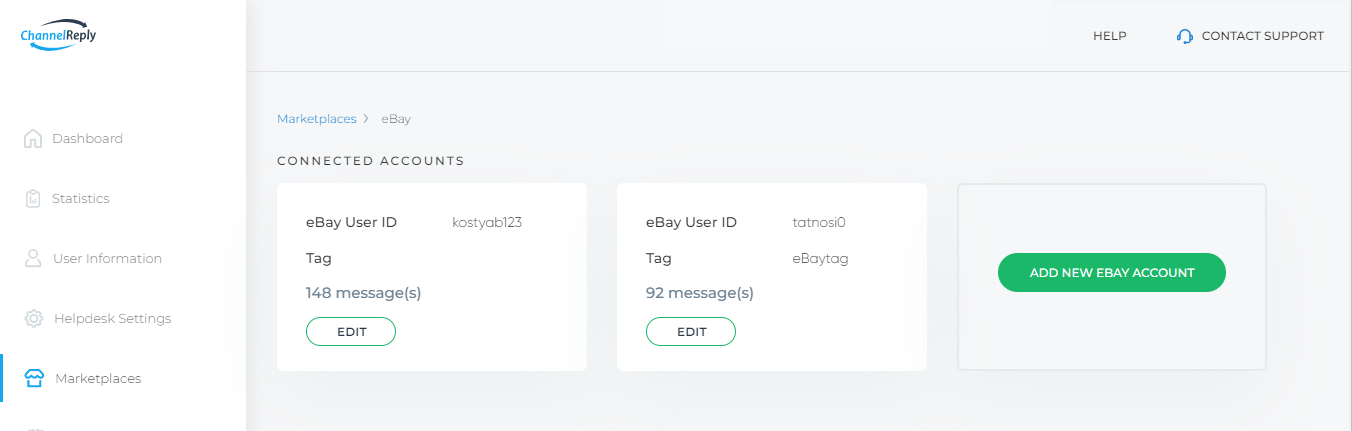
Marketplaces
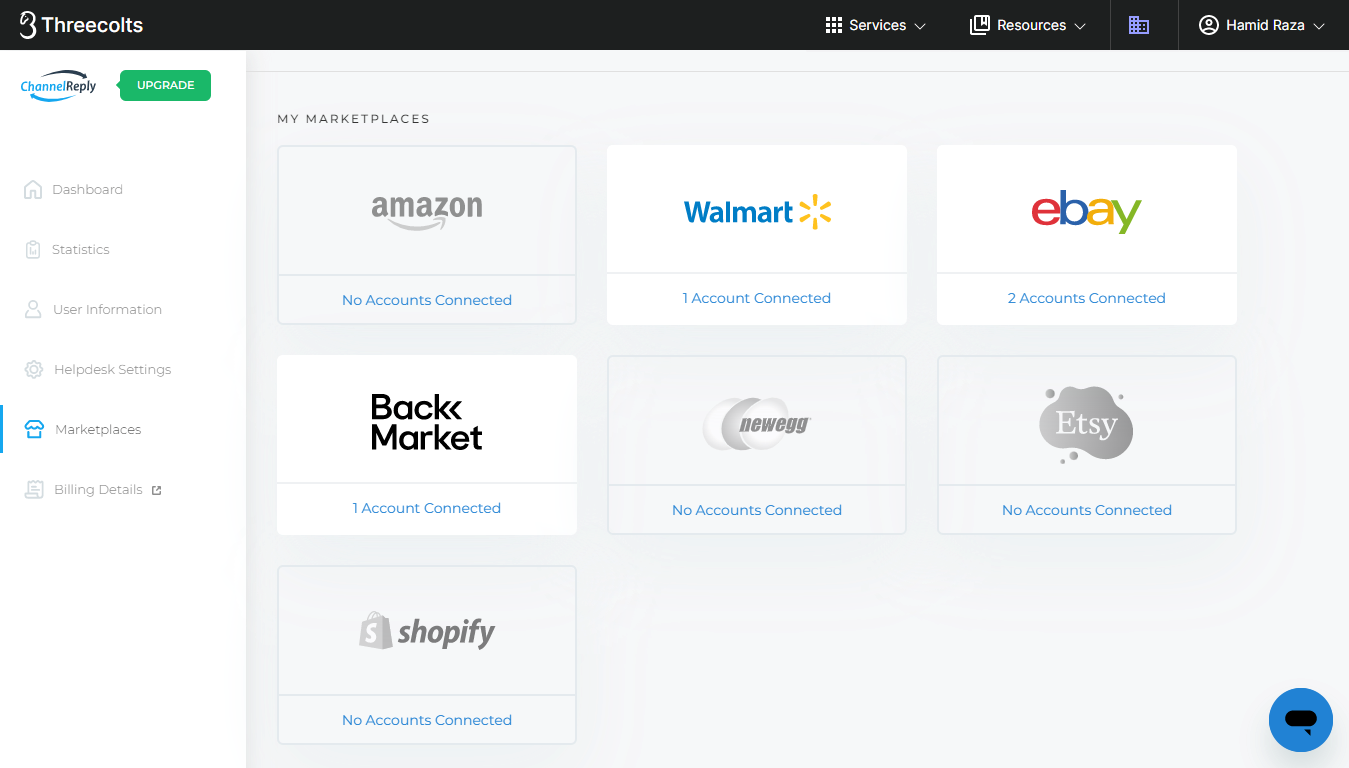
The Marketplaces tab can be accessed in the left-hand menu of your account.
You will be shown the menu of available marketplace integrations. These include Amazon, eBay, Back Market, Etsy, Newegg and Walmart on any account. You will also see Shopify if you use Zendesk, Freshdesk, Help Scout or Re:amaze.
If you have no connected accounts, the marketplace will be shown in grey with “No Accounts Connected” under it. Once you’ve added at least one, it will be colored in and show the number of connected accounts.
Clicking on a grey marketplace icon will take you to the setup walkthrough for that marketplace. For a written guide on connecting any marketplace, click on its name here: Amazon, Back Market, eBay, Etsy, Newegg, Shopify, Walmart US, or Walmart Canada.
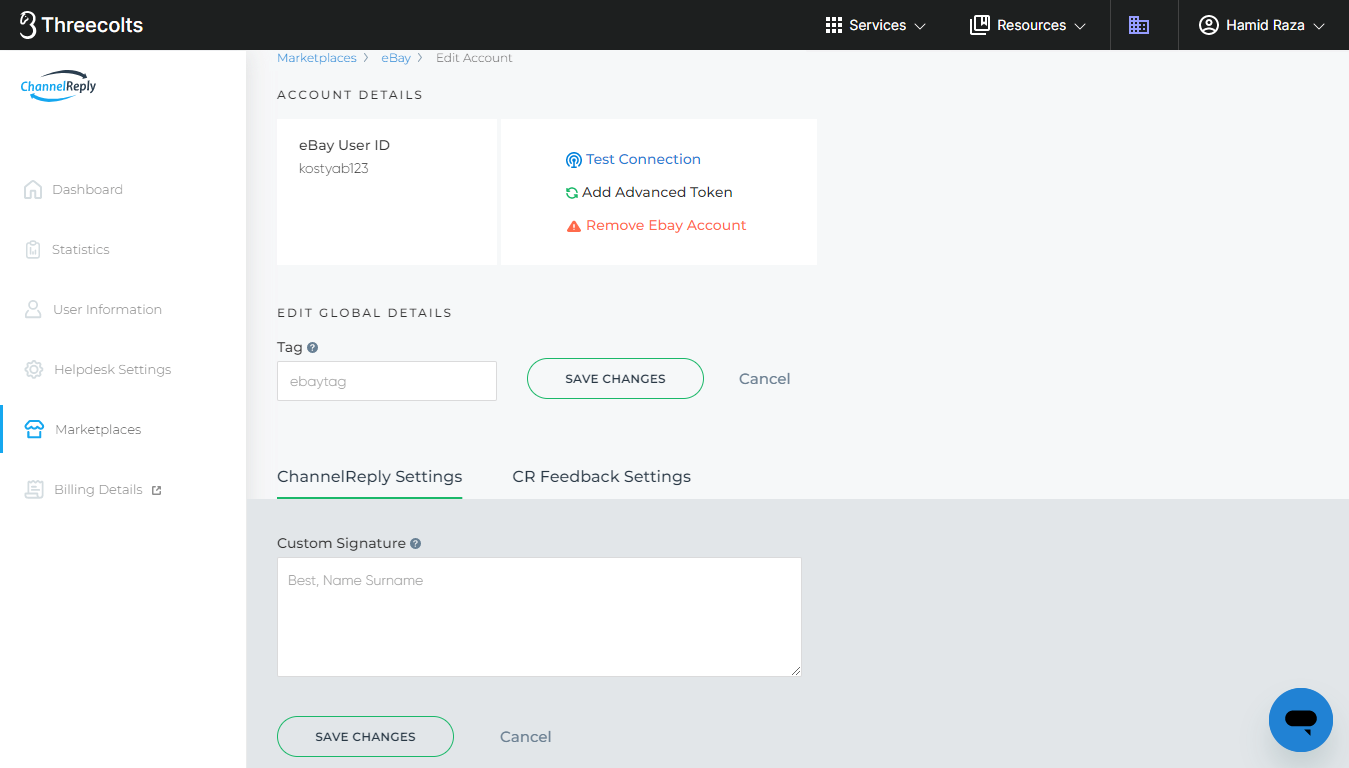
Clicking on a colored icon will take you to your connected accounts page, where you can review and edit existing accounts or connect a new account.
Editing an existing account will allow you to access a wide variety of options you didn’t see during setup. For example, you can create and edit tags and toggle options like eBay Resolution Center Support.
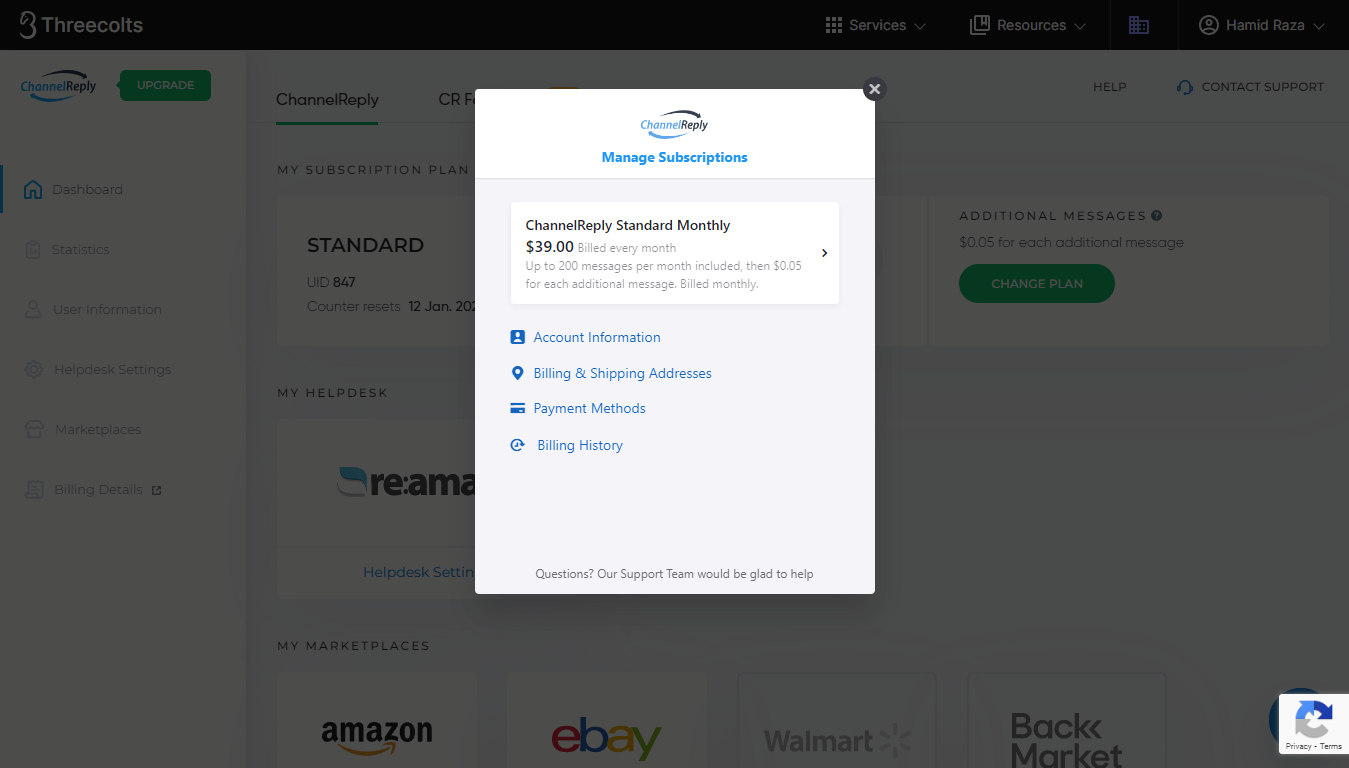
Billing Details
You can find Billing Details in the left-hand menu of your account.
Clicking on it will open a popover where you can manage all your billing information.
You can:
- Change plans or cancel your subscription to ChannelReply or CR Feedback. Simply click on the name of the plan you would like to change or cancel, then hit "Edit Subscription" or "Cancel Subscription." Finally, follow the prompts that appear to confirm your changes.
- Update your accounting contact name, email, and locale/language under "Account Information."
- Update your billing name, email, address, and company under "Billing & Shipping Addresses."
- Review any payment method you have added, or add a new method, under Payment Methods. Detailed instructions on using this section are available in “How to Manage Your Payment Info in ChannelReply.”
- Review and download your invoices under Billing History.
My Account Has Been Cancelled and Most Options Are Grey. What Do I Do Now?
If your account has been cancelled, you can reactivate it in no time. Just follow the instructions in “How to Reactivate ChannelReply.” As soon as reactivation is complete, you’ll be able to use all features of ChannelReply again.
Congratulations on setting up your ChannelReply account! If you ever get stuck, please don’t hesitate to contact us.